
Adding a mailbox registered with Google (Gmail), AOL or Yahoo to an “apple” gadget is a simple matter. However, when it becomes necessary to add a Russian-language mail service account - for example, Rambler– user mobile device you have to break your head. The difficulty lies in the fact that when setting up mail on an iPhone, it is not enough to enter a username and password - the application " Mail» requires you to provide information that is usually not known to the average user. Where to get such information and how to set up mail successfully, you will learn from this article.
If you are the owner of the now popular " googlemail”, you can consider that you are lucky - in iPhone, the settings of this mail client are “driven in” by default, so you can do without “dancing with a tambourine”.
Adding a box from Google goes like this:
Step 1. Enter the program Mail» on the gadget.
Step 2. From the options select " Google».

Step 3. Fill in the fields " Name», « Email», « Password". In field " Description» the note « gmail". You can change the text in this field yourself.

Step 4. After entering all the data, click " Further” - this is how you start the information verification procedure.
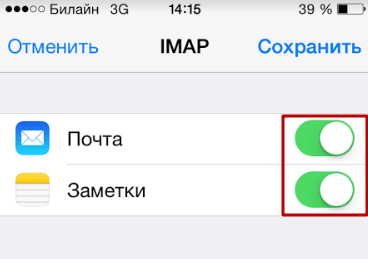
Step 5. At the next stage, the system will offer to synchronize contacts, calendars and notes between the mobile device and the mail client. Move all the sliders to the active position and click " Save».

After that, the Google mailbox on the iPhone will be added. Application " Mail" will immediately notify you of an incoming letter, which indicates that you have entered Google mail from an iOS device.

How to set up Yandex.Mail or another Russian-language mail service?
Adding Yandex.Mail is easier than other Russian-language services. The setting is made as follows:
Step 1. Go to " Mail” and click on the option “ Other».

Step 2. Proceed to the section " New account».

Step 3. Fill in the same fields as during installation gmail.

Step 4. Set up synchronization of mail and notes - activate two toggle switches. Then click " Save».
You do not need to specify anything else - the Yandex mailbox will be added.
With clients Rambler and Mail.ru everything is more complicated: after filling in the required fields, the application " Mail» asks for the details of the mail servers.

Where can you get such information?
How to find out mail settings through the Apple website?
Get server data to clients Mail.ru You can through the service on the official website of Apple. The service is called Finding Mail Settings” and is located at the link https://www.apple.com/ru/support/mail-settings-lookup/ .
All that is required from the user is to “drive in” the address Email in the field (the only one) and press the blue arrow button.

Pay attention to the note printed in small print at the bottom. According to this note, Apple may use the information you provide to Apple to improve your experience. In fact, this means that the email address you enter will be stored in the company's database.
After a second wait, the service will return all the data about the client.

Which of the data is really useful?
- In the block " Incoming mail server" in field " Node name» you need to transfer the server hostname ( imap.mail.ru). In field " Username» Please enter your email address again. The password must be re-registered - this is an important point.
- In the block " Outgoing mail server» you can fill in only one field - « Node name". Copy the hostname of the server here ( smtp.mail.ru). The rest of the fields do not need to be filled in.
Once you've entered your server settings, click " Further". At the final stage, you need to switch the toggle switches for synchronizing notes and mail and click on " Save».

The described method will give a result if the Mail.ru mailbox is configured - but with Rambler it is more difficult. Service " Finding Mail Settings"on the Apple website will not show information about the Rambler-mail servers.

When setting up mail Rambler you need to act like this:
- In the block " Incoming mail server" in field " Node name» should be entered pop.rambler.ru, into the fields " Username" and " Password"- respectively the email address and password from it.
- In the block " Outgoing mail server" in field " Node name» must be written smtp.rambler.ru. Other fields in this block can be left blank.
How to adjust email on iPhone?
"Apple" device leaves the possibility to customize e-mail to the needs of the user. What options are available to the iPhone owner, it is easy to find out by following the path " Settings» — « Mail, addresses, calendars» and clicking on the name mailbox.

At the very bottom of the section Account» there will be a subsection « Additionally"- you need to follow it there.

In the subsection " Additionally» has the following mail settings blocks:
Box behavior. Through the block Box behavior»A correspondence is configured between mailboxes on the iPhone and on the server. For example, with such a configuration, which is shown in the figure below, letters sent to " shopping cart” from iPhone will be saved in the folder “ outgoing" on server.
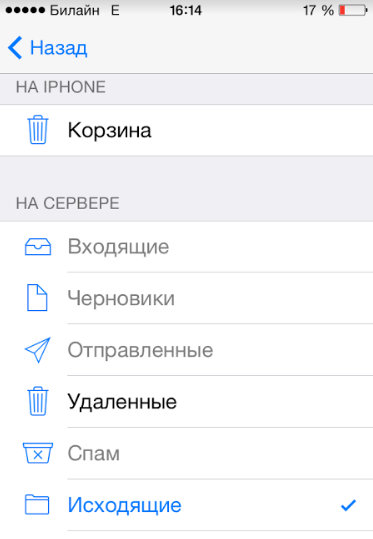
Place to move unwanted messages. If you put in this block " Archival box", but not " Remote”, letters erased via iPhone will be transferred to the archive on the server - just in case.
Deleted messages. In this block, you can set the period of time after which messages will be deleted from the mailbox irrevocably. There is an option " Never» is for the most cautious users.

Inbox setup. This block contains several options:

- Use SSL. If the slider is activated, letters are sent via a secure channel - as a result, there is no need to worry about confidentiality.
- Authentication. You can set up the iPhone so that the user is authorized in the mail not by entering a username and password, but in other ways - say, through MD5 Challenge-response. It’s better not to go into the authentication settings: entering a password is the easiest way to access your mail.
- s/mime. Option S/Mime allows you to send encrypted messages. We note right away that in order to use S/Mime, you need to have a digital certificate.
In the fields "IMAP path prefix" and "Server port" do not change anything. The first field does not need to be filled in at all, in the second field the value is entered automatically when the user adds a mailbox.
How to log out of mail on iPhone?
You need to delete an account from an iPhone as follows:
Step 1. Go to " Settings" and find the section " Mail, addresses, calendars».

Step 2. In the block " Accounts»Find the box you want to delete and click on it.

Step 3. On the next screen, click the " Delete your account».

Step 4. Confirm your intention to delete your account - click on " Delete from iPhone».

When you delete an account from a mobile device, all information that was synchronized with the account will also be lost. Therefore, before deleting your account, take care to transfer valuable information to a reliable medium.
Conclusion
Application " Mail» on iPhone allows add existing mailbox - and here register a new using the built-in program will not work. However, this does not mean that creating an account on an Apple mobile device is unrealistic. Any of the popular email clients has its own application in the AppStore. By downloading and installing a third-party program, you can manage your email accounts without any hassle and create new accounts right on your iPhone. Problems arise, as usual, only with Rambler / Mail: the application of this client makes high demands on the "OS" of the mobile device - the iPhone must have iOS version 9.0 or higher.
Setting up email on iPhone and iPad is not difficult if your mailbox is registered with iCloud, Google (Gmail), Yahoo!, AOL, or Outlook.com. It all comes down to entering user data in just 4 fields, the mail client will do the rest. But if you need to set up a mailbox in Mail.ru, Yandex, Rambler or Meta.ua, the situation changes somewhat.
Today we will tell you how to set up a standard mail client (Mail) on iPhone for mail services preinstalled in iOS (iCloud, Gmail, Yahoo!) and non-standard ones like Yandex or Mail.ru.
In order to set up a mailbox in iOS, you need to connect your iPhone to the Internet (3G connection is enough, but it is better to use high-speed wireless Wi-Fi access). True, this is not necessary, mail can be configured in offline mode, an account will be created, but the username and password will be verified after the device is connected to the Internet.
How to set up Gmail on iPhone
Setting up mail on iPhone for email service providers (hereinafter referred to as the "mailer") Gmail, Yahoo!, Outlook, AOL, Exchange does not cause any problems, the Mail mail client will automatically determine the settings of the incoming and outgoing mail servers, it is enough to fill in just 4 text fields:
- Name- when sending messages, the value of this field will be displayed in the "From" field. Enter your full name so recipients can easily identify you.
- Email- E-mail address.
- Password- password for the mailbox.
- Description- a label that will be displayed in the "Mail, Addresses, Calendars" menu. If you have multiple mailboxes, use an email address as the description so it's easier to identify the correct entry.

Setting up Yandex mail on iPhone
There are no problems with those “mailers” (e-mail service providers) for which the standard mail client Mail.app can automatically receive settings, but if it comes to Yandex, Mail.ru or Rambler, you will need to dig deeper.

You can find them using Yandex search, Google or any other search engine, or you can use a special search form on the Apple website.
Search for Yandex Mail settings for iPhone and iPad


After the server settings are found, they must be entered in the appropriate fields:
- Incoming mail server
- Account type- select the IMAP protocol (what is the difference between IMAP and POP according to Google)
The values of the fields "Name", "E-mail" and "Description" are substituted automatically from those that you entered earlier - Node name- server hostname
- Username- email address (same as in the E-mail field)
- Password- mailbox password
- Account type- select the IMAP protocol (what is the difference between IMAP and POP according to Google)
- Outgoing mail server
- Node name- server hostname
- Username and passwordь in the settings of the outgoing mail server, it is not necessary to enter
After you correctly filled in all the required fields, tap " Further". After checking the data, in the window " IMAP» tap on « Save". The Yandex-mail account will be saved and will become available in "Mail, addresses, calendars".
Additional email settings in iOS

You can set up an email account on an iPhone or iPad more flexibly. On the page " Mail, addresses, calendars -> Account name -> Advanced» can be configured:

As we have already noted, searching for Apple's Mail settings does not give positive results for some mail services, namely: Rambler, Meta.ua, Ukr.net. For your convenience, we will provide the necessary settings.
| Account type: | IMAP |
| Incoming mail server: | |
| Node name: | imap.mail.ru |
| Username: | |
| Password: | email password |
| Outgoing mail server: | |
| Node name: | smtp.mail.ru |
| Username: | email address (full) |
| Password: | email password |
| Account settings ("Mail, addresses, calendars - Account in Mail.ru -> Advanced"): | |
| Use SSL: | included |
| Server port: | 993 |
| Outgoing mail server ("Mail, addresses, calendars -> Mail.ru account -> Outgoing mail server (SMTP) -> Primary server (smtp.mail.ru)") | |
| Use SSL: | included |
| Server port: | 465 |
| Account type: | POP |
| Incoming mail server: | |
| Node name: | pop3.ukr.net |
| Username: | email address (full) |
| Password: | email password |
| Outgoing mail server: | |
| Node name: | smtp.ukr.net |
| Username: | email address (full) |
| Password: | email password |
| Account settings ("Mail, addresses, calendars - Account in Ukr.net -> Advanced"): | |
| Use SSL: | disabled |
| Server port: | 110 |
| Outgoing mail server ("Mail, addresses, calendars -> Ukr.net account -> Outgoing mail server (SMTP) -> Primary server (smtp.ukr.net)") | |
| Use SSL: | disabled |
| Server port: | 465 |
| Account type: | POP |
| Incoming mail server: | |
| Node name: | pop.meta.ua |
| Username: | email address (full) |
| Password: | email password |
| Outgoing mail server: | |
| Node name: | smtp.meta.ua |
| Username: | email address (full) |
| Password: | email password |
| Account settings ("Mail, addresses, calendars - Account in Meta.ua -> Advanced"): | |
| Use SSL: | disabled |
| Server port: | 110 |
| Outgoing mail server ("Mail, addresses, calendars -> Mail.ru account -> Outgoing mail server (SMTP) -> Primary server (smtp.meta.ua)") | |
| Use SSL: | disabled |
| Server port: | 465 |
Unblocking the POP3 protocol in Meta.ua
- Enter your mailbox in Meta.ua (webmail.meta.ua).
- Click on "Settings" and select "POP3/SMTP Server Settings".
- In order to allow work with mail by mail programs using the POP3 protocol, select the 2nd or 3rd item: "Allow access via the POP3 / SMTP protocol" or "Allow access via the POP3 / SMTP protocol and allow email programs to permanently delete messages from my box."
Once you've set up your email accounts, you can access email directly from your iPhone from anywhere in the world using the standard Mail.app client. All changes will be automatically synchronized with mail servers.
Note: Email accounts are not shared with third-party email clients for iOS (Gmail by Google, MailBox by Dropbox) and you will need to configure mail in these clients separately.
How to Delete an Email Account on iPhone
In order to delete a mail account, a few steps are enough:

As you can see, difficult to setting up email on iPhone or iPad there is nothing, though there are some subtleties for e-mail service providers from the post-Soviet space.
Fortunately, you will only need to set up mail on the iPhone once, then or in, so that after data recovery during a flashing or device, the mail account will be restored.
If you have any difficulties during the setup process, or if you need settings for some specific "mailer", write to us in the comments, we will certainly help you.
E-mail services have firmly entered our lives. And we actively use them on our iPhones or iPads. After all, the ability to check mail anywhere ensures that you do not miss important messages. To read letters more conveniently, you need to properly configure the application.
Setting up email services on iPhone or iPad
Regardless of the email service you use, you can connect it to Apple's official Mail app. This application will allow you to access messages from any of your email services. To configure this program, you can either use the automatic configuration option, or you can configure everything yourself.
Automatic addition of mail services
The Mail app is installed by default on any iOS device. With it, you can automatically add accounts of many popular mail services. For this:
If you need to add more than one email service, you may well complete this setup multiple times.
Optional addition
If the mail service you need is not on the list, do the following:

Other applications for working with mail services
If you use only one mail service, then it will be much more convenient for you to use an application made specifically for it.
Many mail services have their own mail applications. You can usually find them by the name of the mail service. Such, for example, is the Gmail program for the mail service from Goolge or "Mail.ru Mail" from the corresponding postal service.
And there are also alternatives to the official Mail app. For example, a very convenient and easy-to-use option is the myMail program, which you can also download from the AppStore. Setting up this program is no different than setting up the Mail app.
Quick cleaning of incoming mail
For some reason, Apple's official mail app only allows you to mark emails one at a time. Therefore, if you need to delete a lot of emails at once, it can take a long time. Fortunately, there is a simple trick that will allow you to quickly delete all incoming messages at once. We do the following:

How to turn off email on iphone or ipad
In order for mail to stop coming to your device, do the following:

Possible problems
If you are unable to receive or send a message through the mail service, try the following:
- Make sure you have a stable internet connection - the message may not reach due to a poor network connection or a weak wi-fi signal.
- Check your outbox - any messages you try to send will be placed there in case of failure to retry.
- Make sure that you have correctly configured the mail service settings in the account section.
If you are unable to access your email.
- Make sure you enter your email password correctly when logging into it.
- If you need additional confirmation after signing in, it means that two-step verification is enabled on the mail. This means that additional confirmation is required before using mail.
- If you cannot receive the required message for confirmation or experience other difficulties in using the mail service, contact your mail service provider for more information.
You can also delete your account and set it up again. To do this, use the instructions above.
How to Set Up Email Services on iPhone - video
We figured out how to configure the application to work with mail services. Now you can work with mail on your iOS device, wherever you are.
In contact with
There are three mail check modes in the standard mail client Mail: "Sample", "Push" and "Manually".
Sometimes it happens that because of our own inattention, or because of someone's playful hands, and sometimes by ourselves, certain functions stop working for us. If the standard iOS mail client Mail has stopped updating automatically and you do not know what to do, you must perform the following steps:
1 . On your iPhone or iPad, open Settings → Passwords and accounts.
».3 . For the required mailboxes, specify the schedule " Push», « Sample" or " Manually". A description of each mode can be found below.

Push
The "Push" function will allow you to automatically push messages from the mail server to your iPhone or iPad. It is not available for all mail servers (for example, it does not work with Gmail, but it works well with iCloud mail). Let's not forget about the obvious disadvantage of Push - the function consumes a bit more battery. Push is ideal for active users who need to respond to emails quickly.
Sample
By specifying the mode " Sample”, don't forget to choose the appropriate value:
- Automatically: iPhone or iPad will download emails in the background if the device is connected to a charger and Wi-Fi.
- Manually: The data will be downloaded to the device only when the application is launched.
- Hourly, 30 minutes and 15 minutes: The data will be loaded automatically according to the selected check interval.

It is worth considering that the battery will be more economical if you sample less often.
Manually
Checking mail manually will fall entirely on the user. We opened the application, dragged the workspace down and waited for new emails to load. If you rarely receive letters or hardly use mail, then this is your option.
The "Mail" (or "Mail") program is a regular application of the iOS system and does not require additional installation from the App Store. However, to work with the mail client, you must first carry out the “Mail” setup procedure. This article will cover all possible steps for setting up an email client using the native Mail application as an example.
Default Mail setting on iPhone/iPad
To configure the mail client, go to "Settings" -\u003e "Mail, addresses, calendars". Here the user is given a choice of services, such as Google, Yahoo, iCloud, Outlook, and so on. To connect an account for a service that is not included in the general list, you need to tap on the “Other” button, however, in this case, the procedure for connecting an account may differ from the standard one.
Having chosen a service in which you already have an account, you need to tap on its logo, and then specify the main data of your account: name, e-mail, password. After checking the information, if there are no errors, the Mail application will be ready to go. But do not rush to leave the "Mail, Addresses, Calendars" section. Here you can also customize some of the design styles, notifications, signature and other little things.
By the way, if necessary, it is possible to add several accounts of various mail services at once.

Adding an account Tut.by, Rambler, Yandex, etc. to the Mail app on iPhone/iPad
You can add a Tut.by or Rambler account to the regular iOS mail client "Mail" only by linking the server address. To do this, in the service selection window, click the “Other” item. In the menu that appears, enter your name, email and password.
- Mail.ru - pop.mail.ru
- Yandex - pop.yandex.ru
- Rambler - pop.rambler.ru
- Tut.by - pop.gmail.com
- Mail.ru - smtp.mail.ru:25
- Yandex-smtp.yandex.ru
- Rambler - smtp.rambler.ru
- Tut.by - smtp.gmail.com
If you encounter the error "The server rejected the recipient because. it does not allow relaying" or "Relay error" in the mail client, check that the information is filled in correctly.
As a final step, in the last settings menu that appears, specify those sections that we want to synchronize with the mail service (contacts, calendars, etc.), save all the settings made and check the mail. If an error occurs in the operation of the mail service, try to repeat the entire procedure again. Perhaps you just missed something at one of the stages.

Also check that in the settings of your mail account, in the "outgoing mail" section, in the "primary server" item, the use of SSL is activated. If this does not help and mail continues to not work on your iPhone or iPad, then, in the same section, change the numerical value of the server port to 465 or 25.
Google 2-Step Verification: Set up mail on iPhone or iPad
Often, Gmail users turn on the 2-Step Verification feature to increase the security of their Google account. From the moment it is enabled, the active mail account on the iPhone and iPad stops working, giving an error "The username or password you entered is incorrect". In this case, re-entering the password or checking the username (just in case) does not bring any benefit.In this case, you must do the following:
Step 1. We go through the browser to your Google account and go to the section "Security".
Step 2. We are looking for the line "Two-step authentication" and go to "Settings".

Step 3. You will be prompted to enter a password for your Google account, after which you will be taken to the settings for this function. We need the second tab "Application passwords". Click on the "Manage application passwords" button and enter the password again.

Step 4. We open a list of all applications that have access to your Google account and mail, including. Here you can give access to the Mail application on your iPhone and iPad. To do this, by clicking on the "Applications" menu, select "Mail", and on the right, by clicking on the "Device" menu, select the iPhone or iPad and click the "Create" button.

Step 5. After all the manipulations, an instruction containing a new password for setting up an account on your device will immediately open.

Follow the instructions to go to "Settings" -> "Mail, Addresses, Calendars", select your Gmail account from the list, and change the password to the one specified in the instructions. Ready!
Email clients from the App Store
Despite the presence of quite high-quality regular on iOS, good alternatives can become: Mailbox, myMail, Boxer (lite version available) and standard clients from Google, Yandex, Yahoo and so on. Each of the applications has a unique design and boasts interesting features that make working with emails much easier and more convenient. The choice is yours.If you did not find an answer to your question or something did not work out for you, and there is no suitable solution in the comment below, ask a question through our . It's fast, simple, convenient and doesn't require registration. You will find answers to your and other questions in the section.
Join us on