
No matter how fast the modern mobile Internet is, Wi-Fi connection still remains a priority for most users. However, it is not more pleasant to encounter problems with this very connection, when the device either does not connect to Wi-Fi at all, or connects, but there is no Internet. In such situations, you should check the following basic points and settings.
1) On your Android device, go to Settings > Wi-Fi, select the network you are trying to connect to and click Forget or Delete. This is necessary if the network you are trying to connect to has a common or universal SSID. For example, some popular coffee shop chain may have the same chain name for different locations, but have a different password for connecting. In this case, the Android device tries to use the password that was suitable earlier.
2) When trying to connect to your home router, the first step in troubleshooting any problems is to reboot it. If none of the connected devices can access the Internet, contact your ISP.
3) If you are convinced that the Internet is functioning normally, but only your Android device cannot connect, then check the security settings used by your router. First try disabling them completely, if this fixes the situation, then try different security protocols (WEP, WPA-PSK, WPA2-PSK, TKIP, AES)
4) Turn off the QoS function in the router settings. It is responsible for the intelligent distribution of bandwidth between devices. For example, if you have a gaming console or TV with streaming services installed at home, the router will give priority to connecting to them, cutting off the speed of other connections.
5) Disconnect USB peripherals from the router. If you connected to your router HDD or any other USB device, and the port is not shielded, this may result in signal reception in the 2.4 GHz range.
6) Speaking about the signal range, if you have a dual-band router operating at 2.4 GHz and 5 GHz, set the settings to force the use of one of the bands. If you have a relatively old device, then it may simply not support operation at 5 GHz.7) When connecting to public networks, remember that they all require prior authorization before providing Internet access. Having connected to such a network, try to open any tab in your browser, the system should automatically redirect you to the authorization page. Make sure that you have not disabled the CaptivePortalLogin system process, which is responsible for the appearance of the authorization window. You can do this in Settings > Applications.
8) Make sure the date and time on your device are set correctly.
9) Check the "Wi-Fi" setting in sleep mode. Settings > Wi-Fi > Advanced Features. As the name suggests, this feature automatically turns off Wi-Fi to save battery power. Its incorrect operation may result in the device not connecting to Wi-Fi.
10) Turn off the Wi-Fi tethering function.
Despite a number of advantages, the improved version network protocol IPv6 was not able to become widespread in a short time, but leading software companies are still paying more and more attention to it. Microsoft is no exception, whose main software product Windows 10, starting with build 1809, will require the mandatory inclusion of IPv6.
Windows 10 1809 Store and Edge browser cannot connect to the internet, check the status of the IPv6 protocol
If, after updating to the October build and launching the Edge browser or Windows Store, you will see a message "You are not connected" or "Check your connection"
Moreover, third-party browsers open pages without problems, first of all, check whether the IPv6 protocol is enabled in your network adapter settings. This is a mandatory condition; without it, neither the Store nor Microsoft Edge, and possibly other standard Windows 10 applications, will not be able to connect to the Internet.
Use the command control.exe /name Microsoft.NetworkandSharingCenter in the “Run” window to open the Network and Sharing Center, on the right, click “Change adapter settings”,

open the properties of your connection (Ethernet or Wi-Fi) in a new window,

Find the IP version (IPv6) in the list and make sure the component is checked. If not, check the box next to it, save the settings and reboot. Now Windows Store and Edge will be able to connect to the Internet.
On modern phones the ability to call mobile communications, this is just one of the functions. And for many this function is not the most popular. What do we mostly do on a smartphone? We watch the video, sit in in social networks, communicate in instant messengers, browse websites, play, etc., and for this we need an Internet connection. And when the phone does not connect to Wi-Fi, and the mobile Internet is very slow, expensive, or not available at all, then this is a tragedy. A phone without the Internet, like a computer, is not clear why you need it :)
Maybe I'm exaggerating a little, but that's basically true. All phones that run on Android (Samsung, Lenovo, Huawei, Xiaomi, Sony, Asus, Meizu and others) and iOS ( Apple iPhone) require an Internet connection. At least for setup, updating programs and systems, synchronization, etc. Now there are no problems with this. Almost every home has a Wi-Fi router that distributes a wireless network. There are open Wi-Fi networks neighbors, and full of open networks from shopping centers, cafes, shops and other establishments. Even subways, trains, buses and planes have Wi-Fi. You can always stay online even without mobile Internet.
But very often the phone simply does not want to connect to Wi-Fi. Such problems happen not only with open, public networks. (where, as a rule, the problem is on the side of the network itself), but also with home Wi-Fi. I usually have problems connecting to one specific network. And sometimes the smartphone simply works with the router, then disconnects from it and does not connect again. Or it refuses to connect after replacing the router, some settings, installing programs, etc.
We will look at solutions for Android phones. If you have an iPhone, then see the article and.
Why is there no Wi-Fi connection on my phone and what should I do first?
First of all, it is very important to determine what specific problem is in your case:
- The phone does not connect to the Wi-Fi network at all. It says “Saved”, constantly obtaining an IP address, authentication error, authentication error, incorrect password, error connecting to the Wi-Fi network, etc.
- The phone is connected to the Wi-Fi router, but the Internet does not work. Near the network itself there may be a message “The Internet may not be available,” an exclamation mark, or there may simply be no access to the Internet through the smartphone’s browser, or in programs. Error: "There is no Internet connection" or "Check your network connection." At the same time, the phone is connected to Wi-Fi.
- There is another option when The phone does not see the required Wi-Fi network. I talked about the solution to this problem in the article. We will not consider it today.
No matter what problem you have. Whether you are connecting to your home network or a public one, try these steps:
- Disable and re-enable Wi-Fi on your smartphone. Better yet, reboot it.
- Reboot your router if you have access to it. Just turn off the power for a few minutes and turn on again.
- Check if other devices are connected and the Internet is working on them. This is especially true when a problem has arisen with connecting to your home Wi-Fi router.
- If you cannot connect your phone to a public Wi-Fi network in the metro, cafe, or store, then most likely the reason is in the access point itself. Perhaps it is simply glitched, temporarily not working, or cannot handle a huge number of clients. Just connect to a different network, or try connecting later.
- Remember when the connection problems started. Perhaps you changed some settings on your router or phone, connected new devices, installed some programs, or something like that. This will help you find the cause and fix it quickly.
To make it easier for you to find and apply a solution, I will further divide the article into two parts: in the first part I will tell you what to do if your smartphone does not connect to Wi-Fi (various errors appear, it says saved, etc.), and in the second part - how to solve the problem when mobile device connected to a wireless network, but the Internet does not work.
The smartphone does not connect to home/public Wi-Fi (an error appears)
Let me clarify: in this section we will consider cases when, when trying to connect to some wireless network, our Android device does not connect at all (it happens that there is a connection but the Internet does not work, read about this in the second section of this article).
Main mistakes:
- Error "Saved" (WPA2 or WPA).
- It says "An authentication error occurred" or "Authentication failed".
- It takes a long time to connect, or it constantly says “obtaining an IP address.”
Basic solutions on the phone
These solutions often help when a device was previously connected to that wireless network, but suddenly stopped connecting.
Don't forget to restart your mobile device and router first!
1 Remove the Wi-Fi network on your phone. Just go to Wi-Fi settings, select the network you want, click on it and hold (or just click) and select "Delete network" or "Forget network".
Then select the network from the list again, enter the password and try to connect.
2 I recommend doing full reset network settings. On Android, this can be done in the "Reset" section. Item "Reset network settings". Depending on your phone manufacturer and Android version, these settings may vary slightly.

After which you will need to reconnect to the wireless network. Perhaps everything will connect and start working.
Error "Saved", "Authentication", "Authentication Error"
Such messages appear very often because we We enter the Wi-Fi password incorrectly.

Remove the network, or reset the network (I wrote about this above).
According to my observations, when connecting the phone it says saved or authentication error due to the fact that the phone “does not like” some of the Wi-Fi network parameters that are set on the router. I will enter the network operating mode (b/g/n/ac), security type, channel and channel width, region, etc. There was even a case when the smartphone did not connect until the Wi-Fi network name (SSID) was changed .
In this case, you can try changing some settings on your router. Of course, only if there are problems with your home network. We cannot change network settings in the same metro.
I also wrote about this problem in the article:.
I will write about solutions that can be applied on the router below in the article.
Obtaining an IP address... and the phone does not connect to Wi-Fi
We enter the password on the phone and the Wi-Fi connection freezes with the status “Obtaining an IP address...”. Common situation? Most often this happens for three reasons:
- Automatic IP settings are disabled on the phone (possibly static addresses are set).
- The DHCP server is disabled or disabled on the router. But by default the DHCP server is always enabled and is very rarely disabled.
- Other restrictions from the access point. For example, your device is blocked in the router settings. Perhaps one of your relatives did this. Or the owner of the network to which you connected your phone.
Solutions:
On your smartphone, open the properties of a specific wireless network and make sure that “DHCP” is set in the “IP Settings” settings. If it's "Static", then change it to "DHCP".

Check if the DHCP server is running on the router. But most likely it works, this is unlikely to be the reason. Moreover, if other devices are connected without entering static IP addresses.
Well, don’t forget that you (your device) You could simply disable (block) in the settings of the router that broadcasts a wireless network to which you cannot connect your phone.
Setting up a router to solve a problem connecting an Android smartphone?
There, find the section with Wi-Fi network settings (Wireless) and try changing the following parameters:

Don't forget to save your settings and reboot your router every time! Remember which parameters you change and where.
The phone is connected to Wi-Fi but the Internet does not work
It seems to me that the problem with the lack of Internet connection while actively connected to Wi-Fi is much more common than the connection errors that I wrote about above.

From my experience I can say that this very often happens due to Android settings (time and date, for example), problems with DNS addresses and due to some programs (For example, Freedom app) . Sometimes (app store). It says there is no internet connection. But Wi-Fi is connected.
I don’t know how it is on other Android devices, but on Samsung phones.
What you need to find out:
- Does the Internet work on other devices when connected to this “problematic” network. If it works, then we are looking for the reason in the phone. If it doesn’t work, then the problem is on the side of the router (or provider) and needs to be solved. This is where my article may be useful to you.
- You can also try connecting your phone, which connects to Wi-Fi but on which the Internet does not work, to other networks. This way we can also understand on whose side the problem is.
Looks like we found out. If the router is at fault, then we look for and solve the problem on its side. If this is not a Wi-Fi network in the metro, or in another transport/institution (to the settings of which we do not have access). If the reason is our smartphone, then look at the solutions and links to other articles that I will provide below.
Time and date
Who would have thought that the phone might not connect to Wi-Fi due to incorrect date and time settings. But this happens!
Go to Android settings and check if the time and date are set correctly.

You can try disabling automatic settings and setting everything manually.
DNS problem
I can’t say exactly why this happens, but sometimes the Internet on the phone starts working only after .
To do this, you need to open the properties of the Wi-Fi network to which the smartphone is connected. (but no internet access) and specify DNS in additional parameters:
This is what it looks like on a Samsung phone:

After this, the Internet should work. You can disable/enable Wi-Fi, or restart the phone.
Proxy server on Android
There are proxy server settings in the wireless network settings on your phone. So, if the proxy server is enabled, then the Internet connection most likely will not work. You need to open the properties of a specific Wi-Fi network and check/disable the proxy server.

Check that the settings are set to “Proxy” – “No” (or disabled).
Wi-Fi does not work due to programs
I have heard more than once about the Freedom program, which somehow disables access to the Internet via Wi-Fi networks. On purpose or by accident - it’s not clear. But then the phone is connected to the home Wi-Fi network, or somewhere in the subway, but it doesn’t load anything. I am sure that there are many such programs.
If you encounter Freedom, then you need to go to the settings of this program, click on “Stop” there and only then delete the application. You can also install Dr.Web anti-virus on your phone and run a system scan.
Or perhaps you experienced these problems with the Internet immediately after installing some other application. Try to remember what you installed recently.
Reset the network, or completely reset the phone (Android)
If all else fails, then resetting the network parameters must be done in any case. I wrote above in this article how to do it. Clearing network settings will not affect your settings, programs, or personal data in any way. You just have to re-enter passwords for all wireless networks to which you have previously connected.
Well, if nothing helps at all, including resetting the network, then most likely you will have to do a complete reset of the phone.

Only if you are already convinced that the reason for the lack of Internet connection is your smartphone and no solutions have brought positive results.
If anything, I'm in touch in the comments. You can ask a question there, tell us about your problem, or add useful information to the article.
This article will talk about what to do if Window 7 does not connect to the WiFi network. The fact is that although this operating system is more stable than its predecessors, various errors may still occur that must be corrected manually.
Before moving on to connection problems and their solutions, you need to understand what WiFi is and how the technology works. This will allow you to fix some problems faster.
The fact is that to connect to such a network you need an access point. Its functions are usually performed by a wireless router. And therefore, first of all, if there are no available connections to the WiFi network in Windows 7, you should pay attention to the router.
As a rule, this is the reason. But of course, there are other problems. So, let's take it in order.
Checking the router
Everything is very simple here. If the laptop does not see available connections, then you should go to the router’s WiFi settings menu and check whether the wireless network is turned on. To do this, you need to connect to the router using a regular Internet cable. After that, open a browser (any) and enter 192.168.0.1 in the address bar. Press "Enter". Next, a window will appear asking you to enter your password and login. As a rule, the default key and login are admin, admin, respectively.
How to easily find out the IP address of a WiFi router: Video
If you changed this data, then enter your values. Next we get to the settings menu. We are interested in NetworkWireless settings. In the wireless network settings, you need to check the box next to “Enable Wireless Router Radio”. That's it, setting up the router is complete. And if your laptop with Windows 7 still has problems with WiFi, then you should proceed to setup operating system.
Why doesn't my computer see available wireless networks?
There can be many reasons for this, as well as solutions. Fortunately, Windows 7 is user-friendly and has many options for diagnosing and fixing problems. But we will consider only the most common ones.
The first thing you should check is the status of your WiFi wireless connection. To do this, you need to open the Network Control Center. To do this, click on the network icon in the tray and select “Network and Sharing Center” in the window that appears.
A menu will open in which all network-related settings are made. Here we are interested in the “Change adapter settings” item. In the window that opens, you need to find a shortcut called “Wireless network connection" If this connection is gray, it means it is disabled. To enable it, you need to right-click on it and select “Enable”.
Windows 7 won't connect to Wi-Fi: Video
The wireless network icon does not appear in the tray
Users often ask the question, what to do if the WiFi icon does not appear in the tray in Windows 7? This can only mean one thing - the module wireless communication turned off or not working. occurs, as a rule, using the key combination Fn + adapter power button. On different laptops, this button may be located in different places.
For example, on Asus laptops it is the combination Fn+F2, on Lenovo it is Fn+F5. The WiFi power key itself is indicated by a corresponding image. In addition, on some models there is a separate button to activate the wireless connection module. In this case, just press it.
So, after turning on the wireless adapter, Windows 7 should automatically start searching for available networks. If this does not happen and the tray icon does not appear, then you should check that the drivers are working correctly.
What to do if a laptop with Windows 7 does not see Wi-Fi: Video
Checking drivers
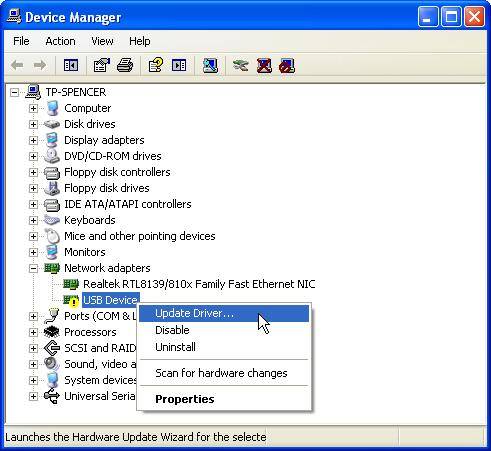
You can check the software in Windows 7 in the task manager.
You can launch it by clicking on the “My Computer” shortcut, which can be found on the desktop, in the start menu or in Windows Explorer, right mouse button. In the window that appears, click “Properties”. Next, a menu will open in which you need to open “Device Manager”.
In the window that appears, we are interested in network adapters. If you do not find this, then there are no drivers for the device and you need to install the driver for this module. If there is such an item, then open it. Typically, the wireless adapter is called Wireless Network Adapter. The device may also be indicated by an exclamation mark. This indicates that the driver is not working properly and needs to be updated or reinstalled.
It's very easy to do. As a rule, the laptop comes with a special disk that contains all the necessary programs and drivers. If there is no such disk, do not rush to get upset. The necessary software can always be downloaded from the Internet, since manufacturers have taken care of supporting their customers.
To do this, find the official website of your laptop manufacturer and write the exact name of the laptop (exact model) in the search. Next, download the necessary drivers and install them. It is worth noting that it is not recommended to install software downloaded from third-party sources, as such drivers can be unstable and sometimes even pose a threat to the integrity of the system.
How to reinstall the WiFi driver: Video
It is also important to know that sometimes, even with the driver installed, the adapter cannot be turned on, since additional keyboard functions are used for this. This means that together with software For the network adapter, you should download the driver for the keyboard, as well as the recommended utility for managing the wireless module.
If your laptop does not connect to Wifi, says limited access or no Internet access, you should look into this problem in more detail.
There are several reasons for the problem:
- outdated or completely missing drivers on the laptop;
- failure of the Wifi card itself;
- incorrect router settings, etc.
We are looking for the culprit - a laptop or router
To understand why the laptop does not connect to the Internet via Wifi, let's look at all aspects of this issue.
The first step towards solving a problem is identifying the culprit. Problems with Wifi can be in the laptop itself, or maybe in the router. Finding the cause is important so as not to make things worse by changing all the settings.
First, try connecting another device via Wifi - phone, tablet, laptop. The Wifi button on the router should glow green. If the connection is normal on other devices, then the problem is with your laptop. And if the selected network does not work everywhere, then the cause of the problem is in the router and its settings.
If the reason is in the router, then you still need to check whether there is internet at all. Connect the cable directly to your laptop or computer. If everything works, then the problem is definitely in the router settings, and if not, contact your Internet provider to troubleshoot the problem.
Checking the network driver version
A common reason for the lack of Wifi on a laptop is an incorrectly installed or outdated network driver. This is indicated by this icon at the bottom right of the notification panel.

It shows that there are no connections available (even though there actually are). This often happens when reinstalling the system. Drivers that worked on Windows XP may not work on Windows 7, and drivers that worked on Windows 7 may not work on Windows 8.
You need to check whether the drivers are installed and, if so, their version, as follows:

- here look for the “Network adapters/boards” tab and your network adapter in it. It can be called differently, it all depends on your laptop;
If the device is there and there are no exclamation marks near it, then everything is fine with the driver.
To find out its version, you need to right-click on the driver and select “Properties”.

In the window that opens, select “Driver” and look at its development date.
Hardware enable adapter
The network device driver is working properly, but there is still no network? Or did the Internet work before, but now there are no available connections? This indicates that the network adapter on the laptop is turned off.
This is done differently on different models, but often this requires pressing the FN + F2 key combination at the same time or FN + another key with a Wifi icon drawn.
Some models have a special button on the body.
Video: How to distribute wi-fi from a laptop
You can also enable wireless networking on the system itself.
If you have Windows 7, then follow these steps:
- open “Start”;
- select "Control Panel";
- "Network and Internet";
- "Network and Sharing Center";
- "Change adapter settings".

If the wireless network icon in the window that appears is colorless, this means that the network is inactive and needs to be turned on by right-clicking
To do this on Windows 8 then:
- click the “Options” button on the right panel;
- further – “Changing computer settings”;
- select "Wireless Network". It must be turned on.

You can perform the same operation as for the 7th operating system to make sure that the network is turned on.
In Windows XP it's even easier:
- "Start";
- "Control Panel";
- "Network connections";
- turn on the wireless network by clicking the right mouse button.
The activation of the adapter will be indicated by this icon on the notification panel.
Laptop stopped connecting to WiFi
If previously the laptop was connected to this Wifi networks, and then suddenly stopped (the settings were not changed), the cause of the problem may be a virus. It may corrupt the file or change settings. Even if the antivirus scan showed nothing, installing some program on the laptop could have messed up the settings.
Simply removing this program will not restore the network. Alternatively, you can delete the network connection and create it again, you can reset the router settings and connect it from scratch, you can search for a long time for the broken parameter on the laptop, but the easiest way is to restore the system to the level at which the program got into it.
Restoring the system
Starting this process:
- "Start";
- "All programs";
- "Standard";
- "Service";
- "System Restore" ;
- “Start System Restore”;

- "Further";
- select a recovery point (updating and installing programs is recorded in the registry, so in the window that opens, select the desired recovery time);
- "Further".

The recovery process will begin and upon completion the laptop will reboot. If the problem is a malware, then Wifi will work.
Updating hardware drivers
If, when checking the network adapter, there is an exclamation mark next to the driver icon in Device Manager, right-click on it and select “Enable”.
The absence of a driver entry means that it needs to be installed. Then you need to download it from the manufacturer’s official website. Or use the driver disk that comes with your laptop.
You can find out the name of the driver from the information in the device manager, in the description of the laptop, or using a special program.
You can update the driver by right-clicking on it and selecting “Update”. Or go to its properties and select this item there. Even if everything is fine with the driver, it is recommended to download and install it again.
Checking connection settings
To check connection settings:

When you try to connect to the selected Wifi network for the first time, a password prompt appears. Next, there should be an automatic connection to the network when you turn on the laptop. But if the laptop does not want to connect automatically and asks for a password every time, check whether the “Connect automatically” checkbox under the network name is checked.
Internet no access or limited in Windows
It happens that after connecting, identification occurs without access to the Internet via Wifi and a yellow triangle appears near the network icon on the panel:

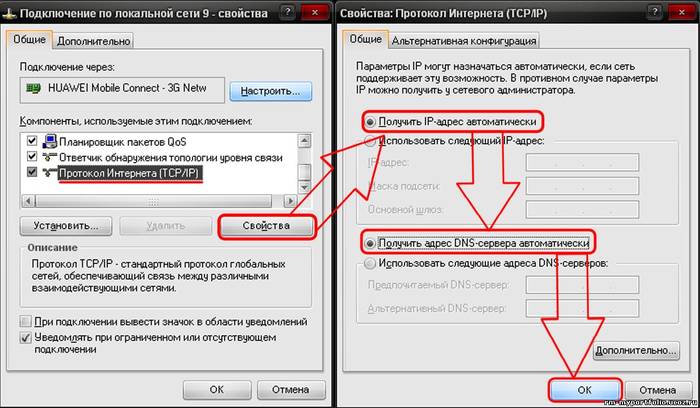
Also, if you go to the “Network and Sharing Center”.
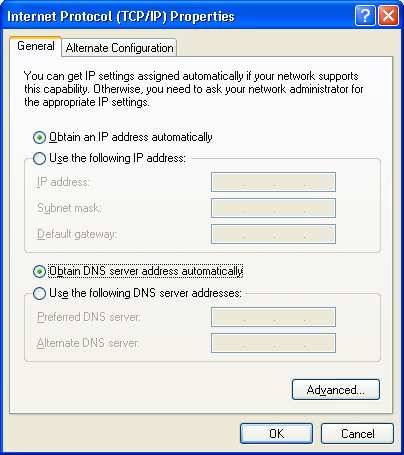
Enter the connection properties. If everything in the window looks like this and the IPv4 connection says “No network access,” the problem is incorrectly entered IP addresses or a disabled DHCP server on the router.

Check that you did not forget to check the box to receive addresses automatically. But if they are already there, then try to do the opposite - register everything manually. You can get the network address in the router settings. But basically the IP address is standard 192.168.1.X, and the DNS is 192.168.1.1.
If the connection properties show an IPv4 connection “Without Internet access,” then the DNS server addresses or router settings were entered incorrectly.
In this case, we manually change only the DNS settings, leaving the IP address automatic.
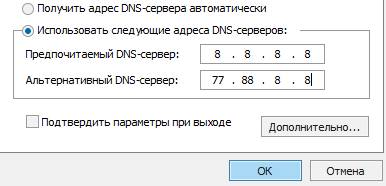
- 8.8.8.8 is Google's public DNS server;
- 77.88.8.8 – Yandex.
Some connection errors
If your laptop connects to the Internet, but sites load slowly, you might have gone too far from the router’s coverage area. And if the problem does not go away with a high Wifi signal, most likely, you are receiving many other networks and the Wifi channel is busy.
This can be changed in the router settings. The default value is 6. You can try changing it from 1 to 13 and watch the speed change. You can also try the "Auto" option.
If the laptop connects to Wifi, but does not access the Internet, and programs such as Skype and ICQ are working, check the DNS addresses. They must be automatic or registered, as in the paragraph above.
If the laptop does not immediately connect to the Internet:
- open the Start menu;
- "Control Panel";
- "System and safety";
- "Power supply";
- “Power button actions”;
- In the Shutdown Options section, uncheck "Enable Fast Startup (Recommended)";
- "Save".
Windows was unable to connect to...
Having selected the desired network and entered the security password for it, I suddenly got the error “Windows could not connect to...”:

You can try clicking “Troubleshooting” and look at the written reason. Network devices and settings will be checked.
This message also appears due to a router error. Try rebooting both it and the laptop.
In Device Manager, in the properties of the network adapter, disable "Allow the computer to turn off this device to save power."
Long authorization process
If, after entering the Wifi security key, while connecting to the network, the message “Obtaining an IP address” is displayed for a long time, and then the connection is disconnected and tries to connect again, this indicates an error in setting up IP addresses. In this case, you need to configure automatic acquisition of an IP address in the connection properties. And if it doesn’t help, write them manually.
Unidentified network - what to do
If the laptop does not identify the network, check whether the Internet cable is connected to the router. Reboot your router and laptop. You also need to check the IP addresses and DNS servers, as described in the above paragraphs.
>There may be several reasons for the lack of Wifi on a laptop, the main ones being an incorrectly configured router (see instructions for setting up your model), problems with the network adapter (outdated or not installed), or an incorrectly configured IP address or DNS server.