
Want to monitor your system's performance while gaming? What's the best way to see what your equipment can do? Does it fully reveal itself or is something preventing it?
You've probably seen game reviews with system performance information right on your computer screen while you're playing and wondered: How did they do it?
This information, presented in the upper left corner of the screen, is called OSD or OSD menu and is one of the most frequently used features in the MSI Afterburner app. It allows you to monitor the performance of your graphics card and other hardware while you're gaming, giving you important information about what you can improve to improve performance. Want to know how to get this information on your screen? Just follow our directions below!
First, you need to get the latest version of MSI Afterburner and Rivatuner Statistics Server. Both programs are included in the MSI Afterburner installer. ()
1. Launch MSI Afterburner
2. Click “ Settings"(Settings) 
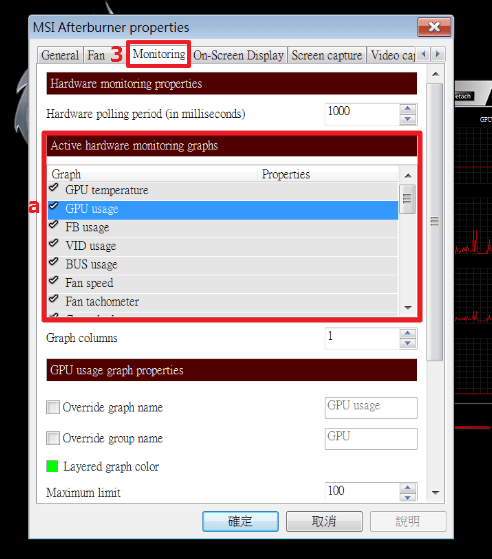
3. Click “ Monitoring”(Monitoring) and go to “ Active hardware monitoring graphs”(Active Hardware Monitoring) and select the information you are interested in to display in the OSD menu (for example, we use “GPU usage”)
b. To display the information you are interested in on the screen, select the “ Show in On-Screen Display”(Show in OSD menu). 
c. In a collumn " Properties"" (Properties) you will see the inscription " in OSD"(on the menu). Select other information to display on the screen in the same way. You can change the order of information displayed on the screen by dragging the desired menu items up or down the list.
d. Text shown in “ Override group name”(Group Name Change) to be displayed in the OSD menu can be changed as you wish. (Here we changed the name “GPU usage” to “GPU load”)
e. Don't forget to click OK to save your changes and exit to MSI Afterburner. 
Now when you launch the game you will see an OSD menu!
But that is not all! You can also customize appearance menu. You can easily customize the OSD menu using the RivaTuner Statistics Server utility, which is automatically installed with Afterburner.
1. Click on the “ icon Riva Tuner Statistics Server”

2. In the menu that opens, you will see settings that you can change. Here are some of the more interesting options to change:
a. On-Screen Display shadow (OSD Shadow Setting): When this option is enabled, the text will have a dark outline to improve its visibility.
b. On-Screen Display palette (Change OSD Color): Here you can change the OSD text color. You can also change the color of the shadow.
c. On-Screen Display zoom (OSD Enlargement): Here you can change the OSD text size.
d. Position of OSD(Changing OSD Position): Drag the OSD text to any position on the screen. 
3. After you are done with the OSD settings, launch the game and observe the result. The MSI Afterburner application is a very convenient tool for any gamer, and not just overclockers. You can use MSI Afterburner for optimal gaming performance! The application is constantly updated and guarantees excellent stability and compatibility with your equipment. Since new versions are released regularly, make sure you use latest version application, which is available for download at the following link:
Multifunctional program for managing a video card. It works with graphics cards from AMD and NVIDIA, allows you to overclock, enable data monitoring functions in games and more. In this publication, we will consider the question “how to configure MSI Afterburner” for the correct operation of the video card.
Setting up the program
Important! For full operation of the program, do not uncheck the boxes from RivaTuner Statistics Server. Install with MSI Afterburner.
The main settings of MSI Afterburner are opened by clicking on the gear. When you first start, there are 7 tabs available in the menu:
- Basic and Monitoring.

- Capture Screenshots and Videos.

- Profiles and Interface.

To begin with, in the “Basic” tab set:
- “Synchronize settings of identical GPUs” if your PC has two graphics cards.

- “Unlock Voltage Monitoring” to access the use of the Core Voltage slider.

- “Run with Windows”, to integrate some functions and the ability to run with the operating system.

Click OK and restart the program.
Working with a cooler
In the program you can change the rotation speed of the coolers, which depends on the heating temperature of the video card. Unfortunately, this function Available only for desktop PCs. Open the “Cooler” tab in the properties. You can change parameters by dragging points on the graph. 
Setting FPS in the game
To set up the monitoring mode, in the “Monitoring” tab, click to select the “frame rate” values and click “Show in Overlay Screen Display”.  In addition, you can output other parameters in a similar way. In the game, the necessary monitoring data will be displayed on the screen.
Working with OED
In this tab you can set hotkeys and set additional settings for displaying text on the screen in computer games. 
When you click the “Advanced” button, a new window with settings is displayed. 
Saving game screenshots
In the “screenshot capture” tab, you can configure the key that will be used to save. In the “Capture screenshots” line, click the mouse pointer and press a key or key combination. In the future, pressing the indicated keys will save a fingerprint of the image from the screen. You can also select the folder in which the screenshots will be saved.
The main functions of the MSI Afterburner utility are overclocking the video card, monitoring its current state and regulating the cooler speed. In addition, the program has the ability to capture screenshots and videos from the screen. The overclocking process is discussed in detail in the manual "". Here we will get acquainted with the main parameters and settings of this program.
Step 1: Installation
Download the archive from the site and unpack it.
Run the installation file MSIAfterburnerSetup410.exe.

Select Russian language. After accepting the license agreement, the component installation screen will appear. The program itself is divided into an overclocking module and a statistics and monitoring module.

Check the boxes next to MSI Afterburner and RiverTuner Statistics Server and click “Next”.
We select the installation path (leave the standard one) and decide whether to create a shortcut on the desktop or not.

Select the Russian interface language for the RiverTuner Statistics Server program. It is worth clarifying here that the visual part of MSI Afterburner is not completely translated. But all the tips and important information translated into Russian. And only the settings have been transferred to RiverTuner Statistics Server. The interface remains in English.
Step 2. Interface
We launch the program through a shortcut or the file MSIAfterburner.exe, which is located in the C:\Program Files\MSI Afterburner folder, if you did not change the standard installation path.


At the top there are 3 buttons: run the MSI Kombustor stress test, help about the program, as well as information about the video card, processor, OSD overlay server and assigned hotkeys. Please note that Kombustor must be downloaded and installed separately.
The main screen of the utility is divided into 3 parts: the GPU/MEM sensor (frequency and memory), the main panel with sliders and the Voltage/Temp sensor (voltage and temperature). Below is a monitoring window that provides current information in the following areas:


To monitor all these indicators in a separate window, click the red button Detach(separate).

Below are the columns Fan Speed There is a button with a picture of a gear. This is the program settings menu.


If you prefer the old interface skin, then go to “Settings”, open the “Interface” tab and put the skin you like in the “User Interface Skin Properties” section.

The picture shows the Default MSI Afterburner v3 skin - big edition.

Next to Settings is a button to reset your GPU settings. The last button in this row is the “Apply” option, which is necessary for changes to the main parameters of the central panel to take effect.

Under the settings there is a window with information about the model of our video card and the driver version. To the left of it we see a button Startup- applying all overclocking settings when Windows starts. To the right of the information window there is a menu of profiles for saving overclocking configurations.
Step 3: Center Panel
Let's look at all the parameters of the central panel.

The main indicators here are Core Clock(MHz), video core frequency, and Memory Clock(MHz), video memory frequency. Overclocking a video card is done using these sliders.
The cooler speed is controlled by the parameter Fan Speed, which is expressed in %. However, you will not be able to move this slider if the video adapter is not equipped with a chip to control the cooler or a controlled cooling system.

You can also set a direct relationship between temperature and video card fan speed in “Settings” → “Cooler” tab. To do this, check the “Enable software user auto mode” option. You can change this dependence on the graph by moving the gray control dots in different directions. This option is useful during heavy overclocking, when you need to use the cooler to the maximum. In other cases, you can leave it alone. Under no circumstances put 100%! The cooler simply won't hold up and will break.

Core Voltage(core voltage), Power Limit(power limit) and Tem. Limit(temperature limit) are not initially available. IN in this example we can only unlock Core Voltage. To do this, go to “Settings” → the “General” tab → the “Compatibility Properties” section → check the box next to the “Unlock voltage control” option. Power Limit, Core Voltage and Tem. Limit can only be accessed if the video card supports controlling these characteristics. Our map is not one of them.
Step 4. Monitoring

You can monitor the system status in games even in full screen mode. To do this, go to “Settings” → “Monitoring” tab. In the “Active monitoring graphs” section, select any graph, and then check the “Show in Overlay Screen Display” option. Then this graph will have a mark “in OED” in the “Properties” column.
In the same way, we set all the graphs we need that we want to see during the gaming stress test.


After that, click the “Advanced” button. Enable features Show-on-Screen Display, On-screen display shadow And Show own statistics(set to On). Option On-screen Display palette allows you to select the font color, and On-screen Zoom- scale.

To select a font style, click the button Raster 3D. Also, for convenience, you can move the FPS indicator to any place on the screen.

Launch the game and use the assigned hotkeys. We should see something similar to what is shown in the screenshot.
Step 5: Capture Videos and Screenshots

Go to “Settings” → “Video Capture” tab. Specify the hotkey in the “Video Capture” column. In our example, this is the “K” key. In the “Video Format” section, the default setting is “MJPG compression”. We leave it as is. “Frame size” - select “full frame”.

Video recording at 60 fps. in parallel with the launch of the game can pull enough powerful computer. In other cases, it is recommended to leave the value at 30 FPS. Specify the path to the folder where the recorded video will be stored. We leave the remaining parameters unchanged.
We go into the game and press the hotkey to start recording. As soon as you decide that you have recorded the right moment, press the same button again to stop recording. If the picture ends up being choppy, then it makes sense to set a limit on the number of frames and try to re-record the video.

To take a screenshot, you need to go to “Settings” → “Screenshot Capture” tab. Assign a hotkey for capturing and select the format and folder where the screenshots will be stored.
The Msi Afterburner application is designed to manage Nvidia and AMD video cards. Its main features are the following: controlling the frequency of the graphics processor and memory, changing the power voltage, adjusting video card coolers, collecting data on the state of the video card from sensors and displaying them on the screen.
Also, the program, originally aimed at gamers, allows you to record videos and take screenshots. The software is indispensable for a miner; with its help, it is easy to optimize video cards for long-term operation with minimal wear and power consumption, or overclock them to get maximum output in a short time.
The program allows you to manage a group of video cards and save up to five different profiles with settings. The software is free. The easiest way is to download Msi Afterburner from the official website.
After installation and launch, the main program window opens:
The dial on the left displays the current frequency of the GPU, below it is the frequency of the video memory.
On the dial on the right is the power voltage, and below it is the temperature of the video processor.
Under the left dial is a button for setting the program to autorun when Windows starts, under the right dial are buttons for saving a profile and switching between different settings profiles.
In the middle, above the indication of the video card model and the version of its drivers, there is an advanced settings button (with a gear), a reset button to standard settings, and a button to apply current settings (which are set using sliders between the dials).
Some sliders may be inactive, and to gain access to manage all the parameters, you need to click on the gear and go to the advanced parameters, where on the “Basic” tab, check the “Compatibility Properties” column:

Now you can fine-tune the video card. The miner is primarily interested in the frequency of the GPU, video memory, cooler speed, and the temperature of the video card under load. If you want to get maximum performance from your video card, find on specialized resources the typical frequency and voltage values for your overclocked video card model, and gradually move the appropriate sliders to these numbers.
Be careful with the voltage - increasing the current causes strong heating, and if you are overclocking a video card, it is better to set the cooler speed to 100% in advance, and also set the temperature limit to no more than 80-90 degrees. An overclocked video card will give a high hashrate, but its service life will be shortened, sometimes up to a year or several months.
Nowadays, miners often do the opposite and choose gentle settings to extend the operating time of the video card. To do this, you need to empirically find the minimum voltage value at which the video card is able to operate at the factory frequency - this will reduce overheating. And limit the rotation speed of the cooler so that it is not overloaded in vain, and the necessary temperature balance is maintained - no higher than 60-70 degrees.
Cooling fans are the only moving part in a video card, and they often fail when constantly running at maximum speed. A suddenly broken fan can cause the video card to overheat. It is also recommended to choose the upper temperature limit so that it does not interfere with stable operation, but turns off the video card if the slightest overheating occurs.
All of these settings must be done with caution. Don’t even think about setting the frequency and especially the voltage to high values right away - in the best case, the video card simply won’t start. Move the sliders to 5-10 MHz and test the stability of the card under load with the new settings.
You can check the performance of your video card by running a benchmark in the advanced settings of the program. If you see stripes or artifacts on the screen, the operating frequency must be urgently reduced.
If you hover your cursor over a button and hold it for a few seconds, you will see a tooltip with a detailed description of its function:

Therefore, figuring out how to set up Msi Afterburner will be easy even for a beginner. And this is necessary knowledge for a miner.
- News selections once a day to your email:
- Collections of crypto news once a day in Telegram: BitExpert
- Insiders, forecasts for discussing important topics in our Telegram chat: BitExpert Chat
- The entire crypto news feed of the BitExpert magazine is in your Telegram: BitExpert LIVE
Found an error in the text? Select it and press CTRL+ENTER
MSI Afterburner is a program for overclocking AMD and NVIDIA video cards, developed by the Taiwanese company MSI. Using the utility, the core frequency, voltage, and fan speed are adjusted. The state of the graphics card is monitored in real time. Additional features include recording video in games and testing the video card with a separate MSI Combustor tool, which is based on the FurMark benchmark engine.
How to use MSI Afterburner
Main features of the utility:
- Monitoring switching between 2D and 3D modes;
- Adjusting the voltage of the video memory chip and power supply of video cards;
- Graphics card cooling control;
- Monitoring FPS in games and displaying values on top of the screen;
- Recording the game process using the Predator video module.
After downloading MSI Afterburner, you need to unpack the archive and run the installation file. Then select the Russian language and accept the license agreement. Check the boxes for MSI Afterburner and RiverTuner Statistics Server and click “Next”.

Supports work with video cards AMD Radeon 3000, NVIDIA GeForce 8X00 and later
The interface screen is divided into three parts:
- Video card and memory frequency sensors (GPU Clock and MEM Clock);
- Voltage and Temp values;
- Panel with sliders in the center.
At the top there are three buttons - launching the stress test of the MSI Kombustor utility, which must be additionally downloaded from the official website (also free), help on working with the program and information on the characteristics of the video card. Below the Fan Speed slider there is a settings menu button with a gear symbol. Next to it is the “Reset settings” option, designed to return the graphics card settings to their original state. On the right is the “Apply” button to approve the changes.
How to enable monitoring in the game
Before starting testing, you need to enable monitoring in games - show the temperature, video card load and FPS counter (called “Frame Rate” in the list). In the list of parameters, select the appropriate item and check the box Show in OED.

On the next tab you can set shortcut keys to display the monitoring window in games. You can set any, for example, Ctrl + 0.

The output of the monitoring window with operating indicators is separated by clicking on the Detach button.
MSI provides the ability to adjust three parameters at once - the voltage of the phase-locked loop system, memory and graphics processor. But a common problem in Afterburner is that the sliders don't work.
To unlock Core Voltage, check the settings - unlock voltage control and monitoring. If this does not help, we recommend that you read it.
The correct setting for overclocking a video card
Correct setting MSI Afterburner is determined by brute force without the risk of overheating the video adapter. The approximate operating temperature limit for NVIDIA video cards is within 90 degrees, Radeon – up to 80.
Each video card model has its own values, so be sure to know the maximum temperature before overclocking.
During gameplay the values will always be high and you need to configure MSI Afterburner to play without artifacts due to overheating.
If there is a failure due to MHz being too high, the card will simply reset the settings. It is not recommended to set high Core Voltage - there is a high risk of burning out the video card. Core Voltage is the voltage of the graphics card's GPU core. It is better not to touch this parameter at all if you have a clear understanding of your goals and only increase the frequency.
As the voltage and frequency increase, the load on the card and the temperature increase. The Fan Speed column specifies the fan rotation speed - the higher the speed, the better the cooling. By increasing the voltage and frequency of the GPU and controlling the fan speed, the ideal balance between temperature and performance is determined.
Balancing performance and temperature allows you to overclock the video card as efficiently as possible.
Before starting overclocking, we increase the Power Limit - this is the TDP threshold, after which the video card resets the frequency so as not to exceed power consumption (throttling mode is activated). That is, this is the adapter’s power consumption limit - turn the slider to the right. Then we will increase the clock speed parameters of the video memory and graphics chip one by one. The instructions consist of only two parts - increasing Mhz and conducting a stress test lasting 15 minutes in the FurMark program.
Let's start with Core Clock - this is the operating frequency of the GPU. You need to raise the values slowly - 50 MHz each and test. If the adapter does not produce artifacts, we increase it another notch. As soon as the video card starts producing artifacts, lower the Core Clock by 20 Mhz and repeat. Everything is in order - increase it by 10 MHz and repeat.
Thus, MSI Afterburner selects the maximum frequency at which the video card can operate without failures during overclocking.
After the final stress test in FurMark, you need to check the stability of the game, which will load the video adapter completely. If no artifacts appear in 30 minutes, move on to Memory Clock. All actions are the same. If the card gets very hot, increase the cooler speed to 90-95%.