
Virtual PC or " Virtual machine" is installed on a real computer using various emulation tools. In this lesson, we will look at creating a virtual computer using the Microsoft Virtual PC 2007 software product.
Before we can start creating a virtual machine, we need to install it. How to do this is described in the article.
Let's start creating a virtual computer in Virtual PC.
Step 1. Launch Virtual PC 2007 by double clicking on the icon. A window will appear Virtual PC Console. The Computer Control Center consists of three areas. In the center is a list of used virtual computers. On the right are commonly used commands:
- New... (Wizard for creating a new virtual computer).
- Settings (Settings of the selected virtual computer).
- Remove (Remove the selected computer).
- Start (Starting the virtual computer).
So, in order to create a new virtual machine click on the button New...

Step 2. In the New Virtual Machine Wizard window, click Next.

Step 3. In the new window, select the option Create a Virtual Machine(Create a virtual machine). Click to continue Next.

Step 4. Enter the name of the new computer in the field name and location. Then click Next.

Step 5. In the operating system selection window in the section operating system click on the drop-down list and select the operating system that you will install on this virtual computer. After selecting the OS, click Next.

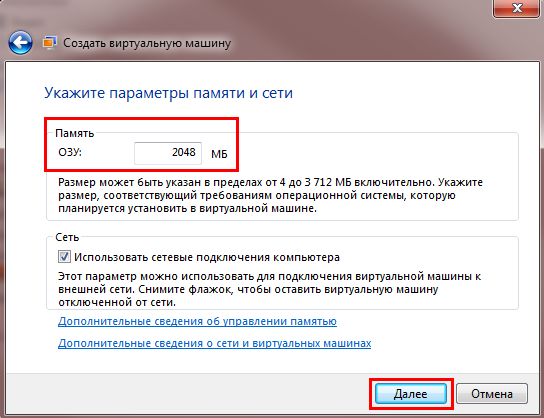
Step 6. Next, you need to adjust the volume random access memory. You can use the recommended amount of memory by setting the switch to Using the recommended RAM or change the memory size by setting the switch to Adjusting the RAM. I advise you to use the recommendations of the installation wizard and click the button Next.

Step 7. Further in the virtual creation window hard drive In chapter Do you want to use set the switch to A new virtual hard drive.
(An existing virtual hard disk- this is the connection of an existing hard drive with an installed system).
Click to continue Next.

Step 8. In the window virtual disk settings you can specify its future location by clicking on the button Browse, as well as set hard disk size in field Virtual hard disk size. Leave the default settings and click Next.

Step 9. All. Creating a Virtual PC in Virtual PC completed successfully. Press to exit Finish.

Now we proceed to configure the created virtual computer in Virtual PC 2007. To start the created virtual computer, right-click on it once, and then click Start. The computer starts up, but nothing appears, because it does not have an operating system installed.

In order for our computer to start working on it, we need .
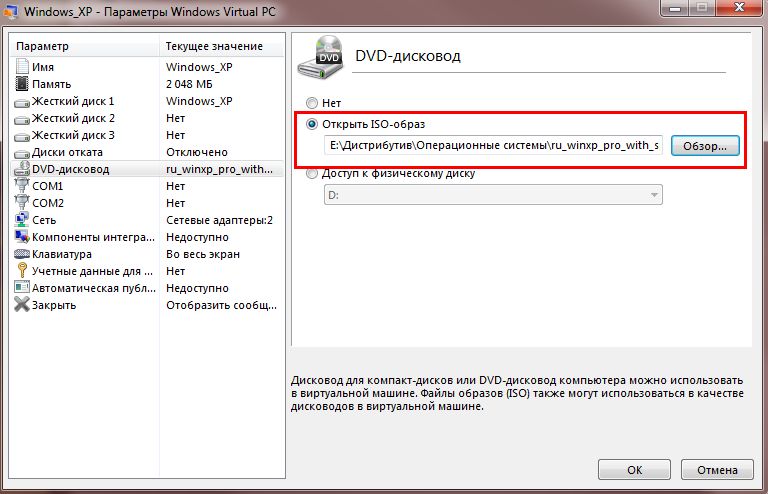
To do this, in the running window, in the top menu, click CD and choose Capture ISO Image...

In the window that appears, specify the path to ISO operating system image. Double click on iso image. After that, restart the virtual computer by clicking on the cross and selecting turn off.

After the next start of the virtual computer, the operating system will automatically boot into the virtual CD drive.
After that, the standard installation of the operating system will begin. You can see how to install the windows operating system in the section.
Until the add-ons are installed, the mouse cursor will sink into the virtual computer screen.
After the installation of the operating system is complete, you will need to install add-ons for the virtual machine.
In the window that appears autorun click Run setup.exe.
The procedure for installing the add-on is standard. In the first and subsequent windows, click Next. When installation is complete, click Finish. After that, restart the virtual computer by clicking in the window that appears Yes.
To have several operating systems at hand with a separate workspace and applications, you do not need to buy a second (third, fourth, etc.) computer. Because all this will fit in your only PC. How? Thanks to virtual machines (VMs) - special programs that create (emulate) imaginary (virtual) computers inside the main operating system.
Virtual PC is almost like a real one. It has its own processor, memory, hard drive, network adapter and everything else. Of course, these are not physical devices, but they are made in such a way that operating systems consider them to be exactly that - real.
Several virtual computers can run on one physical computer at the same time. How much depends on hardware resources: the faster the processor, the larger the RAM, the more spacious the drive, the more. A typical Windows 10-based mid-range home PC can handle three to five lightweight operating systems (such as Windows XP, Android, and Lubuntu + main system) at the same time. Or two or three relatively heavy ones (for example, the main Windows 10 + virtual Windows 7 and Mac OS X). As you already understood, virtual desktop emulator applications allow you to install and run a wide variety of operating systems on them.
General-purpose virtual machines (as opposed to specialized ones, such as, for example, Java VMs), use:
- To run applications that the main system does not support.
- To protect the system from potential harm from unverified programs.
- As an additional barrier against viruses when visiting dubious web resources.
- To create an isolated environment for studying malware activity.
- As a testing ground for debugging your own developments.
- To master the technologies of building networks.
- For double authorization on some game portals and much more.
And of course, virtual machines are widely used to distribute the working resources of servers.
Today we will not touch on the industrial use of VMs, but will only consider what may be useful to home users of Windows.
Oracle VirtualBox
Consider the process of creating a new virtual machine and starting to install Windows 10 into it.
- Click the "Create" button on the top bar.

- In the first window of the VM creation wizard, specify the name of the OS (it will be displayed in the list of guest systems), its type (Windows, Linux, etc.) and version. In our example, this is Windows 10 32 bit (you can also install 64 bit, but it will require more resources). To go to the next step, click Next.

- Next, specify the size of the VM RAM. Windows 10 x86 defaults to 1 GB, but you can increase this amount by moving the slider to the right. If your PC does not have a lot of RAM, do not give the VM more than 2-3 GB, otherwise the main system will slow down due to lack of memory.

- Next, create a virtual hard disk. If you are installing the system for the first time, select the "Create new" option.

- Leave the virtual disk type as default.

- A storage format is an area on your computer's physical storage that is allocated to a VM. It can be fixed or dynamically expandable within the limits you define next. To save space, we will choose a dynamic format.

- Next, specify the name of the volume (virtual disk C) and its size. The default is 32 GB.

- After clicking the "Create" button in the last window, a new virtual machine will appear in the list. The frame on the right shows its parameters.
- To proceed to the installation of Windows, click the "Run" button in the top panel.

- In the window that opens after that, the window "Select a boot disk" will appear. Click on the folder icon and specify the path to the system distribution kit. It can be an image in .iso format or physical media (DVD, flash drive). Once you've selected your distribution, click Continue.

- The further course of installing the OS into a virtual machine does not differ from installing it on a physical computer.

Some VM and guest system settings
A click in the virtual machine window captures the mouse cursor (i.e. it will only move within the virtual screen). To return the cursor to the main OS, press the Ctrl + Alt combination.
To access the entire feature set of the guest OS, you need to install special add-ons. Go to the "Devices" menu, click "Mount Guest Additions Disk Image" and follow the instructions.

To connect a folder to the guest system for exchanging files with the main one, click the “Shared Folders” item in the “Devices” menu. Click on the “folder+” icon in the window that opens and, through the “folder path” field, specify it in Explorer (it shows the directories of the main system).
If you want the setting to work all the time, check "Auto-connect" and "Create a permanent folder". The shared folder will be available from the virtual machine explorer as a network folder.


To change the order in which boot devices are polled (for example, to boot a virtual machine from a DVD), shut down the guest OS, open its settings (in the main Virtualbox window) and go to the first tab of the "System" section. In the "Load Order" list, select the desired media and use the arrow buttons to move it to the top.

VMware Workstation Pro
Some options for Hyper-V virtual machines
To take a snapshot of a running guest OS, Open the top menu of its Action window and click Checkpoint. Or press the combination Ctrl+N.
Access to the settings of an individual virtual machine is opened from its context menu in the list of the main dispatcher window and is hidden behind the "Settings" button.
Other features of the program are also very straightforward and mastered without much difficulty.
In today's article, I will tell you about virtual machines: why they exist, how to use them and I will show all this with an example. I think it's no secret to anyone that with the release Windows Vista was acute compatibility problem. Those programs that are without problems worked on Windows XP- refused to work in Windows Vista. Time passes, Vista is no longer relevant, it was replaced by the "seven", however program compatibility issues have not disappeared. The compatibility mode that you specify in the file properties sometimes helps, but for the most part it is useless - that's why virtual machines appeared to emulate work the operating system we need. If you have any specific program that refuses to work in Windows Seven but no problem works in Windows XP, then you should not write it off. The program is fine, but I have an old scanner, Mustek 1200UB Plus, which does not want to work in any way in 64-bit Windows Seven. It is quite working, it is just very old, and the manufacturer won't update drivers for equipment.
However, this is not the only application of virtualization technologies. Imagine that you have a suspicious file, what can be done with it? take a chance and run on computer, which you actively use and on which you have a bunch of important programs and documents ?, or you can run it on isolated from all programs and data operating system that runs in your window! Which option would you prefer? I think the conclusion is obvious.
In my article about virtual machines, I used Microsoft Windows Virtual PC. You can download this program from the official Microsoft website. (If you have licensed Windows) or find on , I downloaded on nnm-club.ru, just enter in the search Microsoft Windows Virtual PC. There is also VMware - its functionality is much higher, but we do not need it.
Let's get started!
The program requires CPU support for virtualization technology if your processor supports it, make sure virtualization technology is enabled. Installs the Package (x86 for 32-bit OS, and x64 for 64, respectively). You will need to restart your computer after installation...
You can also download here:
32-bit (x86): Windows6.1-KB958559-x86.msu
64-bit (x64): Windows6.1-KB958559-x64.msu
After reboot you need create a virtual machine, or a virtual computer, which is actually the same thing. To do this, we launch Virtual PC and choose "Create a virtual machine", give it a name and specify where it will store its files.

Choose the optimal amount of RAM for the virtual machine (depending on your amount of RAM), but for XP, 512 megabytes is enough.
With a dynamic disk, everything is clear, choose the default option, in this case your disk in the virtual computer will have a volume equal to the volume of the partition that you specified earlier.

So our virtual computer is launched, it is as empty as the new one, therefore we need to install operating system, for example Windows XP.

There are several installation options: if you have installation disk, then you can install from it, or specify the path to o Brazu disk. I chose the second option. In the DVD drive parameter, specify the path to the MS Windows XP SP3 image. Click OK and reboot the virtual machine with the button "CTRL+ALT+DEL"
Here is the one we know Windows XP installation. I will not focus on it, everything is described in detail

How share disk- it's up to you, although I think there is no point in this: just create a section for the entire free space. But the installation files are being copied!

Well, here is the installation process - nothing complicated, the same as a simple installation, only in the window. By the way, virtual machine intercepts mouse and keyboard controls to return to your OS press ALT+CTRL+LEFT ARROW

OK it's all over Now: system installed and ready to go.

In contact with
The Windows operating system allows you to create a virtual machine (VM), which is another computer with a separate virtual disk, OS, system data, and software. Simply put, you connect another system that can be opened in a separate window. We will tell you how to install a virtual machine in this article. Carefully follow the instructions, and in 20-30 minutes a VM will appear on the computer
Create a virtual machine on Windows 10
The top ten has a standard service for creating virtual machines - Hyper-V. By default, the components of this service are disabled - we need to start them. To do this, you need to go to Control Panel, then go to section Programs – Enable or disable features. In the menu that appears, activate the item Hyper-V and confirm your action with the key OK.After installation, the computer must be restarted. Now we go to the search service Windows and put it in there Hyper-V Manager. He himself is located in Administration Tools. Now let's move on to creating a VM:

Ready. Having opened Hyper-V, you will see the VM.

The launch occurs by double-clicking on the name of the VM in Hyper-V. In the connection window, you need to click on the button Turn on. You just have to go through the standard installation procedure of the system.
Important! It may happen that you configured and installed everything correctly, but the operating system on the virtual machine does not start. This can be explained by the fact that specifications not suitable for virtual system playback. Read carefully system requirements to install a particular version of the OS. For example, you cannot install Windows 10 on a weak PC with a dual-core processor and 1 GB of RAM.
Creating a virtual machine on Windows 7
The "seven" has a built-in service for creating a VM, but it allows you to create a virtual machine only for Windows XP. We believe that the lack of choice is bad, so we made instructions for using third-party software to create a VM. The program is called Virtual Box, you can also use it to install a VM on Windows 10, 8 and even XP. You need to download Virtual Box from this link.
Install the program according to the standard scheme and run it:
- In the main menu, press the button Create.
- This will open the New VM Creation Wizard.
- We select the type of operating system and its version: if you want to install Windows 8, then select it from the list.
- In the next window, we set the required amount of RAM for the new OS - 512 MB is enough for Windows XP, and the tenth version will not work correctly if you do not provide at least 4 GB for it.
Useful advice! When specifying memory, set at least 515 MB and not more than 50% of all RAM that is in your computer.
We create a new hard drive for the VM by clicking on the appropriate item, and move on. We recommend choosing a fixed option so that the hard disk for the VM does not take all the space with the main Windows. Having set the size of the virtual HDD, you must specify the path where it will be located.
Now we return to the VM creation menu and press the button Ready. Now we need to configure the virtual machine and install the system itself on it - go to the section Properties. In chapter Display must be included 2D accelerator and 3D accelerator.
The next step is to select the media from which the new OS will be installed on the virtual machine:
- If you want to use the image with the installation, then go to the section Attributes and click on the icon with the image of the folder - the media manager will open - here you need to add your image.
- If the installation will be performed from a DVD-ROM or USB-drive, then you should insert it into the computer and go to the section Attributes. After downloading, the disk or flash drive you need will appear in the list of media.

Now we press the button Install and go to the standard installation wizard of the operating system. We recommend that you study the Virtual Box program to customize the virtual machine completely for yourself.
Useful advice! To create a VM with Linux, it is better to use the Virtual Box program. You can also use the standard Windows 10 wizard, but user feedback suggests that Linux will be unstable.
Installing a virtual machine with Windows XP
We have already considered an example using Virtual Box, now we will study the VMaware Workstation program, with which we will install Windows XP on a virtual machine. You can download the VMaware Workstation application from here.After downloading, run the installation file and install the program according to the standard scheme. Now we go to VMaware Workstation and proceed as follows:
- In the dialog menu of the application, select the section for installing the VM. In the English version it is called New Virtual Machine.
- First of all, the program will ask us to specify a DVD, Flash drive or ISO image. For example, we took a regular XP DVD. Click on the button Further and go to system activation mode - specify the path to the XP activation file.
- Now you need to set up a separate hard drive on which files with Windows XP will be located, and software will also be installed there. Specify the size: usually 40 GB is enough, but for trial use of the VM, 8 GB is enough for you.
- After that, VMaware Workstation will start checking and finalizing. Here we can change the amount of RAM for the WindowsF version, login methods, and other options. Now the Russian version is available on the VMaware Workstation website, we recommend that you read the description of each setting in the help. If you skip this section, the program will automatically set the RAM.
- Once the setup is complete, VMaware Workstation will move on to installing the XP system on the virtual machine.
VM video installation
The video is about installing Windows XP on a VM and then setting it up. A novice user will also be able to install the VM according to this instruction. The video also explains in detail how to use an already installed XP as a virtual operating system.You now have a virtual machine to experiment with. If you have long wanted to use "unwanted" software, then it is best to install it on a VM. Using standard services to install a VM is easier, but third-party software provides more options. It all depends on your requirements - the instruction with Windows 7 is also suitable for other operating systems, there is also a link to download a convenient program.
Microsoft has developed Microsoft Virtual PC 2007, not least to provide the ability to run Windows Vista as a guest operating system. At the time of writing, Virtual PC 2007 is in the Release Candidate (RC) stage and was downloaded from the Microsoft Connect website. The program was installed in the operating system Windows Vista Ultimate.
Virtual PC 2007 is packaged in a Windows Installer (.msi) package, so installation should be straightforward.
In the installer welcome window, click the button Next.

Accept the license agreement by checking the radio button as shown in the figure and click the button Next.

Enter your username and organization name. Since the program is distributed free of charge, the product key has already been entered. You can choose whether to install the program for all users ( All Users) or only for the current user ( Only for me).

Click the button Next to start installing the program.
Once the installation is complete, launch Virtual PC 2007. The first time you run it, the Virtual Machine Creation Wizard window should appear. If the wizard does not start, click the button New in the window Virtual PC Console.

In the wizard's welcome window, click the button Next.

This article discusses creating a new virtual machine. Set the switch to Create a virtual machine and press the button Next(if you already have virtual machines, you can add them by setting the switch to Add an existing virtual machine).

Specify the virtual machine file name and path. You can use the button Browse for ease of navigation.

Select the operating system that you plan to install on the virtual machine from the drop-down list.

You can specify how much RAM will be available for the virtual machine. You can enter the desired value using the keyboard or move the slider. By default, it is suggested to allocate the recommended 512 MB, but for Windows Vista I decided to allocate a little more.

The next step is to create a virtual hard disk or specify an existing one. Set the switch to A new virtual hard drive if you want to create a new virtual disk.

Specify a file name for the virtual hard disk and a folder where it will be stored. You can use the button Browse for ease of navigation. Then specify the desired virtual hard disk size. For Windows Vista, you need a disk size of at least 8 GB. By default, Virtual PC 2007 creates a virtual disk that will automatically expand if the guest operating system requires more space than originally allocated.
This completes the initial setup of the virtual machine. In general, the configured parameters should be sufficient to successfully install the operating system on the virtual machine. This will be discussed briefly below.

In the window Virtual PC Console press the button Start to start the virtual machine. When the virtual machine window opens, drag and drop the ISO image of the operating system into it, which will be used as a boot disk. You can also choose from the menu CD command Capture ISO Image and tell the program the ISO image you want to use, as shown in the figure below.

If everything is done correctly, the installation of the operating system should begin. The description of this process is beyond the scope of this article, but I will mention one nuance.
In general, installing a guest operating system Windows systems Vista from the core Windows Vista system went off without a hitch. It would be even easier if I knew that you can exit the guest system into the main one by pressing the right ALT key and moving the mouse out of the screen (thanks, Tomatos ;). In VMWare Workstation, in such a situation, you need to simultaneously press CTRL + ALT, which also leads to a return to the main operating system.
I would like to note that after installing Windows Vista on the Microsoft Virtual PC 2007 virtual machine, it was not necessary to make additional settings for network connections. There were no problems with Internet access in the guest operating system, as evidenced by the notification of downloaded updates immediately after installing Windows Vista.

After installing the guest operating system, it is highly recommended that you install the virtual machine add-on package, which provides a number of benefits. Among them:
the ability to drag and drop files with the mouse from the main operating system to the guest and vice versa;
the ability to use shared folders;
optimized video card drivers;
time synchronization;
shared clipboard;
improved guest operating system performance;
Windows Vista compatible sound card driver.
In addition, after installing the add-on package, the aforementioned problem with logging out of the guest system into the main one disappears.
To install the menu add-on package Action select a team Install or Update Virtual Machine Additions.

A dialog box will appear informing you that if the add-on package installation does not start automatically, you will need to open the CD drive in the guest operating system and start the installation manually.

Click the button Continue to continue installing the add-on package.
Before completing the story about installing and configuring the Virtual PC 2007 program, I would like to draw your attention to the fact that you can always configure the additional parameters of the virtual machine by clicking the button Settings in the window Virtual PC Console. The settings window will open as shown in the figure below.

In this window, you can change the parameters of the virtual machine configured during its creation (for example, the amount of allocated RAM).