
In today's article, I will tell you about virtual machines: why they exist, how to use them and I will show all this with an example. I think it's no secret to anyone that with the release Windows Vista was acute compatibility problem. Those programs that are without problems worked on Windows XP- refused to work in Windows Vista. Time passes, Vista is no longer relevant, it was replaced by the "seven", however program compatibility issues have not disappeared. The compatibility mode that you specify in the file properties sometimes helps, but for the most part it is useless - that's why virtual machines appeared to emulate work the operating system we need. If you have any specific program that refuses to work in Windows Seven but no problem works in Windows XP, then you should not write it off. The program is fine, but I have an old scanner, Mustek 1200UB Plus, which does not want to work in any way in 64-bit Windows Seven. It is quite working, it is just very old, and the manufacturer won't update drivers for equipment.
However, this is not the only application of virtualization technologies. Imagine that you have a suspicious file, what can be done with it? take a chance and run on computer, which you actively use and on which you have a bunch of important programs and documents ?, or you can run it on isolated from all programs and data operating system that runs in your window! Which option would you prefer? I think the conclusion is obvious.
In my article about virtual machines, I used Microsoft Windows Virtual PC. You can download this program from the official Microsoft website. (If you have licensed Windows) or find on , I downloaded on nnm-club.ru, just enter in the search Microsoft Windows Virtual PC. There is also VMware - its functionality is much higher, but we do not need it.
Let's get started!
The program requires CPU support for virtualization technology if your processor supports it, make sure virtualization technology is enabled. Installs the Package (x86 for 32-bit OS, and x64 for 64, respectively). You will need to restart your computer after installation...
You can also download here:
32-bit (x86): Windows6.1-KB958559-x86.msu
64-bit (x64): Windows6.1-KB958559-x64.msu
After reboot you need create a virtual machine, or a virtual computer, which is actually the same thing. To do this, we run Virtual PC and choose "Create a virtual machine", give it a name and specify where it will store its files.

Choose the optimal volume random access memory for a virtual machine (depending on your amount of RAM), but for XP, 512 megabytes is enough.

With a dynamic disk, everything is clear, choose the default option, in this case your disk in the virtual computer will have a volume equal to the volume of the partition that you specified earlier.

So our virtual computer is launched, it is as empty as the new one, therefore we need to install operating system, for example Windows XP.
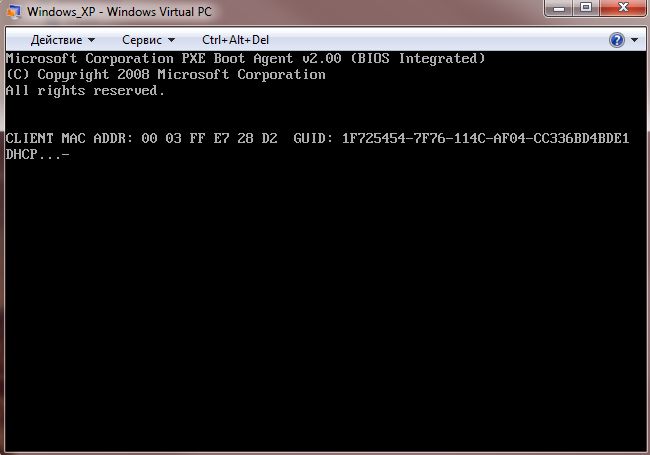
There are several installation options: if you have installation disk, then you can install from it, or specify the path to o Brazu disk. I chose the second option. In the DVD drive parameter, specify the path to the MS Windows XP SP3 image. Click OK and reboot the virtual machine with the button "CTRL+ALT+DEL"

Here is the one we know Windows XP installation. I will not focus on it, everything is described in detail

How share disk- it's up to you, although I think there is no point in this: just create a section for the entire free space. But the installation files are being copied!

Well, here is the installation process - nothing complicated, the same as a simple installation, only in the window. By the way, virtual machine intercepts mouse and keyboard controls to return to your OS press ALT+CTRL+LEFT ARROW

OK it's all over Now: system installed and ready to go.

In contact with
At the time of the release of Windows 7, the bulk of its potential buyers used Windows XP. Among them, very few turned out to be those who decided to immediately and unconditionally switch to a new product. The majority, however, were in no hurry to retire the old XP, because it turned out that a huge amount of software simply could not work under the new system. What was left for Microsoft to do? Losing potential buyers is not an option, so the solution was found to be this: to release an update for Windows 7, which carries a virtualization package - a system feature that allows you to run XP right inside the "seven".
An update named "Virtual PC" and numbered KB958599 was released in 2008. It is a virtual machine - an application that emulates computer hardware and creates an isolated environment inside the operating system where you can install another OS, including a type other than Windows.
Microsoft's Virtual PC is included in the Windows 7 Ultimate, Professional, and Enterprise editions. This virtual machine is specifically designed to install Windows XP Service Pack 3 and solve problems with non-starting software.
How to install Virtual PC?
Verify hardware virtualization support
If you have Ultimate, Enterprise or Professional installed on your PC and the function is enabled automatic update, Virtual PC you already have. Before you start using it, you need to make sure that your processor supports hardware virtualization. To test this, Microsoft has created a Hardware-Assisted Virtualization Detection Tool that is easy to download and run.
If the utility displays a message, as in the screenshot below, then hardware virtualization is supported and you can use Virtual PC without additional settings.

In the absence of such support (message in the window below), some more changes need to be made to the system.

Please note that hardware virtualization is enabled and disabled in the BIOS, so if it does not work on your PC, try enabling it in BIOS Setup. The option may be called Intel_Virtualization Technology (for Intel processors), AMD-V (respectively, for AMD), Virtualization Extensions, etc.

In this example, the Intel_Virtualization Technology option is disabled (Disabled). To enable it, you need to change the value of Disabled to Enabled.
If hardware virtualization fails, Microsoft suggests installing a patch that will still allow you to run Virtual PC on Windows 7. On the download page, you need to select the file version according to the bit depth of your system.
Installing Virtual PC manually
Manual installation of a virtual machine in Windows 7 involves installing 2 components:
- Windows Virtual PC;
- Windows XP Mode virtual disk;
Install Virtual PC first. For this:
- download from the official site update KB958599corresponding to the bitness of your Windows 7 and run it;

- accept the license agreement;

- wait for the installation to complete;

- close the installer window and restart your PC.

Next, you need to install the Windows XP Mode virtual disk:
- run the installer downloaded from the official Microsoft website;

- select a location for the virtual disk;

- wait for the installation to finish;

- check the box “Start Windows XP mode” and click “Finish”.

First launch of Windows XP mode
After installing Windows XP mode, the "seven" will configure it further and create a virtual disk.
The first window will open in front of you, where you will have to accept the license agreement for the use of the program and click “Next”.

Next, you will be asked to specify the folder where the virtual disk will be installed and create the first user.

Then - enable the protective functions of the system being created (optional).

After clicking on the “Start Installation” button, the process of installing a virtual machine with Windows XP will start. It remains to wait for its completion.

Creating a new virtual machine on Windows 7
- Through Start or File Explorer, open the location of the XP Mode virtual disk.

- Click the "Create a virtual machine" button in the top menu of the folder.

- This will launch the wizard and begin creating your new virtual machine. In the next box, enter its name and location.

- Adjust the network settings and the amount of RAM (virtual Windows XP can be content with 512 megabytes of RAM, but you can allocate more).

- Create a virtual hard disk (or use an existing one). Specify its type (dynamically expanding or fixed volume) and location. Click "Create".

- After that, the newly created one will appear in the list of virtual machines. Click on it with the “right mouse” and select “Open” from the menu.
- In the list of options, click on “DVD Drive” and specify the path to the physical laser drive where the Windows XP disc is inserted. If you are going to install the system from an image, find its installation iso file in the directory - the virtual machine considers iso format images to be “optical drives”.

After that, the normal Windows XP installation process starts.

Using alternative virtual machines
 In addition to its own Virtual PC component, Windows 7 supports virtualization systems from third party manufacturers. Among them, two are the most famous and widespread - Oracle VM VirtualBox and VMWare Workstation. Let's look at the principles of working with them on the example of any one. Let's take VirtualBox from Oracle and create a new virtual machine on it to install the same "seven".
After installing VirtualBox, open its main window - the virtual machine manager. Click on the “Create” button in the top horizontal menu.

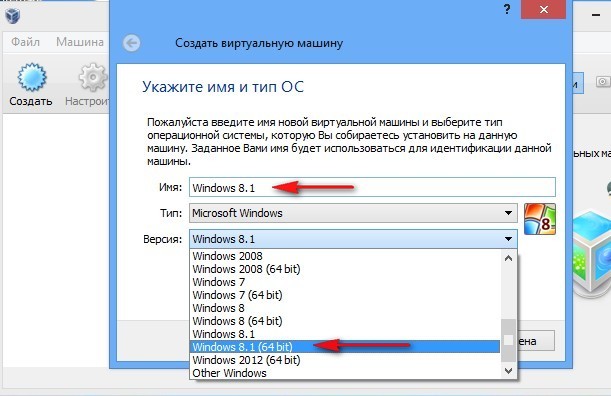
In the next window, write the name of the virtual machine and select its version and bitness from the list. In our example, this is Wibdows 7 32 bit.

Configure the amount of RAM that the virtual (guest) system will use.

Create a hard drive (or choose one of the ones you created earlier).

Specify the disk type. If you don't know how they differ, leave this setting at the default (VDI).

Specify the data storage format - a dynamically expanding virtual disk or a fixed-size disk.

By moving the slider, set the size of the disk, and also specify its name (if you want it to be different from the name of the “virtual machine”).

After clicking “Create”, the new virtual machine will be displayed in the list of the main window. On the right side are its settings.
To start installing the operating system, click on the machine icon and click the “Run” button from the top bar.

Following this, another window will open - one in which you will observe the progress of the OS installation and work in the future. The virtual machine manager (main) window can be minimized for the time being.
Here, as when creating a virtual machine on Virtual PC, you need to specify the path to the installation disk of the “seven” or the iso image.


After the OS installation is completed, the virtual machine is ready to work. You need to launch it by clicking on the corresponding icon in the left vertical list of the main window of VirtualBox. As you can see, creating virtual machines is not at all difficult.
Creating a virtual machine on VMWare Workstation is also intuitive and in many ways resembles the procedure just discussed.
How to install a virtual machine on your computer and most importantly, which virtual machine to choose? Before asking you this question, I wandered around the Internet and realized that the easiest to install and configure are VirtualBox and Virtual PC, but there are also Hyper-V and VMWare. I understand that now you will ask me: “Why do I need a virtual machine?” My answer: "I want to install different operating systems and experiment with them, I'm very interested: Windows XP, Windows 7, but especially Windows 8!" The Windows 7 I have installed works fine with all the applications installed in it, but the hype around the new Windows 8 is only growing and I don’t want to stand aside, so you have already written two dozen articles about the eight on your site and continue to write. I’m thinking of installing a virtual machine (but I won’t choose which one) to install Windows 8 into it and slowly study it like that, and then you look in October, when the final version of Windows 8.1 comes out, I’ll install it second operating system. Mark.
Hello admin! on the Microsoft website and wanted to install it on my VirtualBox virtual machine, but the installation fails with the error “ VT-x/AMD-V hardware virtualization features enabled but not functional". What to do?
How to install a virtual machine
Friends, if you have never dealt with a virtual machine, then I will explain to you in a nutshell what it is. A virtual machine is a real computer created inside your main operating system and in this computer you can install other operating systems (several!) and not only Windows. You can, as you wish, experiment with the operating system installed in the virtual machine, go out to the Internet, install various software, not being afraid to infect your computer with a virus, in short, connect your imagination and you will find a use for it.
For example, one of my friends learned to reinstall the operating system and divide the hard disk into several partitions only using a virtual machine.
As for the choice of a virtual machine, an article will be written on our website about each of the existing ones. Recommend to you install virtual machine VirtualBox, its capabilities are enough not only for a beginner, but also for an experienced user, besides, it is free. Start with her. Simple and intuitive settings, stable operation, made it one of the most popular.
What are the virtual machines?
Virtual PC is free, very easy to install in Windows 7, follow the link to the Microsoft website, download and install.http://www.microsoft.com/en-us/download/details.aspx?id=3702
paid, costs 222.53 €, but there is a 30-day trial period. This virtual machine is needed primarily for system administrators and software developers.
So it's decided, install the VirtualBox virtual machine. We go to the site https://www.virtualbox.org/ , click "Downloads", select
VirtualBox 4.2.16 for Windows hosts x86/amd64.

The installer of the virtual machine is downloaded, we must run it as an administrator, otherwise in the future you will be plagued by various errors when working with the virtual machine. Right click on the installer and select "Run as administrator"

The program is very easy to install on our computer.


We start the virtual machine as an administrator.

Click on the "Create" button.

First of all, I would like to draw your attention to the fact that if you decide to install Windows 7 64-bit on a virtual machine, select Windows 7 64-bit from the list. If you decide to install another operating system, for example Windows 8.1 64-bit, then be sure to select Windows 8.1 64-bit in the drop-down list and enter a fictional name for the virtual machine, for example Windows 8.1, then click Next.

In this window, you need to specify the amount of memory that you can allocate to the virtual machine. Friends, you must understand that the RAM allocated to a virtual machine will not be available to the operating system installed on your computer. If you have only 2 GB of your own RAM, then you cannot allocate more than 1024 MB to a virtual machine, your operating system, when working with a virtual machine, will slow down a lot. If you are installing Windows 8, then the optimal size for it is just 1024 MB. As you can see, my computer has 8 GB of RAM installed, which means I can allocate more than 1 GB, for example 2 GB.

Create a new virtual hard disk.

File type select VDI

At this stage, we need to specify the format of the virtual hard disk. If you check "Dynamic virtual hard disk" This means that the space on your hard disk allocated for the needs of the virtual machine will not be taken immediately, but as files accumulate in your virtual machine. I recommend that you use this option.

Specify the size of the virtual hard disk. If you are creating a virtual machine for the first time, specify 50 GB, this is enough to install Windows 8. But I personally indicate for myself a larger volume. Why? In the process of working with a virtual machine, I will install many operating systems, so I will indicate the amount of 240 GB.
You can create a virtual disk on a disk other than the system disk, it's very simple, click on the yellow folder and Explorer will open, specify any partition on your hard drive to place the virtual hard disk.

We see the outcome. So, we have created a virtual machine, now we need to configure it and finally install Windows 8 into it.
Select our virtual machine and click "Configure".

System. Remove the checkmark from the "Diskette" item. We leave the CD / DVD-ROM as the first boot device, since we will boot the virtual machine from the installation disk or Windows 8 image, we leave the Hard disk as the second device.

The "Processor" parameter is left as is.

"Acceleration" Hardware virtualization must be enabled, for sure you will install a 64-bit operating system.

Display. Video. "Enable 3D Acceleration" and "Enable 2D Acceleration"
Video memory 128 MB

Media. A little of your attention!
Your physical disk drive will be available in the virtual machine, in my case Drive "I" and if you have a Windows disk you can use it to install the operating system, check the Live CD/DVD box.
There is also a virtual drive here, let's connect an image with the Windows 8 operating system, which we downloaded in yesterday's article, to it. In the "Media" option, select "Drive" and "Select optical disc image"

File Explorer will open where you can select the downloaded Windows 8 image, then click Open.

The Windows 8 image will attach to the virtual drive.


What is a USB filter? Imagine such a situation, all USB devices connected to your computer will be detected in the operating system that is installed on your virtual machine. Naturally, you don't need it. USB filters will determine which USB device should be defined in the virtual machine, and which one in your main system. To see how it all works in practice, we must first install an operating system into our virtual machine. Windows system 8.1, and then everything will become clear to you, read on.

In order for all connected USB-2.0 flash drives to work properly in your virtual machine, install the VirtualBox 4.2.16 Oracle VM VirtualBox Extension Pack plugin, download it at the office. website https://www.virtualbox.org/
Virtualization is a general term covering the abstraction of resources for many aspects of computing. Some of the more typical examples of virtualization are listed below. In turn, a virtual machine is an environment that is presented to the "guest" operating system as a hardware one. However, it is actually a software environment that is simulated by the software of the host system. This simulation must be robust enough for the guest system drivers to run stably. When using paravirtualization, the virtual machine does not simulate the hardware, but instead offers to use a special API.
Terms used:
- Host system (host)- computer running the virtualization platform
- Guest operating system- operating system running inside a virtual machine
- Virtual machine, virtual environment- Virtualized computer hardware that can run a guest operating system and applications. Multiple virtual machines can be running at the same time
- Virtual Application- a virtual machine with a pre-installed guest operating system and fully configured applications, aimed at solving a specific task
In this guide, I will talk about the new virtualization features of the Windows 7 operating system. Virtual PC Windows is a new optional system component that can be used to deploy and migrate application compatibility support to Windows 7 that can be managed on legacy operating systems. This component is available when you download an update package.
Windows Virtual PC provides an easy way to manage Windows XP and support compatibility for applications that need to be run on that particular operating system. Can be used to refer to a virtual image of Windows XP that is ready to provide compatibility tuning for applications that the user needs. You can even use Windows XP Mode and Windows 7 to run applications directly from Windows 7 when the applications are basically installed in a Windows XP virtual machine. Windows XP Mode is available in Windows 7 Professional, Windows 7 Enterprise, and Windows 7 Ultimate.
Under the Windows 7 operating system, other 32-bit operating systems can also be used in Windows Virtual PC. Namely:
- Windows XP - only Windows XP Service Pack 3 (SP3) Professional is supported;
- Windows Vista - Only Windows Vista Enterprise and Windows Vista Ultimate are supported;
- Windows 7 - Only Windows 7 Enterprise and Windows 7 Ultimate are supported;
In this guide, I will describe several options for using Virtual PC - installing Windows XP Mode, as well as installing another operating system. In both cases, virtual machines are used to manage the operating system. Windows XP Mode is a faster way because it involves fewer steps and effort. After the test environment of the operating system is installed, we will look at a few key features Windows Virtual PC - such as sharing physical resources: USB devices, printers, and hard drives.
Pre-Installation Steps
To install Windows Virtual PC, you must download and install a specific system update. Before you install Windows Virtual PC, you need to consider the requirements to determine if your computer can run Windows Virtual PC. Windows Virtual PC requires Windows 7 hardware support for virtualization. Virtualization support is available for processors that include the virtualization option - namely, processors with Intel Virtualization Technology (Intel VT) and AMD Virtualization Technology (AMD-V), as well as some VIA processors. You can enable hardware virtualization support using the BIOS. For more information regarding hardware support for a specific virtualization processor, it is best to refer to the hardware manufacturer's Web site.
In order to find out if hardware virtualization is supported on Intel processors, you need to do the following:
- Download, install and run the Intel Processor Identification Utility;
- Go to the "CPU Technologies" tab and read the value in the "Intel Virtualization Technology" field
In order to find out if hardware virtualization is supported on AMD processors, you need to download, install and run the AMD Virtualization Compatibility Check Utility
The following list shows some Intel processor models that have hardware support for virtualization:
- Pentium 4 662 and 672
- Pentium Extreme Edition 955 and 965 (not Pentium 4 Extreme Edition with HT) Pentium D 920-960 except 945, 935, 925, 915
- Core Duo T2300, T2400, T2500, T2600, T2700 (Yonah)
- Core 2 Duo E6300, E6400, E6320, E6420, E6540, E6550, E6600, E6700, E6750, E6850 (Conroe)
- Core 2 Duo E7600, E8200, E8300, E8400, E8500, E8600 and some versions of the E7400 and E7500 (Wolfdale)
- Mobile Core 2 Duo T5500 T5600 T7100 T7200 T7250 T7300 T7400 T7500 T7600 T7600G T7700 T7800 (Merom)
- Mobile Core 2 Duo SU9300 SU9400 SU9600 P7370 P8400 P8600 P8700 P8800 P9500 P9600 P9700 T8100 T8300 T9300 T9400 T9500 T9600 T9800 T9900
- Core 2 Quad Q6600, Q6700 (Kentsfield)
- Core 2 Quad Q8400, Q8400S, Q9300, Q9400, Q9400S, Q9450, Q9550, Q9550S, Q9650 and some versions of the Q8300 (Yorkfield)
- Core 2 Extreme X6800 (Conroe_XE)
- Core 2 Extreme QX6700, QX6800, QX6850 (Kentsfield_XE) Core 2 Extreme QX9650, QX9770, QX9775 (Yorkfield_XE) Xeon 3000, 5000, 7000 series
Atom Z520, Z530, Z540, Z550, Z515 (Silverthorne) - all Intel Core i7 processors
- Pentium Dual-Core E6300, E6500 and some versions of the E5300 and E5400*
- Celeron E3000 series
This section of the guide describes the process of installing Windows Virtual PC, as well as installing the virtual machine itself. Additional configuration and technical details in the examples.
Installing Windows Virtual PC

After installing Windows Virtual PC, you need to install a virtual machine. You can use Windows XP Mode or create your own virtual machine. If you plan to use Windows XP, you can download it using the Windows XP Mode installation package discussed in the Before You Begin section.
A little about integration components
Integration components simplify the use of a virtual machine by improving the interaction between physical resources and the virtual machine environment. They are installed automatically with Windows XP Mode. For other operating systems, they must be installed manually after installing the operating system itself. Integration components are included with Windows Virtual PC and provide access to the following resources:

Installing Windows XP Mode
Installation process:

Attention
- You should not uninstall a package if you will no longer be using it. If you remove it, the Windows XP Mode Feature Pack will no longer be available, and you may lose important data. Uninstalling the package removes the virtual machine and also stops access to the data that was stored in the virtual machine;
- Microsoft recommends that you keep a backup copy of the Windows XP Mode package (WindowsXPMode_xx-XX.exe, where xx-xx is the system language) as a backup in case you need to restore Windows environment XP mode. For example, you can burn an .exe file to a CD or DVD. It is highly recommended to have a backup because Windows XP Mode has 2 VHDs - a parent VHD and a differential disk. A differential disk cannot be used without a parent disk. If the parent drive is removed or corrupted, the existing Windows XP Mode environment should be upgraded. In this case, you need to use the same parent hard drive that was used earlier if you are reinstalling Windows XP Mode.
The installation process looks like this:


After installing Windows XP Mode, you may want to create new accounts for this feature. If you create accounts, they will need to be added to the Remote Desktop User and Administrators groups. Accounts can be either domain or local.
Installing a virtual machine manually
This method can be used if you do not want Windows XP to be your guest. In this section, I will explain how you can create a virtual machine and install the guest operating system that you plan to manage in Virtual PC. You can use the Create Virtual Machine Wizard to create a virtual machine. The wizard will guide you through the configuration of the virtual machine with basic settings that you can customize as you need to use the virtual machine. For example, you can specify a specific amount of memory that the virtual machine will use. The amount of RAM you allocate should be the same as you would allocate to a physical computer. It is desirable to provide a virtual machine with enough memory so that you can easily manage the operating system and applications installed on it. You should also pay attention to how you will install the guest operating system. For example, to install an operating system, you can use a network server for installation, or a physical CD or DVD drive, in which you simply place the installation disk with the system. If you are installing a Virtual PC supported guest operating system, you will need to install the Integration Components Pack after installation.
- You need to open the virtual machine folder. To do this, go to the menu Start”, choose “ Windows Virtual PC". If this item is not immediately in the menu, you need to click in the menu " Start" on the " All programs”, left-click on the folder “ Windows Virtual PC", and then select " Windows Virtual PC»

- AT Windows Explorer folder will open Virtual machines". From the menu area, click on "".

Folder " Virtual machines” provides detailed information about all virtual machines created by the current user, and from this folder you can share, create and modify virtual machines and virtual disks.
- The Create Virtual Machine Wizard opens. After going through the dialogs of the wizard, you will select the required settings for installing the guest operating system.

The first step is to name the new virtual machine and specify its location.
At the second step, the virtual machine creation wizard prompts us to specify the memory settings for the virtual machine.

The third step is to specify the virtual machine disk settings.
- At the end of the wizard, the virtual machine will be displayed in the list of files in the " Virtual machines».

- Installing a guest operating system. If you are using a network installation server, you can safely skip this step. If you are using a CD or DVD disc, then insert it into the drive carriage and proceed to the next installation step. To use the .iso image, do the following:
a) Right-click on the created virtual machine and select " Options»;
B) In the left pane, select the drive where the image is located. In the right pane, select " Open ISO Image". Click the button OK.

- Start the virtual machine. In the list of files, select the virtual machine and click " open". Windows Virtual PC will open the system installer for the virtual machine. The virtual machine will look for the installation disk. The installation will start after the boot disk is found.

- After the installation is completed, you need to install the integration components. Click on the menu " Service" in the window of the virtual machine and select the item "". If the installation does not start after a few seconds, go to the desktop of the virtual machine and open the CD in it. After that, you need to double-click the left mouse button on the file IntegrationComponents.msi.


- Complete the installation using the Integration Components Installation Wizard.

- Reboot the virtual machine. From the menu " Action» virtual machine window select « Reload»

Closing the virtual machine
Before you begin to perform some actions in the virtual machine, you may want to know how you can exit the virtual machine. When you close a virtual machine, it may hibernate, shut down, or shut down. When a virtual machine wakes up from hibernation, it does not have a sequential system boot, so this option is much faster than shutting down and shutting down.
Attention
When you open a virtual machine, Windows Virtual PC provides it with memory and processor resources. The length of time it takes to open a virtual machine depends on the method you used to close it during your last session. The amount of memory you allocated when you created the virtual machine also matters. By default, when you click on the "Close" button in the virtual machine window, the Windows XP Mode virtual machine enters hibernation mode and prompts you to choose the same action for other virtual machines. You can change this option yourself.
Changes to the default close virtual machine action

Shutdown the virtual machine
- In the virtual machine window, click on Ctrl+Alt+Del. Or you can press the key combination CTRL+ALT+END.
- In the guest operating system window that appears, click on " shut down».
- The operating system will be shut down, the resources consumed by it will be returned to the host system.
Attention! If you want the installed software to be displayed on the desktop of the host operating system, you need to log out of your account before you can close the virtual machine.
If you are using certain Windows versions XP, Windows Vista, or Windows 7 in a virtual machine, you have the ability to access the application directly from the desktop on the host machine when the application is installed in the virtual machine. With this feature, you can run existing applications on a Windows 7 host machine without the problems that can arise if they are not compatible with the host operating system.

Business applications running on the Windows XP operating system are great for testing this feature. However, Windows Virtual PC does not support applications that require stereo sound or 3D graphics. This means that user applications, such as games, cannot be launched in this case.

Using USB devices in a virtual machine.
Windows Virtual PC supports USB 2.0 devices, and device sharing or recording from a device to a virtual machine is also possible. The method you will use depends on the type of USB device you are using. If the integration components are installed and allowed to the guest operating system, storage devices and smart card readers are automatically shared between the virtual machines and the physical computer. No additional steps are required for these types of storage devices. For other types, they can be used by attaching them to a virtual machine. For example, you can attach the following types of USB devices:
- Digital cameras;
- USB CD drive;
- MP3 players;
- Phone/PDA/mobile device;
- Webcams/video cameras;
- Wireless network adapters.

Printing from a virtual machine
There are several ways to make a printer available on a virtual machine. The methods that can be used are affected by several factors: whether a printer driver is available on Windows 7, and whether the printer is connected locally or over a network. You can also use the XPS format if your computer supports this printing method.
Using a local USB printer
Attention! This method is suitable if drivers are available for both systems - the Windows 7 host system and the guest operating system. You only need to go through a few steps to install the printer on the virtual machine. The following steps assume that you have already printed to the printer using the host operating system.
Make sure the printer is turned on and available for driver installation. For example, you can install drivers on it using a CD.
- Connect the printer to the virtual machine. To do this, in the virtual machine window, click on " USB" and then to " Device_name Sharing».
- Install the printer driver on the guest operating system. You can install the driver via the Internet or use the CD.
- Disconnect the printer from the virtual machine. To do this, from the virtual machine window, click on " USB" and then to " Device_name Release».
- Reboot the virtual machine. To do this, from the virtual machine window, click on " Action" and then to " Reload».
- The printer will be available on both systems, both host and guest.

If you are using a Windows XP guest, you must manually install the driver for the printer to be used.

Printing from a virtual machine
- Go to the virtual machine and log into the account if necessary (you will be logged in automatically if the option associated with saving a password is set).
- Do the following:
a) On the desktop in the virtual machine, right-click on the file and select the option " Seal»
b) Open an application that has a print option available and use the print command. - All printers that are available in the virtual machine are in the list of printers. Select the desired printer and click OK
You can also use Print to XPS Document from your virtual application or virtual session to save the printed file on the host, and then you can print the file using a printer installed on the host computer. This option is useful when drivers are not available for the guest operating system or you do not want to install a printer on it. This method requires the following configuration:
- Microsoft XPS Essentials Pack installed on the guest operating system. Microsoft XPS Essentials
The Pack can be downloaded from the following link: Windows Hardware Developer Central site . - The virtual machine is configured and has access to disks and partitions on the host computer, so that you can simply save the file (By default, when Windows XP Mode is installed, the system is configured to allow access to disks and partitions of the host system. For other virtual machines, you need to install components integration).
- A working printer must be installed on the host operating system.

Appearance new version operating system is stressful for most users. Therefore, one of the main tasks of developers is to make the transition as smooth as possible. This does not always work out, but the creators of Windows 7 turned out to be understanding people, and therefore they introduced a virtualization package into the system that was new at that time, allowing XP to run inside the “seven”.
General information
A virtual machine emulates hardware, creating an isolated environment inside the system in which any OS can be installed. This allows you to solve many problems with software compatibility, and also makes it possible to "try" another system without deleting the current one. You can work with physical drives, install games and programs for Windows XP without giving up the "seven", save files and perform other tasks. Let's see how to install a virtual machine on Windows 7 to take advantage of all its useful features.
Checking for Virtual PC
If you installed Windows 7 Ultimate, Enterprise, or Professional, then you have the Virtual PC feature by default. You just need to make sure that the processor supports hardware virtualization. This can be done using the utility from Microsoft Hardware-Assisted Virtualization Detection Tool.
Download the utility and run it. Depending on the results of the processor test, the following messages may appear on the screen.

Enabling / disabling virtualization is done in the BIOS settings, so before installing Virtual PC manually, make sure that the option is enabled.
The option may be called Intel_Virtualization Technology, AMD-V, Virtualization Extensions, etc. Find this feature in the BIOS and change the value from "Disabled" to "Enabled".  If after that it is not possible to start the virtual machine, Windows offers to install a special patch. At this stage, it is important to choose the correct bit depth of the system - x32 or x64.
Manual installation
Installing a virtual machine on Windows 7 includes two steps:
- Installing Windows Virtual PC;
- Installing a Windows XP Mode Virtual Disk.
First, let's deal with Virtual PC:

Then you can proceed to install the Windows XP Mode virtual disk:

First start
After installing XP Mode, the "seven" must configure it further in order to create a virtual disk. Therefore, after clicking the “Finish” button, the following window will appear on the screen, in which there will be another license agreement, the terms of which you must accept.  Specify the folder where the virtual disk will be located and create the first user.
  Enable the security features of the system you are building. Doing this is optional. Click Start Installation.
  The installation process will start; you just have to wait for it to finish.
New virtual machine
The system is prepared, the virtual disk is installed. It remains to create a new environment and run Windows XP in it.

The sandbox you just created will appear in the XP Mode main window. Right click on it and select "Open". Select the "DVD drive" option and specify the path to the physical drive (if you have a disk with the Windows XP distribution kit) or a pre-downloaded ISO image. The system installation wizard will start.

All you have to do is install Windows XP in normal mode to start using this system in an isolated environment created using the hardware virtualization feature.
After the installation is completed, you can use all the features of the OS from Microsoft: install gadgets for Windows XP, install games that do not run on the "seven", run outdated programs, etc. - to do this, simply run XP mode through the emulator. 
Alternative virtual machines
In addition to the built-in hardware virtualization feature, Windows 7 supports third-party programs that help you create an isolated environment and install any operating system into it.
First of all, it is necessary to note such virtualization systems as VMWare Workstation and Oracle VM VirtualBox. Let's look at the example of Virtualbox, how such programs work.
Oracle VM Virtualbox
Download and install Virtualbox. It is installed in the same way as any other program, so you should not have any problems.
- Launch Oracle VM VirtualBox and click "Create". The Sandbox Creation Wizard opens.

- Specify the name of the new machine, the type and bitness of the system, and then click Next.

- Set the amount of RAM that will be automatically allocated when the virtual machine starts up for its operation.

- Create a new hard drive and click next.

- Specify the disk type. If you don't know which one is better, leave the first item on the list checked.

- Select the storage format - it is recommended to specify "Dynamic Image".

- Specify the name and scope of the new virtual hard drive, and then complete the wizard by clicking the "Create" button.

The isolated environment is ready. To start working with it, mark it with the left mouse button and click the "Run" button in the top menu.  A new window will appear on the screen through which you will first install and then interact with Windows 7 or another installed operating system. Specify the path to the physical disk or ISO image with the Windows distribution and click Continue.
  We will not consider the installation process of Windows 7 in detail here, since it is no different from a regular installation on a physical hard drive. You just need to wait for the system installation to complete.
The virtual machine is launched through the Oracle VM VirtualBox program. You will need to open this utility and select the desired virtual system image from the main menu on the left.
As for other utilities, in VMWare Workstation the process of creating a virtual machine almost completely repeats the procedure described above.  Some other programs may require additional configuration, so for beginners they may seem somewhat complicated.
Conclusion
Creating a virtual machine and installing a system on it is quite simple, but you need to be careful - since April 2014, Windows XP is not supported by Microsoft, therefore, even emulating the mode of this OS, you make your system vulnerable.
In addition, XP mode is not supported on machines with Windows 8 installed, and there is no way to fix this. The Virtual PC feature was originally designed to seamlessly transition between systems, so there's no way to jump over a version.
However, you can try installing a system other than Microsoft Windows, such as Linux.  It is quite difficult to immediately switch to it, besides, you have to abandon most of the programs familiar to Windows. In emulation mode, you will gradually get used to the peculiarities of interacting with the new system and decide whether you need to completely switch to it.