
To bring Windows 10 to the public, Microsoft chose a strategy that irritates many users: the expression “forced update” passes from mouth to mouth.
The main frustration when upgrading to Windows 10 is caused by the so-called “Get Windows 10 Tool” (GWX) utility, which can be found on the Quick Launch panel in the form of a small Windows 10 icon. Every time you start the system, it pops up and encourages you to upgrade to the new version.
This is especially unnerving for those users who decided to stay on Windows 7 or 8.1. However, for everyone who does not want to follow Microsoft's lead, there is a solution: the GWX utility is relatively easy to remove. Since it is performed as a Windows update, it is disposed of in the same way.
1 1 Remove the intrusive update

To get started, go to Control Panel, and then click, depending on the view, on “Add or Remove Programs” or on “Programs and Features.” Now in the left column, click on “View installed updates" and look for update KB3035583.
The fastest way to do this is through the search bar located in the upper right corner. Select the corresponding line and click on “Delete”. In the next window, select “Yes”, and after removal, restart your computer.
2 2 Preventing forced installation

Even though the GWX utility has now been removed, Microsoft will still try to install the Windows update on your computer. This must be prevented. Go to Windows Update (for example, through “Control Panel | System and Security | Windows Update”) and here in the left column, click on “Check for updates.”
At the end of the search, there should be at least one important update in the list. Click on the link that leads to a list of important updates and find the infamous one under serial number KB3035583. Right-click on the line and select the “Hide update” option.

Close the list by clicking “OK”. Immediately, Windows will no longer notice this component, and your computer will remain free of the GWX utility.
3 3 Restoring the update utility

If you subsequently want to update, you can just as easily restore this utility. To do this, in Windows Update, click on “Restore hidden updates”, check the box next to update KB3035583 and select “Restore”.
Windows 10 automatically installs updates in the background. Most of the time this is good, but sometimes you get an update that breaks everything. In this case, you need to uninstall that particular update.
Windows 10 is more aggressive about updating than previous versions. For the most part, this is a good thing, since too many people never bother installing updates—even critical security updates. However, there are many PCs and configurations that stop working correctly after an update. There are several ways to delay installing bad updates. You can prevent certain types of updates from downloading automatically. And, starting with the Spring 2017 update, you can easily pause or defer non-critical updates for a month or more.
Unfortunately, none of these strategies help if you've already downloaded and installed an update that broke something. This gets even more complicated if the update is a major new build of Windows, such as the Fall Creators Update released in September 2017. The good news is that Windows provides a way to remove major build updates and smaller, more typical Windows updates.
Removing major build updates
Windows 10 has two different types updates. In addition to traditional patches, Microsoft sometimes releases larger "builds" of Windows 10. The first major update for Windows 10 was the November Update in November 2015, which made it version 1511. The Fall Creators Update, released in September 2017, was version 1709.
After installing a new build, Windows saves the files necessary to uninstall the new build and revert to the previous one. The catch is that these files are only kept for about a month. After 10 days, Windows will automatically delete the files, and you will no longer be able to return to the previous version without reinstalling.
Note: Rolling back a build also works if you are part of Windows programs Insider, and you help test new, pre-unstable builds of Windows 10. If the build you install is too unstable, you can revert back to the one you were previously using.
To cancel the build, press Windows + I to open the Settings app and then click Update & Security.

On the Update & Security screen, go to the Recovery tab, and then click the Get Started button under the Go back to a previous version of Windows 10 section.

If you don't see the "Go back to a previous version of Windows 10" section, it's been more than 10 days since you upgraded to the current build and Windows has cleared those files. It is also possible that you ran the Disk Cleanup tool and selected "Previous Windows Installations" files to remove. The build is handled much the same as new versions of Windows, so you uninstall the build the same way you uninstall Windows 10 and go back to Windows 8.1 or 7. You will have to reinstall Windows 10 or restore your computer from a system backup to go back to the previous build after these 10 days have passed.
Also, note that rolling back a build is not a way to permanently discard future new builds. Windows 10 will automatically download and install the next major build released. If you are using a stable version of Windows 10, this may take several months. If you are using the Insider Preview build, you will likely receive the new build much sooner.
Uninstalling common Windows updates
You can also uninstall the regular, smaller updates that Microsoft rolls out consistently - just like in previous ones Windows versions.
To do this, press the Windows + I button to open the Settings app and then click Update & Security.
On the Update & Security screen, go to the Windows Update tab, and then click the View update history link.

On the View Update History screen, click the Uninstall updates link.

You'll see the familiar interface for uninstalling programs, showing a history of recent updates sorted by installation date. You can use the search box in the upper right corner of the window to search for a specific update by its KB number if you know the exact update number you want to remove. Select the update you want to remove and click the "Delete" button.

Please note that this list allows you to remove updates that installed Windows since the installation of the previous “build”. Each build is a new list with new minor updates applied to it. Additionally, there is no way to avoid a particular update forever, as it will eventually be pushed into the next major build of Windows 10.
To prevent a small update from being reinstalled again, you may need to download Microsoft's "Show or hide updates" troubleshooter and "block" the update from automatic download in future. This isn't necessary, but we're not entirely sure that Windows 10 will end up trying to re-download and install updates that you manually removed. Even the “Show or hide updates” troubleshooter can only “temporarily prevent,” according to Microsoft.
Windows 10 updates will hopefully be more stable than ever thanks to the new Insider program, which allows people to test updates before they're rolled out to everyone, but you may find that at some point it becomes necessary to uninstall the problematic update and wait corrections.
Microsoft is quite optimistic about the worldwide upgrade of computers to Windows 10: by 2018, it hopes to overcome the mark of 1 billion devices with the new operating system.
In less than a year, Microsoft managed to acquire over 300 million devices running Windows 10. However, the figure would hardly have been so impressive if not for the company’s aggressive actions, which sometimes force users to install a new version of the OS.
Constant offers to upgrade that you can no longer refuse, free distribution of the system, exclusive projects for Windows 10 - all this is part of the company’s big plan to conquer computers around the world.
Despite all the delights of the system, many do not need the update and want to stay on their favorite “seven” or even XP. But Microsoft has a different vision, so the company constantly changes the update system, and each time it becomes more and more difficult to refuse the offer.
A proposal can appear at any time during system operation, which is associated with several curious cases. So, a similar proposal appeared during a weather forecast in Iowa. A window popped up live on top of the weather map.

In addition, more and more complaints are appearing that the system has been updated even without warning the user. Just step away from the computer for a few minutes, and at that moment the process of installing a new system can begin. Or the installation of Windows 10 may occur after the system is rebooted during the installation of a new update package.
Also, constant changes occur with the update window. At first, the option to refuse the upgrade disappeared, and the choice was only between “Update now” and “Update at night.” In this case, simply closing the window does not help - soon it appears again.
Now, when there are less than two months left until the end of the free update, Microsoft is going all-in and simply won’t let you refuse it.
Of course, Microsoft claims that the choice is always up to the user, but now the rules have become even stricter, so the system allows you to change the update time only once, after which the process will begin automatically.
But if the user needs more time to weigh the pros and cons, or is terrified of losing his good old operating system, then there are several ways to delay the update's doomsday.
Simple method
The Get Windows 10 (GWX) application is responsible for updating the system. It is this that displays all these annoying messages and windows. The application appeared on all computers with Windows 7 and 8/8.1 after the system update and is protected from deletion. You shouldn’t even try to get rid of it, because the application will in any case find a way to return to the system during the next update.
Everything related to the transition to Windows 10 gets to the computer through minor system updates, so the most effective way- just disable all updates.
After this, if there have been offers to update the system, it is worth cleaning the computer. For this purpose, many enthusiasts release their own utilities (for example, I Don't Want Windows 10), which remove everything that is somehow related to the annoying upgrade. But you should be careful, since such home-made programs can easily “infect” the system with viruses. Therefore, to be sure, it is better to do everything manually.
Uninstalling updates manually
Disabling automatic updates may cause you to miss critical updates that fix system problems and protect against new threats. Therefore, it is worth selectively removing only those updates that are responsible for installing the GWX utility.
On Windows 7, in the Update Center you need to find updates under the codes KB3035583, KB2952664, KB3021917, KB2977759 and KB3083710; in Windows 8 - KB3035583, KB2976978 and KB3083711. However, after restarting the computer, these updates will return, as they are classified as “required” updates that are installed automatically.
In addition to these packages, there are several more that can install GWX, although Microsoft released them for other purposes: KB30383710, KB3035583, KB2990214, KB3014460, KB3083711, KB3021917, KB2977759, KB2976978 and 2952664. After this, you need to prevent the system from making updates to registry level to these packages did not return after rebooting the system. Full instructions are published on the community website Microsoft .
After all these manipulations, the proposals for switching to a new system should disappear, but some users note that after the next system update, the line disappeared from the registry.
Also, do not forget that the system has downloaded all the files necessary for the upgrade, so they need to be deleted. This is done using the standard Disk Cleanup utility. After scanning the system, you just need to click the “Clean up system files” button.
Those wishing to upgrade their operating system to the new Windows 10 are faced with problems. If you tried to reserve an update, but you don’t receive it or don’t find the update icon in the taskbar where it usually appears, after reading this article everything will fall into place, and you will have the best OS from Microsoft at the moment. The problem is solved in several ways, the meaning of which is not significantly different. This is a forced update via:
- command line;
- "Windows Update";
- Media Creation Tool application.
Through the Support Center
Such an update is implemented by launching the “Support Center” using several methods.
Launch via control panel
- Find the installation icon in the form of a white flag in the taskbar and click on it with the left mouse button.
- Click on the link with the appropriate name.
- The installation tool for Windows Update will launch.
- In the left frame, click on the link that says: “Search for updates.”
Via "Control Panel"
Such a launch is implemented by sequential actions:
- We go to the Control Panel, which is launched through Start.
- We visualize its contents in the form of large icons.
- Immediately launch Windows Update.
Via Start
- Open the Start menu and enter the appropriate installation query in the search bar.
- Launch "Update Center".
- In the Windows response that appears, click on the “Get Started” button.
After the Update Center has started doing its job, you will have to wait a little. When the message “Upgrade to Windows 10” appears, follow the steps below:
- Click on the “Get Started” button.
- We wait until the Windows 10 update downloads and the installer prepares before installing the downloaded files.
- Once the download is complete, the installer will prompt you to restart your computer before installing the Windows 10 update.
- We confirm the restart so that the update to Win 10 will start.
See also: Windows 10 mail not working
Before the PC boots, updates will be installed, system files will be modified, after which the computer will start with Windows 10 installed.
Command line procedure
This forced update is simple and fast way get a Windows 10 update - using the command line.
- We reserve the download of update files (after this the corresponding icon will appear on the Taskbar).
- We enable automatic updating (the Update Center service must start along with the operating system).
- We clear the “SoftwareDistribution\Download” directory in Windows folder.
- You will then need to run a command interpreter with administrator privileges.
- Enter “command” in the Start search bar, call up the context menu of the corresponding icon and click “Run as administrator.”
- Insert or enter the command “wuauclt.exe /updatenow” into the line, confirming its execution by pressing “Enter”.
- In a few minutes (not immediately) it will start Windows boot 10 via the OS update tool.
- After the download is complete, the computer will ask to restart, as a result of which your updates operating system before Widnovs 10 will be installed.
Using the Media Creation Tool
The update program will not only help you update the operating system to Windows 10, but will also download an image with its installation files, and also create bootable USB flash drive For clean install Windows 10. This method is notable for the fact that it does not require a reservation or a long waiting process until the turn comes - the user only needs to select the OS version and confirm its download, and the installation will be carried out automatically. All user data will be saved in case of update. MCT also allows you to roll back the system state to a previous version from a backup within 30 days if something is not to your liking or does not go as expected.
- Download the Media Creation Tool and launch it.
- Select the item as in the screenshot and click “Next”.
See also: Customizing the Windows 10 Welcome Screen
- We wait while the application downloads the necessary update files to Win 10. At this time, you can minimize the window and go about your daily business.
- The completion of the process will be marked by the appearance of a window with the license terms.
- We carefully study them and, if accepted, click “Accept”.
- Be sure to select the first option if you don’t want to reinstall all applications and lose your own data.
- We check the specified settings and click “Install” to get Windows 10.
- The "ten" version is detected automatically. In our case, we installed Windows 10 Pro.
- We are waiting for the update installation operation to complete.
- You can still cancel the update at this step if you change your mind.
- Confirm PC restart.
- After this, its parameters will be configured. After a couple of minutes, the computer will restart again and boot with the new OS.
Possible problems
Windows 10 includes automatic updates with no option to reject or cancel them. Often, automatic installation of updates leads to graphics system failures, which can cause monitors to turn off. One of the first updates from Microsoft included numerous bugs related to the security system, which resulted in the permanent termination of the “explorer.exe” process, which is responsible for the window interface. The reason for this was that the update process, one of the first Windows 10 updates, could not complete correctly. Therefore, a message appeared about the impossibility of completing the installer’s work correctly, and cancellation would result in a mandatory reboot of the PC. The process would then begin again, and this could continue cyclically due to the fact that updates are imposed by Microsoft without the ability to cancel or refuse the installation process.
Recently, these problems have been solved, but no one is immune from their recurrence or the emergence of new, possibly more serious ones.
(Visited 4,285 times, 1 visits today)
windowsprofi.ru
A way to force upgrade your computer to Windows 10
Today, Microsoft officially announced the launch of an update to Windows 10 in 190 countries on our planet. But some users are having trouble getting the update on Windows 7 or Windows 8.x. Let us remind you that the update is distributed free of charge only to owners of a legal license for Windows 7 and Windows 8.x. And if you still have problems, then this material is for you.
The method is quite simple. So, what should you do if Windows 7 or Windows 8.1 is silent about the update, although everything is already ready, and the update has been reserved?
- Delete the contents of the folder C:\Windows\SoftwareDistribution\Download. After this, delete the $Windows.~BT folder, which is located in the root of the disk. In order to see this folder, you must enable the display of hidden files. You will need to confirm the action with administrator rights.
- After that, launch the command line (you can find it in the “Start” search) as an administrator and run the command wuauclt /updatenow.
- Some time after this, the download of the update will begin.
There is a method that automatically fixes problems, but we do not recommend using it.
And although this method is quite official, it may also have side effects. Unfortunately, during the process of fixing errors, new problems may appear that will be transferred to the updated system. Then they will be more difficult to correct. We strongly do not recommend using utilities that automatically correct errors before upgrading to Windows 10.
- Download a special small utility that corrects problems with updates from the link (you can also try using this utility).
- Let's launch it. The utility will find and fix errors in the update center.
- After this, we either wait for the update search to automatically run (every two hours), or we go and kick the Windows Update service using the wuauclt /updatenow command in a command prompt run with administrator rights.
- If everything went well, after some time you will see the update downloading or available.
Don't forget that we currently have a separate list of questions and answers, as well as an active discussion in a special material.
thanks to Sergey Dmitriev, Madne5 and others for the tip
Noticed a mistake? Select the text and press Ctrl+Enter!
onetile.ru
How to upgrade to Windows 10? Forced upgrade to Windows 10.
Want to get a new version of Windows for free, but can't find the update icon?! This simple article will help you solve this problem!
Before the release of Windows 10, many with older versions of the operating system had a mysterious icon on the taskbar that offered to “Reserve” a free upgrade to the new version of the operating system.
But not everyone went so smoothly and not everyone can just install a new version of the OS.
In this case, there are only 2 solutions:
- Forced update via command line.
- Forced update via "Support Center".
So, let's start with the simplest and the right way:
1. First, we need to find the checkbox icon in the bottom right corner of the screen in the panel Windows tasks.
2. Click on it and select “Open support center”.
3. Now in the window that opens, in the left column at the bottom, go to the “Windows Update” item.
5. Wait a couple of minutes while Windows checks for new updates.
6. In the Windows response that appears, click on the “Get Started” button.
7. We wait until the update is downloaded and ready for installation.
8. After downloading and preparing the update, Windows will ask you to restart your computer.
9. We agree and reboot.
That's all for this instruction. If something doesn’t work out for you, try the second method, or write in a comment, the author will answer you!
This method is a little more complicated but it also works!
1. Press and hold the “Windows Button” key combination and the “R” key (Russian “K”).
2. In the window that appears, write “cmd” and click “OK”.
2. The following window should appear;
3. Now copy the following text “wuauclt.exe /updatenow”.
4. In the black window that opens, right-click and select “Insert”.


6. The window will look like this:

7. Now follow these instructions:

That's all! 😉 If you have any questions, please write in the comments just below this article!
LookDevices.ru
How to force download and install the Windows 10 Free Upgrade Wizard (KB3012973)
The new version of Windows, Windows 10, has been officially published today and is available for background download to all Windows 7 and Windows 8.1 users who have submitted a request to reserve and freely upgrade their OS to Windows 10 (via the upgrade notification mechanism). Such users should see a window asking them to upgrade to Windows 10.
For Windows 7 and Windows 8.1, the utility that updates to Windows 10 (Windows 10 Upgrade Update) is available through Windows Update and is contained in update KB3012973. The KB3012973 update is 2-3 GB in size (depending on the system version) and must be downloaded entirely over the Internet.
 In the event that you do not want to wait until this update is downloaded and installed (or if the update wizard has not started), in order to quickly begin the update process to WinX, you can force download and install the update for your version of Windows 7 and Windows 8.1.
Method 1: Command wuauclt.exe /updatenow
To start the Windows 10 upgrade process on Windows 7 and Windows 8.1, open a command prompt with administrator rights and run the command:
wuauclt.exe /updatenow

After running the command, open the Windows Update item in the Control Panel and check if the process of checking system requirements and obtaining Windows 10 has started.

Once the download is complete, you will be prompted to start the Windows 10 upgrade process.
Method 2: Install KB3012973 using PowerShell
Another way to run Windows 10 upgrade is manual installation KB3012973 using PowerShell. For this we need a special module - Windows Update PowerShell Module
 Advice. If both of the methods described do not help you update to Windows 10, you can update using a regular bootable disk or Windows 10 ISO created using Windows utilities 10 Media Creation Tool.
 winitpro.ru
How to force upgrade your computer to Windows 10
woodhummer 07/29/2015 - 21:49 Workshop
July 29 has finally arrived and the first lucky ones have begun to receive the release of Windows 10. In this regard, as WCCFTech reports, a trend towards a significant increase in the load on Internet channels is beginning around the world. To update the OS, each computer must download more than 3GB of installation files, and from the very beginning of the update, Microsoft's 40 TB/sec channels were loaded at more than a quarter of their bandwidth. Due to increased traffic, Internet speeds will therefore decrease significantly during this week.
Forced update
Perhaps this is why some computers do not have time to automatically upgrade to “ten”. Let's look at how to force an OS update:
- Find the folder C:\Windows\SoftwareDistribution\Download and delete all its contents.
- In the root of drive C, find and delete the $Windows.~BT folder (you know how to show hidden folders in Explorer and delete hidden folders).
- From the command line, run wuauclt /updatenow (administrator rights required).
- The update will begin after some time.

Don't forget before installing
- Make sure your computer meets the minimum system requirements to install Windows 10.
- Before installing the new OS, it will update the old operating system.
- Be sure to save your license key, otherwise you risk losing it.
P.S.
We hope that you will be able to update your Windows OS to version 10. Still, we advise, if possible, to wait for a standard system update.
How to disable Windows updates - this question is asked by users who need to prevent the installation of system updates on their computer. With default settings, the operating system automatically searches for, downloads and installs updates released for Windows.
The corporation releases update packages for the Windows operating system approximately once a month. From time to time, Microsoft makes unscheduled updates designed to solve emerging problems in the operation of the OS, or to close discovered security holes in Windows.
The main part of the updates concerns system security. When installing updates, system fixes are applied or some new features are added.
In addition to regular updates, so-called major updates are released in Windows 10, after which, essentially, the computer is installed a new version Windows 10. Similar major updates are released once or twice a year.
Some users disable system updates for various reasons. The main reasons for refusing Windows updates:
- sometimes it happens that after installing updates, the normal operation of Windows and installed programs is disrupted;
- if the user has a limited Internet connection, downloading updates affects the amount of traffic consumed;
- lack of free space on the computer disk;
- after applying the update, the user is afraid of losing activation of the operating system;
How to disable automatic updates? You can solve the problem using system tools, or using third-party software. In this article we will look at 5 ways to disable updates on Windows 10 using the operating system.
Simply disabling Windows Update on Windows 10, as in Windows 7 or Windows 8, will no longer work. The maximum that can be done in this way is to pause updates for up to 35 days.
How to disable automatic updates in Windows 10 (1 method)
Windows 10 tools automatically detect, download and install updates on your computer.
On Win 10, you can disable updates in a way that disables the Windows Update service. This method works on all versions of Windows 10 and ensures that Windows updates are disabled forever.
Login to "Administration" from the Control Panel, or using more easy way: In the Windows Search box, type "administration" (without the quotes), and then open Administrative Tools.
In the “Administration” window, double-right-click on the “Services” shortcut.
In the “Services” window that opens, in the “Services (Local)” section, find the Windows Update service.

In the “Properties: Windows Update (Local Computer)” window, in the “General” tab, change the “Startup type” setting to “Disabled”.
In the “Status” setting, click on the “Stop” button to stop the Windows 10 update service.

After this, Windows 10 updates will stop coming to your computer.
To enable automatic updates, in the Properties: Windows Update (Local Computer) window, select your preferred startup type: Automatic (Delayed Start), Automatic, or Manual.
How to disable Windows 10 updates using Local Group Policy Editor (method 2)
Now let's see how to disable Windows 10 updates in the Local Group Policy Editor.
Please note that this method is not suitable for Windows 10 Home (Windows 10 Home) and Windows 10 Single Language (Windows 10 Home for one language). This feature is present in older versions of the operating system: Windows 10 Pro (Windows 10 Professional) and Windows 10 Enterprise (Windows 10 Enterprise).
First you need to log into the Local Group Policy Editor. In the Windows Search box, type "gpedit.msc" (without the quotes), and then launch the editor.
Alternatively, you can enter the Local Group Policy Editor in the following way: press the “Win” + “R” keys, enter the expression “gpedit.msc” (without quotes) in the “Open” field, and then click on the “OK” button.
In the “Local Group Policy Editor” window, follow the path: “Computer Configuration” => “Administrative Templates” => “Windows Components” => “Windows Update”.
In the “Windows Update” section, find the “Set up automatic updates” item, right-click on it, and select “Change” in the context menu.

In the Automatic Update Settings window, enable the Disabled setting, and then click OK.
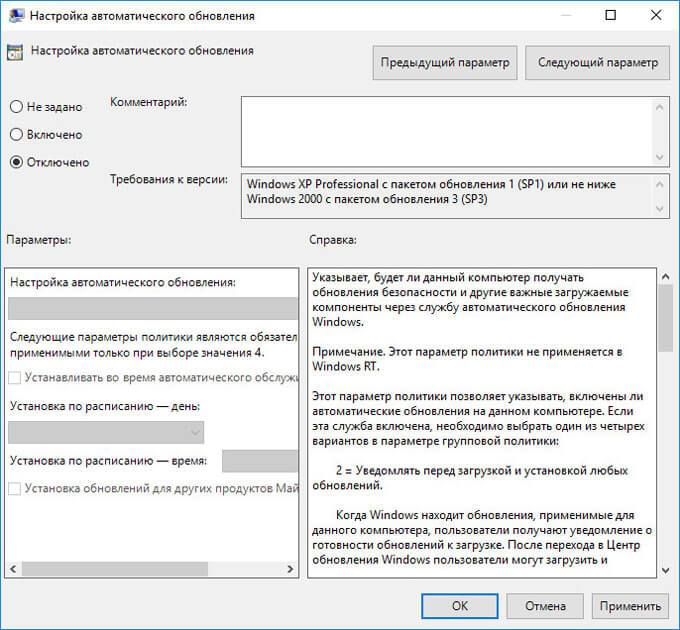
After this, the operating system will not search for, download or install automatic Windows 10 updates.
Disable Windows 10 update in Registry Editor (3rd method)
The third way to disable Windows 10 updates is to make changes to the Registry Editor. This method works in all versions of Windows 10.
In Windows Search, type "regedit" (without the quotes), and then run the command.
In the Registry Editor window, follow the path:
HKEY_LOCAL_MACHINE\SOFTWARE\Policies\Microsoft\WindowsWindowsUpdate\AU
In the Registry Editor window, right-click on the free space. From the context menu, select New and then DWORD Value (32-bit). Give the parameter a name: “NoAutoUpdate” (without quotes).

Right-click on the “NoAutoUpdate” parameter and select “Change...” in the context menu.
Enter the parameter “1” (without quotes) in the “Value” field and click the “OK” button.

To enable updating in Windows 10, you need to change the value of the parameter to “0” (without quotes), or simply delete the “NoAutoUpdate” parameter from the registry.
Enable metered connection in Windows 10 (4th method)
This method allows you to configure a metered connection in the Windows operating system if the network is accessed via Wi-Fi.
Follow these sequential steps:
- Enter system settings.
- From the Settings window, go to Network & Internet.
- Go to the “Wi-Fi” setting, click on the “Manage known networks” link.
- Choose yours Wi-Fi network, click on the “Properties” button.
- In the “Set as metered connection” parameter, move the slider to the “Enabled” position.
After this, the Windows 10 operating system will limit the search for and receipt of updates. With this method, some updates will be installed into the operating system. Major updates such as OS version updates will be disabled.
Disabling access to Windows Update (method 5)
In new versions of Windows 10, after the user disables it, after some time the Update Center service on the computer is forced to turn on. Therefore, we need to block Windows Update's access to Microsoft update servers.
First, disable the Windows Update service (see method 1).
- Follow the path:
- Right click. Select New => Partition. Give the section a name “Internet Communication Management” (hereinafter without quotes).
- Click on the created “Internet Communication Management” section, create a new section inside with the name “Internet Communication”.
- Enter the “Internet Communication” section, right-click on the free space.
- From the context menu, select New => DWORD Value (32 bits).
- Name the created parameter “DisableWindowsUpdateAccess”.
- Double-click with the left mouse button on the “DisableWindowsUpdateAccess” parameter. In the “Edit DWORD Value (32-bit)” window, select “1” in the “Value” field.
In the Registry Editor, do the following:
- Enter the section:
- Create a "DWORD (32-bit) Value", name it "NoWindowsUpdate" with a value of "1".
Create a new parameter in the Registry Editor window:
- Follow the path:
- Create a "DWORD Value (32-bit)", name the parameter "DisableWindowsUpdateAccess" with a value of "1".
Close the Registry Editor window and restart your computer. When checking for updates, Windows Update will show error "0x8024002e".
To enable access to Windows Update servers, remove previously created settings from the registry.
Turn off automatic updates from the command line
To stop and then disable the Automatic Updates service, use the command line:
- Run Command Prompt as Administrator.
- Run the following commands sequentially:
To start and enable the Automatic Updates service, run the following commands:
Net start wuauserv sc config wuauserv start= auto
Disable checking for updates in Windows 10
If all else fails, turn off checking for updates in Windows 10. If automatic checking does not work, it means that updates will not be downloaded to your computer.
To disable checking for updates, follow these steps:
- Run Command Prompt as Administrator. In the command line interpreter window, enter the command and then press the Enter key:
- Go to the path: C:\Windows\System32, find the file “UsoClient.exe”.
- Right-click on the “UsoClient.exe” file and select “Properties” from the context menu.
- In the Properties: UsoClient window, open the Security tab.
- Under the “Groups or Users” section, click on the “Edit” button.
- In the “Permissions for the “UsoClient” group” window, remove all permissions for each group or user one by one. Don't forget to click on the "OK" button.

After this, restart your computer.
To restore the permissions of the "UsoClient.exe" file, run Command Prompt as an administrator, and then run the command:
Icacls c:\windows\system32\usoclient.exe" /reset
Restart your computer.
If necessary, you can manually check for and install updates from Windows Update.
Conclusions of the article
If necessary, the user can disable automatic updating of Windows 10 permanently using operating system tools: by disabling the Windows Update service, in the Local Group Policy Editor, or in the Registry Editor.