
So, you became the owner of an Android smartphone. These tips and tricks will help you greatly simplify its use and uncover its secrets.
Android Secret #1. Quick access to contacts
Android allows you to create desktop icons for your contacts. To do this, you need to hold down the display with your finger until the menu appears, then select "Shortcut", then "Contact", and then select the contact you need from the list.
Almost all models of Android smartphones allow you to use voice search, which is much faster than manual typing. To do this, on the Google search widget, click the microphone icon and say the search word or even a phrase, which is immediately converted to text on the Google search page.
By the way, the Gingerbread keyboard also supports voice input. Thus, you can type SMS, messages in online messengers or take notes.
Android Secret #3. Quick Settings
The Power Management widget lets you quickly toggle Wi-Fi, Bluetooth, GPS, and screen backlight right from your Android desktop, rather than navigating through settings looking for the right menu item. To put it on the screen, you need to call up the menu by long pressing on the display, go to "Widgets" and select the "Power Management" widget there.
Android Secret #4. Contact sync
On Android, it is not necessary to use third-party programs to synchronize contacts and their Reserve copy. Your Gmail account is an excellent repository for contacts. When you add a new contact to your smartphone, it is automatically saved in your Gmail account in the menu of the same name. When you use Gmail from your computer to enter new contacts and edit them, the latest edits and contacts will automatically appear on your smartphone.
Android Secret #5. Bookmark sync
If you are using a browser Google Chrome, the saved bookmarks can be synchronized with the smartphone's browser. To do this, just download the application for Android and the extension for Google Chrome.
Android Secret #6. Android as a flash drive
When you connect your Android smartphone to your computer with a USB cable, the message "Enable USB storage" appears. It will allow you to use the smartphone's memory card directly, like a USB flash drive. If the message does not appear, then you need to go to Settings> Network> USB Settings and select "Removable Disk".
Android Secret #7. File management
One of the advantages operating system Android in that you can fully use internal memory smartphone to store absolutely any files, move them, copy, delete, etc. But if the built-in functionality is not enough for you file manager, I recommend installing AstroFileManager, which will greatly simplify navigation and sorting.
Android Secret #8. Special symbols
Quick access to special characters, without switching the keyboard layout, is possible with a long press on a dot or comma. The same applies to a set of numbers.
Applications social networks, such as Facebook, Vkontakte, Twitter and MySpace can sync friends with contacts in your phone book. Sync can be managed from the Accounts & sync menu in Settings.
Android Secret #10. Share content
Android Secret #11. Applications without Android Market
Unlike Apple's iOS, Android doesn't have a hard-coded connection to the Android Market for downloading and installing apps. You can download any *.apk file from the Internet and install it without the Market, just like on a computer. But by default, for security, this feature is disabled. To enable the installation of files not from the Android Market, you need to go to Settings> Applications, and check the box next to "Unknown sources".
Modern smartphones and tablets are much more like a full-fledged PC than a simple device for communicating and receiving information. Now they are equipped with quad-core processors with a frequency of 2 GHz, gigabytes random access memory and Full HD screens. The only problem is that to power all this power, it is not a cable from an outlet that is used, but a small battery, the capacity of which is rarely enough for more than a day. Well, let's see how to fix it.
In the article I will try to figure out whether modern smartphones really consume too much energy and in fact they need much less. First, let's take a look at the power saving methods that are already being used in the Android operating system, and how much they can reduce overall energy consumption. Then we will try to apply popular energy saving methods, which are often talked about on forums and blogs, and look at the result. In the end, we will apply heavy artillery in the form of methods such as undervolting and downclocking. Go.
Standard Power Savings
There is a myth among smartphone users that in fact mobile devices should live much longer than they do now, and the real problem is not in the capacity, but in the bungling of Android and iOS developers - supposedly they simply do not want to optimize the OS due to laziness or collusion with iron manufacturers who need to sell gigahertz and gigabytes. OK, let's spend our time reading the documentation and try to figure it out. So, four myths about why Android eats up so much energy.
- Java is a brake that devours the processor and memory. The first thing to remember is that Android doesn't have Java. Register is used here. virtual machine Dalvik, designed specifically for embedded devices. The developers of Plan9/Inferno have already written about the advantage of a registered VM, and a link to their article is at the end. In short, the registered VM differs from the classic Java stack in less memory requirements and less redundancy, that is, it allows you to execute code quickly without consuming memory. Secondly, most of the "heavy" code (multimedia codecs, graphics processing algorithms, cryptography, etc.) in Android is written in C, which allows it to be executed as quickly as in any other OS. Dalvik code is used primarily to define application logic, and thanks to HotSpot JIT, code inside Dalvik doesn't run much slower than C code.
- Android does not know how to work effectively with hardware. This is complete nonsense. Android is based on the Linux kernel, in which the hardware support code is polished, if not to a shine, then close to it. The OS implements many hardware optimization and energy saving techniques, such as delayed flushing of buffers to disk with pooling, a competent task scheduler and processor power saving algorithm, efficient power saving algorithms for Wi-Fi, 3G, LTE and Bluetooth (4.0 Low Energy) modules, batch method for polling sensors (implemented in 4.4 KitKat). Without all this, an Android smartphone would not last even five hours.
- The Linux kernel is redundant in mobile technology. The Linux kernel has a very flexible build system that allows you to include in the resulting image only what is really needed in a particular device. Of course, the key subsystems of the kernel will not become simpler from this (at least the base layer), in many ways they are too redundant for the conditions of mobile technology, but this is the price that you have to pay for the fact that Android exists at all.
- **Android is too complex and heavy.** Probably many OS components can be seriously optimized or even removed (there is a lot of duplicated code in the sources), and Google did take up this work with the release of 4.4, but do not expect that all these optimizations will seriously extend the life of the smartphone. In the end, one day of the life of the gadget was a reality in the days of a very simple and easy version 1.5.
The main “problem” not only of Android, but of all modern mobile operating systems is not at all in their severity and lack of optimization, but in the fact that a modern smartphone is no longer a static gadget like the Nokia N95, which allows you to run ICQ and play sokoban, but the system living its own life. Whether the device sleeps or not, it continues to collect mail, receive notifications from the calendar, Facebook, Instagram, wait for Skype calls and synchronize files with the cloud (for example, the Dropsync application does). All this work cannot but affect battery life, and this is where you should look when talking about extending battery life.
Automation
To conserve battery life, it is highly recommended to use automation apps such as Tasker or Locale. With their help, you can configure the automatic inclusion of flight mode at night, turn off data transmission when a certain battery level is reached, reduce the brightness to a minimum in the evening, and much more. Almost any energy saving software from the market can be replaced by these tools, while you will have full control over what is happening.
Insomnia
Before moving on to talk about optimization techniques, I should pour some more water and talk about what wakelock and suspend are. Like any mobile operating system, Android works on the principle of "saving as much power as possible" and therefore, at any time, it seeks to put the processor and other components of the device into a power-saving mode. This mechanism of operation allows the device to give processor resources to applications as needed, and the rest of the time to be in low power consumption mode. When the user presses the shutdown button and the screen goes blank, Android puts the smartphone into suspend mode, turning off the processor and leaving power only on the RAM (similar to ACPI S3). In this way, even greater savings can be achieved, which under certain conditions can reach 99%.
To prevent already running applications that should continue to work even after the screen is turned off (music player, file synchronization, etc.) from being frozen when they go into suspend, a mechanism called "partial wakelock" is used. It works very simply: as long as there are applications that have installed wakelock, the device will not go into suspend and applications will be able to work normally. In addition, applications can use the AlarmManager, which allows you to wake the device from suspend at the right time in order to perform certain work (this is what widgets do, for example). The AlarmManager also uses wakelock to keep the processor awake.
Abuse of these mechanisms can lead to excessive energy consumption, regardless of the operating mode of the gadget. Luckily, if you're root, it's pretty easy to get wakelock usage statistics. The most convenient way is with Wakelock Detector. This free app, which shows the total number of wakelocks, sorted by application.
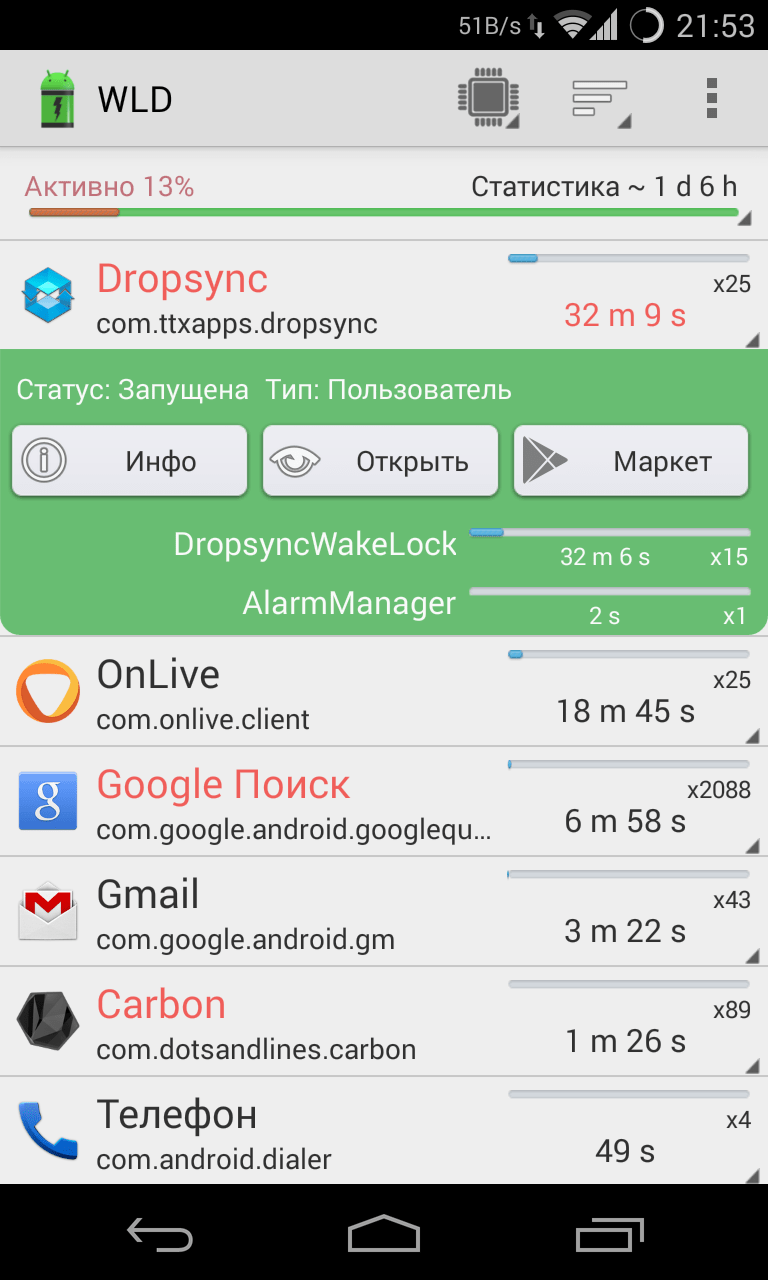
Let's take a look at what Wakelock Detector shows on my Nexus 4 (screenshot of Wakelock Detector). The very first line of the screen is the total awake time of the device for one day and six hours (since fully charged). The five most voracious apps are Dropsync, OnLive, Google Search, Gmail and Carbon. Together they kept the smartphone awake for almost an hour, which is a lot.

Unfortunately, I don't want to uninstall any of these apps, so I'll have to find out what specific purposes they used wakelock for and try to fix this problem with the settings of the apps themselves. We click on Dropsync and we see that he put a wakelock with the DropsyncWakeLock tag 15 times (which resulted in a total of 32 minutes of wakefulness) and once AlarmManager (2 seconds). We already know what an AlarmManager is, but DropsyncWakelock is more interesting. The programmer is free to give arbitrary names to wakelocks, but it's not hard to guess that this one is used to perform automatic synchronization with Dropbox (Dropsync is designed for this). I don't really need constant synchronization, and I can run it myself. So I just go to Dropsync settings and turn off automatic sync. Voila, the phone wakes up less often and not for such long periods of time.
OnLive can be skipped, since 18 minutes of being awake was caused by an incorrect closing of the application (you must exit it in accordance with all the rules). Next up is Google Search, an app that includes Google Now, among other things. We tap on it and see that the two most actively used wakelocks are NlpWakeLock and EntriesRefresh_wakelock. This is already more complicated, and it’s quite difficult to figure out what actually happens when they are installed. Therefore, we hold our finger on the wakelock name for a long time, select "Search" and see what the browser found. Already on the second page found, there is an explanation that NlpWakeLock is set at the moment when the position of the smartphone relative to the network (3G, Wi-Fi) changes, after which Google Now sends location information to the server. The second wakelock seems to be used to update cards in Google Now. At the same time, you can solve the problem of gluttony in both cases by simply disabling "Google Search" in "Settings -> Applications -> All". To solve the first - turn off the location in the Android settings.
Gmail keeps your smartphone awake with a name-bearing wakelock sync/gmail-ls/com.google/ [email protected]. Obviously, it is set for the duration of automatic mail synchronization, so you can reduce energy costs by simply disabling Gmail synchronization in Settings -> Accounts -> Google -> z [email protected]". On the other hand, I do not want to do this and I would rather endure three minutes of wakefulness in a day and a half.

After going through the list of the most energy-consuming applications with Wakelock Detector, it is easy to understand that the main reasons for waking up the device are different types of synchronization and regular location updates. This means that by disabling these features completely, you can get rid of most wake-ups and save a lot of battery.
I would recommend that you first go to your Google account settings ("Settings -> Accounts -> Google -> [email protected]”) and accounts of other applications and disable all unnecessary types of synchronization. For example, I do not need synchronization of the calendar, standard browser, Google Contacts+ and "app data" so I can safely get rid of them. You should do the same with all other accounts registered on your smartphone, and turn off automatic synchronization in the settings of third-party applications (do you really need automatic synchronization of Twitter and RSS?). Rarely used applications are best removed altogether.
The latest versions of Android do not allow you to turn off location detection completely, but they can use a very conservative and almost no effect on the life of the smartphone mode called (surprise!) "Battery saver", which updates information only when there is a connection to Wi-Fi- network or move to another cell tower.
If the app is running low on battery and you can't delete it and there are no sync or auto-update options in the settings, then you can simply freeze it. This is done with the help of a great application called Greenify. It suppresses the ability of the application to wake up on its own and makes it work only when you yourself want it to. It is very easy to use. We launch Greenify, click on the + button in the lower left corner and see which applications run the longest in the background. The screenshot shows that the most voracious are the OTransfer Target, used to remotely enable forwarding (it is generally constantly awake), as well as Beautiful Widgets and Carbon, which periodically wake up for various kinds of synchronization. I set the OTransfer Target for the test, so I can safely delete it (by the way, it is also among the "leaders" in the Wakelock Detector). Beautiful Widgets wakes up to update the desktop widget, so I'll leave that alone. But Carbon, which took fifth place according to Wakelock Detector, can be frozen. To do this, simply tap on the name and click the checkmark in the upper right corner.
- Killing background processes with a task killer. One of the dumbest ideas you can think of. You should just remember: background processes do not consume energy, usually it is consumed by the services they run, which are either not killed by task killers at all, or have the ability to self-resurrect. But killing the background applications themselves leads to the need to restart them, which wastes energy.
- Turn off Wi-Fi at home. In power-saving mode (when the smartphone is asleep), the Wi-Fi module consumes very little power, so little that it often takes much more to turn the module on and off. It only makes sense on a tablet, which you pick up two or three times a day to read the news or a book.
- Automatic switching between 2G and 3G. Similar story. When jumping between types of networks, a re-search for towers and a re-connection occurs, and at this time the radio module operates at full capacity. Apps that automatically turn on 2G while you sleep almost always use even more power.
- Apps with names like Ultimate Battery Saver. In 99% (if not a hundred) cases, this is either a placebo or the same task killer, equipped with a mechanism that turns off various smartphone components when a certain charge level is reached. First, there is a transfer to 2G and the GPS is turned off, then the Internet is turned off, and at the very end, the phone is put into flight mode. The problem here is that the described mechanism of work rather interferes and it is more convenient to do all this yourself at the right time.
- Battery calibration using recovery. It has long been a myth that deleting the /data/system/batterystats.bin file using CWM resets the battery so that it starts showing a “more correct” charge level. The myth has become so ingrained in the minds that some individuals have begun to do "calibration" daily, stating that this way you can extend the life of the battery and even increase its capacity. In fact, the file is needed to save energy usage statistics (the same information from “Settings -> Battery”) between reboots and does not affect anything.
Undervolting
Now let's talk about heavy artillery. It's no secret that one of the most voracious components of a smartphone is the processor. Its power consumption can be even higher than the consumption of the screen (or rather, its backlight), and all because it operates at very high frequencies, which require high voltage. At first, it may seem that you can save battery life in this case by simply lowering the maximum frequency of the processor and disabling the "extra" cores. However, this will most likely lead to nothing: despite the reduced power consumption, the processor will execute code longer, and eventually power consumption may even increase.
Instead, an undervolting operation should be carried out, that is, simply lower the maximum applied voltage for all possible frequencies. To do this, you need to install a custom kernel with support for this function. I talked in detail about how to do this and which kernel to choose in one of the previous issues of the magazine, so I won’t repeat myself, but just say that if you have one of the nexuses, then it’s enough to install franco.Kernel updater and with it help download and install the kernel. Everything happens automatically.
Next, install the paid version of Trickster MOD (the free version does not save voltage settings) or CPU Adjuster; for franco kernels, the paid franco.Kernel updater is also suitable. We go to the voltage adjustment page (in Trickster MOD the necessary settings are at the bottom of the fourth page) and begin to carefully reduce 25 mV for each of the possible processor frequencies. After decreasing, we turn off the application and test the smartphone for a while, launching heavy applications, then decrease it again and test again.
In 90% of cases, the processor will withstand a drop of 100 mV without any consequences, and this will give us an additional hour or two in active use. If you are lucky, then the processor will be able to withstand -150, and in especially happy cases even -200, it all depends on the processor batch and the specific instance. Too much undervoltage will lead to a reboot, after which it will be enough to increase the voltage by 25 mV and save the value in the default profile (in Trickster MOD this is the "Profile" button immediately above the values).
INFO
A smartphone with an AMOLED screen will last longer if you use apps with a black background. To do system applications dark, you can use the AOKP firmware or one of the Xposed modules.
Often, the automatic screen brightness adjustment mechanism sets too high values. If you control the brightness manually, you can extend the life of your smartphone for another couple of hours.
Advanced firmware features from some smartphone manufacturers, such as gesture control, voice control, or automatic screen turn-on, result in excessive battery consumption. If possible, they should be disabled.
Instead of conclusions
In general, the methods described in the article can extend battery life by at least half a day (with an average intensity of use), and even more if all types of synchronization are turned off and unnecessary applications are removed. It is not difficult to follow the recommendations, but the effect is significant.
In four years, Android has evolved from a small but ambitious project into one of the most complex and feature-packed mobile operating systems of our time. Android has support for a huge number of technologies and features, many of which are hidden from the user or hidden where you would not even think to look. This article is a collection of tips and tricks that can be applied to any Android device without the need to be rooted.
01. DISABLE AUTOMATIC CREATION OF DESKTOP ICONS
I think I'm not the only one who annoys how the market behaves when installing the application. For some reason, he thinks that for any little bit of software or another game, I definitely need an icon on the desktop, and successfully creates it. And I have to remove it. And then another. And so every time.
Fortunately, this behavior is easy to disable - just open the settings Google Play(on the panel on the left) and uncheck the box "Add icons". In the same place, you can turn off the forced password request every 30 minutes when purchasing applications, as well as the hated auto-update of applications.
02. DISABLE GOOGLE SEARCH AND OTHER USELESS SOFTWARE
Standard Android firmware includes a huge amount of useless software, ranging from a bunch of Google applications (you know that Google requires manufacturers to include almost all the software it develops in the firmware of their devices?) And ending with all sorts of junk from the smartphone manufacturer . All of these (or at least most) can be turned off.
Go to "Settings → Applications → All", tap on the desired software and click "Disable" (of course, you will be warned how "dangerous" this is). By the way, when you turn off Google search, Google Now will also disappear, as well as the search bar from the desktop (after a reboot), instead of which there will be an empty area.
03. REBOOT INTO SAFE MODE
Few people know, but in Android, as in many other operating systems, there is a so-called Safe mode. This is a mode in which the OS is loaded with third-party applications disabled. Not too skillfully written malware (the one that does not register in the system partition) falls off, like any software that interferes with the normal operation of the system. Safe mode can be used to bypass screen blockers, applications that freeze the smartphone, or, alternatively, to identify who is actually eating the battery - the next firmware or software update.
The mode is turned on in a rather simple, but not at all obvious way: by holding down the power button and then holding your finger on the “Power off” item. After the reboot, the culprit of the problem can be removed through "Settings → Applications".
04. GET RID OF PURPOSE NOTIFICATIONS
"The construction of the castle is finished!" How did you get those notifications? Everyone who is not too lazy is trying to notify me of all possible and impossible events: "Vasya Dzhubga answered you on Twitter", "You have 100500 new messages", "You won the operation to increase your right leg." You swipe one notification, three new ones appear in its place.
How to get rid of all this slag: hold your finger on the notification for a long time and uncheck the box under the "Stop" button. This is a KitKat recipe. In Lollipop, everything is a little different, but the essence is the same: hold down, then the i button, in the window that opens, put a tick on “Block”. In the same place, you can force the notification to be a priority so that it is always at the very top.
05. DON'T FORGET ABOUT THE SERVICE MENU
Another completely non-obvious function is the service menu. It can be opened by dialing *#*#4636#*#*. Basically there are different Technical information like IMEI number, signal strength, current location or network type. But there is also a very useful function for some situations to force the smartphone to switch to the desired network type (2G, 3G, LTE).
In conditions of poor 3G / LTE signal strength, the device tends to reset to 2G in order to conserve battery power and ensure subscriber availability. This behavior can be disabled. Open the service menu and select WCDMA only or LTE only in the "Set preferred network type" item. In the same way, you can switch your smartphone to 2G - GSM only. It will help if you need to save battery power and the Internet is rarely used. By the way, in the same place you can disable the radio module altogether (of course, until the next reboot). 
Smartphones based on Chinese MTK chips have their own and much more sophisticated service menu. His number is *#*#3646633#*#*. There is various system information and a huge number of tests, among which you can find several useful settings, such as adjusting the volume level during a call or, for example, changing GPS / AGPS settings. The menu itself is terribly illogical and contains so much diverse information that I don’t even dare to describe it, but simply send the reader to three letters - XDA.
06. USE A STANDARD BROWSER
I don't know why users don't like the built-in Android browser so much. In my opinion, he is wonderful. Lightweight, fast, on the Chromium engine, can synchronize with a Google account (that is, it immediately includes all bookmarks and passwords from Chrome), but most importantly, it has a very convenient and almost ingenious navigation method. This is the so-called radial menu, which can be activated in the settings (only in Android 4.0-4.4).
07. MANAGE COMPANY CONTACTS
Google has web services not only for remote software installation, blocking and searching for a smartphone, but also for managing contacts. All contacts of people ever saved and synchronized when connecting a new smartphone can always be found at google.com/contacts. They can be viewed, edited, added and deleted. And, oddly enough, in fact it is part of Gmail.
08. MONITOR YOUR PROCESSOR LOAD
Android has a built-in feature to show the current CPU load and currently active processes on top of the screen. In theory, it is intended for application and firmware developers and is hidden from ordinary users, but no one bothers us to activate it. But first, you will have to reach the “For Developers” settings section, which does not exist by default at all.
We go to the settings, then "About phone", we find the line "Build number" and tap on it seven times in a row. The message “You have become a developer!” should appear on the screen. This means that the “For Developers” item is now open, and we are moving into it. We rewind almost to the very bottom of the screen and in the "Monitoring" section we find the switch "Show CPU usage".
We turn it on and see a list in the upper right part of the screen. The first line is the so-called loadavg, showing the number of processes that had to work or wait for their turn to execute in the last minute, five and ten minutes. To put it very bluntly: if these values divided by the number of processor cores are higher than one, this means 100% processor load in the last minute, five or ten minutes, respectively. Below is a list of the most gluttonous processes (essentially similar to the Linux top command).

09. USE ADB TO BACKUP SOFTWARE TO COMP
We have already written more than once about a wonderful tool called ADB, which can greatly simplify device management from a computer for a person who is familiar with the console (here we are mainly talking about Linux, of course). In addition to the ability to install software, transfer files to a smartphone, view logs and other useful things, recently ADB allows you to backup all the settings and applications of a smartphone.
To use this functionality, install the universal ADB driver (goo.gl/AzZrjR), then download the ADB itself (goo.gl/3P7klM), install the driver, then expand the archive with ADB, connect the smartphone to the computer with a USB cable, run command line and execute the command
A message will appear on the smartphone screen asking you to specify the encryption password for the backup - you can safely press "Next". The process of backing up applications will begin, which will affect both the APK packages themselves (the -apk flag in the command) and their settings. The backup will also include all applications from the memory card. You can restore a backup using the following command:
$ adb restore backup.ab
$ adb restore backup . ab |
10. DISABLE BACKGROUND DATA IN APPS
Running in the background, apps can actively use the internet for a variety of purposes, from updating their content to leaking information about your location. In addition, such activity in any case leads to increased battery consumption. 
Android has the ability to selectively restrict apps from background data transfer, but it's located in a place that most users would hardly ever look at. To prevent any application from using the Internet in the background, you need to go to the settings, then - “Data transfer”, scroll down the screen to the list of applications actively using the network (for some it will be a surprise that it is there at all) and tap on the desired software. At the bottom there will be an option "Restrict background mode". It is worth bearing in mind that the option will disable data transfer only over the mobile network, so data will continue to flow over Wi-Fi.
11. USE THE SEARCH BAR
Often, Android smartphone owners neglect the search bar at the top of the home screen. This is really logical, given the ability to perform a search by typing a query into the address bar of any mobile browser.
Meanwhile, the search bar on the desktop can do much more than just redirect the request to google.com. It allows you to search contacts, applications, calendar events, bookmarks and web browser history automatically. In normal smartphone use, it may not be as useful, but when connecting an external keyboard, it is an indispensable tool. Just click
12. USE SMART LOCK
Smart Lock is one of those features that you don't think about, but once you try it, you can't live without it. This is one of the most notable new additions to Android Lollipop and one of the most useful features added to Android in recent times. The idea of Smart Lock is very simple - it disables the pin code or other lock screen protection in case there is a certain Bluetooth device or a place on the map nearby.
By default, Smart Lock "as if" is disabled. That is, it does not glow anywhere, but after pairing with a new Bluetooth device (of any type), it will definitely offer to add it to your white list. After that, you will forget about it again. But only until you turn on the lock screen protection in the "Security" section of the settings. Now it will work the way it should.
The Smart Lock settings themselves are in the same section, and in addition to adding new Bluetooth devices, you can specify "safe places" there, and right away with a list of options based on Google Now "observations". By the way, if you disable it, as described in the first tip, then this functionality will also be lost.
13. SAVE ENERGY RIGHT
Another notable innovation of Lollipop is the power saving mode. It migrated to standard Android from the firmware of smartphone manufacturers, who used to implement it on their own. Now there is a function in pure Android - you use your smartphone to the fullest, and when you reach 15% of the battery charge, the system offers to turn on the power saving mode, which disables background data transfer, reduces brightness to a minimum, disables some sensors and reduces the screen rendering FPS to a couple of dozen frames per give me a sec. For clarity, the status bar and on-screen buttons at the bottom of the screen turn red - so as not to forget.
To save battery on your AMOLED smartphone, you can set black wallpapers and use apps with black backgrounds.
The power saving mode is configurable. Go to "Settings → Battery → menu → Power saving mode". Here you can specify the condition for automatically enabling the mode (although the choice is poor: 5%, 15% or never) and, most importantly, enable the mode right now. It is very convenient if you have a long trip without the possibility of recharging.
14. MONITOR THE TRAFFIC
Most likely, smartphone manufacturers, as usual, will shovel the standard Android 5.0 interface and change everything (hello Samsung - the biggest fan of breaking interfaces), but in the standard Lollipop curtain, or rather, in the “second curtain” with book  The quick settings ops have one zest. The data transfer button in the center does not switch data transfer at all, but expands into an interface that allows you not only to view the current traffic consumption, but also turn off data transfer using the switch on top.
15. SHARE AN APP, NOT A PHONE
Especially for those who like to give their phone to other people, Lollipop has a Screen pinning feature that allows you to lock your smartphone on one application without the ability to close it or switch to another. Like many other usefulness, it is completely invisible and hidden quite deep in the settings. To activate, go to "Settings → Security", scroll almost to the very end and turn on the "App Lock" option.

Now, if you press the button for viewing running applications ("Overview"), a concession button will appear at the bottom of the thumbnail of the current application. After clicking on the icon, the screen will be locked on the selected application and you will need to hold the "Back" and "Browse" buttons at the same time to go back. In this case, you will have to enter a pin code if it is set for the lock screen.
XX. USE ACITIVITY LAUNCHER
Any graphic Android application includes one or more so-called "activities" (activity). Each of them is an application window (screen), for example, the main screen or settings screen, maybe even a file selection window. By default, you can open directly (from the desktop) only those activities that the application developer marks as main (main), the rest are available only through the application itself and only if the developer himself allows it.
However, with the right tool at hand, you can reach out to any other activity in any application and even create a desktop shortcut for it. The Activity Launcher does just that. Just install the application, select "All actions" in the menu above and find the software you need. All her activities will appear on the screen, and any of them can be opened with a simple tap or hung on the desktop with a long finger hold.
An example of useful “internal” activities is the Chrome bookmark window (Chrome → Bookmark), access to the hidden AppOps mechanism in Android< 4.4.2 (Настройки → AppOps), запуск поиска в TuneIn Radio (tunein.ui.activities.TuneInSearchActivity). Очень много активностей имеет в себе ES Проводник, включая редактор, музыкальный плеер, просмотрщик изображений и многое другое. Любую из них можно запустить напрямую с рабочего стола. Таким же образом можно открыть любой раздел настроек и получить доступ к некоторым функциям ОС, достучаться до которых проблематично. Это абсолютно легальная функцио нальность, и она не требует root.
Android has a large set of hotkeys for plug-in keyboards. Arrows, Tab and Enter can be used to navigate the desktop and various menus. In addition, the following keyboard shortcuts are available:
Esc - "Back" button;
Win + Esc - Home button;
Ctrl + Esc - "Menu" button;
Alt + Tab - switching between applications;
Ctrl + Space - switch layout;
Ctrl + P - open settings;
Ctrl + M - control installed applications;
Ctrl + W - change wallpaper;
Win + E - write a letter;
Win + P - music player;
Win + A - calculator;
Win + S - write SMS;
Win + L - calendar;
Win + C - contacts;
Win + B - browser;
Win + M - Google maps;
Win + Space - search;To find out your MAC and IP address, go to "Settings → Wi-Fi → menu → Advanced-
functions”. MAC and IP will be at the very bottom.Lollipop has a built-in Flappy Bird style game. Go to "Settings → About phone",
several times tap on the item "Android version", then hold your finger on the "chupa-chups" that appears. We play.Google Now supports a large number of Russian-language voice commands. All of them can be divided into two groups: voice search and the actual voice commands themselves. Voice search allows you to perform smart searches on Google, where the system displays a specific answer instead of a list of links, and voice commands allow you to perform certain actions, such as sending SMS or setting an alarm. The list of commands is shown in the "Google Now Voice Commands" image. Voice search includes more than a dozen different types of questions:
Weather. What will the weather be like tomorrow morning?
Addresses. Where is the nearest pharmacy?
Flight information. When does Aeroflot flight number 2336 depart?
Time. What time is it in London?
Events. When is the sunset today?
Calculations. What is the square root of 2209?
Translation. What is the Spanish word for "cucumber"?
Sport. When is Spartak playing?
Finance. What is the S&P 500 index today?
Data. What is the height of the tallest building in the world?
Exchange Rates. Convert 2600 rupees to US dollars.
Images. Show pictures of the Golden Gate Bridge.
Interestingly, in English, Google Now understands a large number of and much less obvious questions. As an example, you can give:
Should I wear a jacket today?
How much tip from 420 rubles?
Where is my parcel?
This, of course, is not all that could be told, but it will not work to stretch the article, and many of the other possibilities are already known. Do not forget about these tricks, and the smartphone will become
a little more comfortable.
You may also be interested in:
Let's be honest - many batteries mobile phones just not usable. Even Google says you should be grateful if your batteries are on Android device work all day. In fact, in order to keep your smartphone alive for a full “working” day, you often have to turn off various features of the phone.
So, what can you do, to put it simply, to make your phone battery last longer? And can any application management actually help? In this article, we'll take a look at Android's more obvious battery usage, power-saving solutions, and more modest tips and tricks that could make a real difference - and add a few hours to your potential phone life.
1.Usewidget Android Power Management
Simply put, you must take control of your phone's power. The best way to keep your battery alive is to lower your powerful phone's battery life a bit with a feature shutdown - but do it in a stylish way. Don't just leave it off all the time, or you can still use your Nokia 6610 as well. Widget home screen, Wi-Fi, Bluetooth, GPS and other power-hungry one-click on and off functions, just a headache from the toggle off function, in while Android 1.6 has been added by Google to its own power icon - set it up to run longer by setting it to Android Power Management Widget to the home screen.
2. Take it easy on the update status
No one says you can't use your phone's features, but do you really have to check every two minutes for new messages or email address? someday maybe still leave some battery power while you sleep. So you can chat in your bed at any time, but then chat at night when you sleep.
3. Switch off auto-sync
If you're not a heavy Google user and don't know how to manage apps, disable them. If you can't live without Google Calendar and Gmail, you can do away with auto-sync altogether - just remember that you can manually sync your Contacts. The MySettings app will give you numerous little switches and you can easily turn auto-sync on and off if you like the idea of having an entire screen full of power-saving icons.

4. Disable 3G connection
Good old 2G is perfect for calls and texts, so kill 3G unless you're planning on emergency web browsing on your phone. 3G icon every two minutes, and worried about your network connection mobile communications, is connected.
5. Lower your screen brightness
It's just as spectacular to have your stunning OLED screen glowing and giving off so much light that the current inhabitants of the International Space Station had to squint below the sun visors when you wake them up, but it's completely unnecessary. If you're inside, Android, set the default 0% brightness. When you need to increase visibility, for easy access, install the brightness widget on your desktop.

6. Turn off GPS
GPS is a monster of power and hardly any user uses it most of the time. Even the famous Foursquare app can do a pretty good job of tracking by approximation based on whatever mobile phone tower you're connected to, so if in fact you do a few serious actions, turn it off. You will be able to hear the sigh of relief from your battery. Seriously. Try to keep your phone close to your ear when you uncheck this box.
7. Keep track of everything installed on your phone
Android 1.6 introduced a menu that allows users to see exactly the state of the battery, giving you a percentage, and apps that suck up all your phone battery minutes before you actually want to use it. For example, an app like the mobile black box recorder. The “Battery Usage” tab in the Settings/About Phone menu will give you a detailed breakdown that consumes more power, allowing you to take manual control and uninstall any power-hungry application. Try replacing them with alternative apps and see if it makes a difference. Just one app that sucks battery life on a particular phone can be a problem.
8. Setting Wi-Fi-out
At the very bottom of the screen control in Android, there are Wi-Fi settings, check them out by going to the phone menu “Wi-fi Settings” and then press the Menu button. From here, you'll be able to manually select the timeout options for your Wi-Fi connection - one of the biggest sources of standby phones. This may give your phone a little more time to connect to Wi-Fi when you wake it up, but at least it will still be significantly smarter than leaving it connected all the time and draining your battery.

9. Go Gothic
Today's popular phone screen savers, especially the OLED versions, use more energy with bright display and more colors. So go go gothic and choose a beautiful, dark screen background "today" and then enjoy what you have achieved for charger at least an extra minute every day.
10. Install time-power manager
A lot of time is wasted by sensitive applications on the Android Market, which automatically handles the power of your phone's communication parameters. load, and also help you fall asleep without disturbing the ping notification. Set it to turn Airplane Mode on in your regular sleep, then turn it back on when you wake up. Simple actions, and the battery will consume only a small percentage of energy.

11. Put your phone somewhere with good reception
The phone uses more power when it's looking for a cell tower, so believe it or not, your battery will last longer if you leave your phone in a place where it gets good reception. Put it on the other side of your check-in and service, or on a windowsill. This will have the best value for signal reception. The Antennas app will give you a funny detailed summary of charging your phone to the grid and all the masts in the area if you're looking to find the best low power placement within three miles of your home.

12. Don't drain your battery
The old advice is not to completely drain your battery to ensure proper performance, thanks to today's Lithium Ion batteries. They don't have the charge memory issues affected by the previous generation of batteries and actually work better if you charge them regularly and constantly.
13. Buy a car charger
And leave it in the car. Buy a spare battery and leave it in a friend's car. Also leave USB cables everywhere. A spare set of spare batteries can help you in a difficult situation. There is no guaranteed way to defeat the system. This will be a good solution, once you fall off a cliff and you need help.
Google annually adds many settings and features to the Android operating system, many of which are hidden from the eyes of ordinary users. This was done on purpose, but with good intentions. The American corporation believes that if an inexperienced owner of some inexpensive Android smartphone accidentally activates certain important settings, then his device may start to work more slowly or run out of battery much faster, therefore, right out of the box, all smartphones based on Google's OS have only basic activated functionality, but this is very easy to fix.
Although every year all smartphones work longer on a single battery charge, largely due to better software optimization for hardware, but a hidden setting in all Android smartphones significantly increases the time battery life from the battery, and absolutely anyone can activate it right now, since it is definitely available in any custom firmware and in all models of mobile devices.

All smartphones based on the operating Android systems have an incredibly large margin of power, which is simply redundant for solving simple everyday screens. It's like driving a car, sometimes pressing the gas to the floor, and then slowing down again. In the case of smartphones, it’s not gasoline that runs out faster, but the battery charge. To increase battery life mobile device you need to open "Settings", then go to the "Battery" section.


In the "Battery" section in the upper right corner, three vertically located dots should be visible, which you need to click on. In the menu that appears, you will need to select "Power Saving Mode", and then activate it. As a result, processor performance will be reduced, which will allow up to 50% increase in battery life on a single battery charge. This feature is available in all smartphones and tablets running Android 5.0 Lollipop and higher.


To achieve an even greater effect, the editors of the site recommend installing the Doze-energy saving application, which significantly increases the battery life of all Android smartphones, since processes running in the background “eat up” a lot of charging, which the user does not even see. After installing it in the list, you need to select only those programs and services that should continue to work normally.


It is worth choosing the most basic instant messengers, email clients and other main programs that should receive notifications in real time, and not with a delay. This program works in such a way that all processes that run in the background and consume battery power are automatically frozen. This does not harm them or the data stored in them in any way, and using this application allows you to significantly increase battery life up to 40% of the standard. This is especially noticeable at night, when without this program the smartphone battery will be discharged by 10-12%, and with it only by 5-6%.