
After purchasing a modern smartphone, owners discover new possibilities for digital devices. At the same time, along with novelties, there is a special category of applications that can be called "classic". An example of a program known since the era of push-button phones is the notorious T9 or automatic spell checker. The previous version provided the correct replacement of letters from the point of view of the function, as well as the correction of the entered word if its individual parts were omitted or incorrectly entered. Modern settings allow, if necessary, to replace the entire word at once, which can be not only a real help, but also an additional headache for phone owners. What is the T9 keyboard for android, is it necessary on modern devices and how to install it - the information provided will tell.
The t9 keyboard for android is available in the section Google Play in Russian for free. By choosing the right application based on reviews and program ratings, you can safely download and open it on your phone. This method is good in everything, except that often such applications may not be compatible with some smartphone models, which causes further problems in operation. That is why, before trying your luck in stores, you can use the already built-in functions of automatic replacement and spell checking.
How to set up T9 on android
The Android operating system uses standard patch settings, which are improved as new versions and updates are released. Now such a program bears little resemblance to T9, used to facilitate the entry of messages in push-button phones. Even the name of this option now sounds different, namely Smart type, which literally means “speed dialing”.
The options of this program really allow you to enter text as quickly as possible and at the same time not worry about your spelling. The system will independently analyze the entered characters and offer the best option to continue. In addition, when typing letters, you can immediately see the full word, so the speed of typing will increase noticeably. This feature is just a godsend for fans of correspondence in chats and social networks, but it also has pitfalls.
In what cases will T9 become useless:
- If abbreviations are used frequently. In this case, the proposed autocorrect options may be, to put it mildly, unacceptable.
- The use of compound words, surnames and names unknown to the standard dictionary. The way out will be to independently add the necessary terms to the dictionary. This is long and tedious, but subsequently it will make your life much easier and will allow you to avoid many embarrassing situations.
- When the system settings give unexpected results and do not allow you to correct the text manually. There are cases when a smartphone literally by force replaces unknown words with something completely unacceptable. The best option in this case would be to completely disable the function, or a separate t9 program for android.
Whether or not to disable T9 mode is up to you. If you are completely confident in the literacy of your messages and are not afraid to get into trouble, it is best to refuse additional help. If typing is a tedious and boring task for you, or you can accidentally make a grammatical mistake in a letter, it’s better to play it safe and connect T9, but only according to your own rules.
How to install T9 on android

System settings allow you to enable the necessary options for checking and replacing text without using superuser rights and without deep intervention in the smartphone's operating system. To do this, you need to find the keyboard settings and select the item by type "Language and input". In the section, select the virtual keyboard settings and see the suggested autocorrect options. Usually, modern versions of android suggest the possibility of declining some options, for example, filter names and names. By setting the optimal mode of use, you can not worry about the "classic" incidents, which are usually blamed on the T9.
How to update T9 on android
A convenient and popular settings feature is the T9 dictionary for android. You can replenish it yourself, or you can choose a ready-made application that uses many modern terms and designations. Updates for such an application can also be found on Google Play, or you can unsubscribe from unnecessary attention.

For the convenience of quick messaging, the Android OS provides a built-in autocorrect function and correction of the entered text. This makes typing easier and also helps to correct typos and typos. At the same time, there is a very high risk that the settings can cause a ridiculous incident, fortunately, there is enough such evidence on the network. To prevent this from happening, it is recommended to choose the settings for entering autocorrect parameters on your own, as well as supplement the standard dictionary with all frequently used terms. How to set up T9 on Android, as well as possible disadvantages of automatic word replacement, are discussed in the information provided in our article.
Android update not coming over the air? Is it possible to update the device, is there a new official firmware for it and how to install it yourself? You will learn the answers to all these questions from this article.
It seems that updating Android is the simplest action that even a person who does not understand the system can handle. In general, this is true, but there are several important nuances that even many professionals have not heard of.
How do smartphones and tablets get updates?
Users often ask the question: how often do updates come? Unfortunately, there is no universal answer - it all depends on your manufacturer. Only gadgets of the Google Nexus line are updated regularly and in a timely manner.
All other devices are simply unrealistic to update in such a short time - you need to wait until the manufacturers create their firmware based on the new version of Android, test them, and only then start updating. Usually this process can take from 1 month to six months.
Often, many versions are simply “skipped”, that is, the device does not receive everything in order: for example, not Android 5.0, 5.1, 5.1.1 and 6.0, but only 5.0 and then 6.0. You must understand that each manufacturer has to support up to 30 models at the same time and, purely physically, company developers cannot have time to roll out new updates for each smartphone or tablet.
How long will your gadget be updated? Only the manufacturer knows the answer to this question. It is impossible to predict this when choosing a new device. It is logical that the more popular the model, the more advantageous it is in terms of updates. It is beneficial for the manufacturer to satisfy a larger number of users so that they, in turn, remain loyal to the brand and buy its products again next time.
But how can you find out about the release of new system updates for your smartphone or tablet before the corresponding notification appears on the device? Just follow the thematic sites, forums or groups on social networks, and also check the official website of the manufacturer for new images for manually updating the device (this process is described later in this article).
Checking and installing Android updates
After the announcement of the system update, it may not “fly” to you immediately. Usually this process takes from 2-3 days to 2 weeks. The fact is that the manufacturer sends out updates gradually, which is why it turns out that your friend with the same smartphone got the update instantly, and it only reached you after some time.
When it's your machine's turn, a notification will appear on a new Wi-Fi connection prompting you to update the system.

Select System Update.

Click the "Check for Updates" button.

And if an OTA update is available for the device, a “Download” button will appear.

System Update will be downloaded to your phone, tablet, after which you will need to click on "Restart and install".

The installation process will begin, after which the device will reboot with the updated system.
How to speed up (force) the receipt of OTA updates
If the owners of your device have been updated for a long time, and the update still comes to you, you can resort to a method that few people know about.
Go to "Settings" → "Applications" → tab "All". Open "Google Services Framework". Select the "Erase data" option.

After that, check for updates again according to the instructions above and most likely you will be pleasantly surprised. Sometimes it does not work the first time, and sometimes it takes several minutes before the OTA update appears.
How to update Android manually
In order not to wait for an update over the air (and it happens that it does not come at all), I recommend installing official firmware manually through Recovery.
First, the ZIP archive with this very firmware must be downloaded from the official website of the manufacturer to a smartphone, tablet and placed in any convenient place in memory. After that, go to the Recovery menu and follow the instructions.
1. To enter the Recovery Menu, first turn off the machine.
2. Then turn it on, but while holding down a certain keyboard shortcut. Depending on the manufacturer, this combination is different, but the most common are (in general, it is better to find information on the Internet on how to enter Recovery on your particular model):
- Volume up + power button
- Volume down + power button
- Volume up / down + power button + "Home"
- Volume up + volume down + power button
Moving around Recovery (if it is not touch) is carried out using the volume keys, and the selection is made with the Power / Lock button.
The option names may vary slightly, but I'm sure you'll get the hang of it.
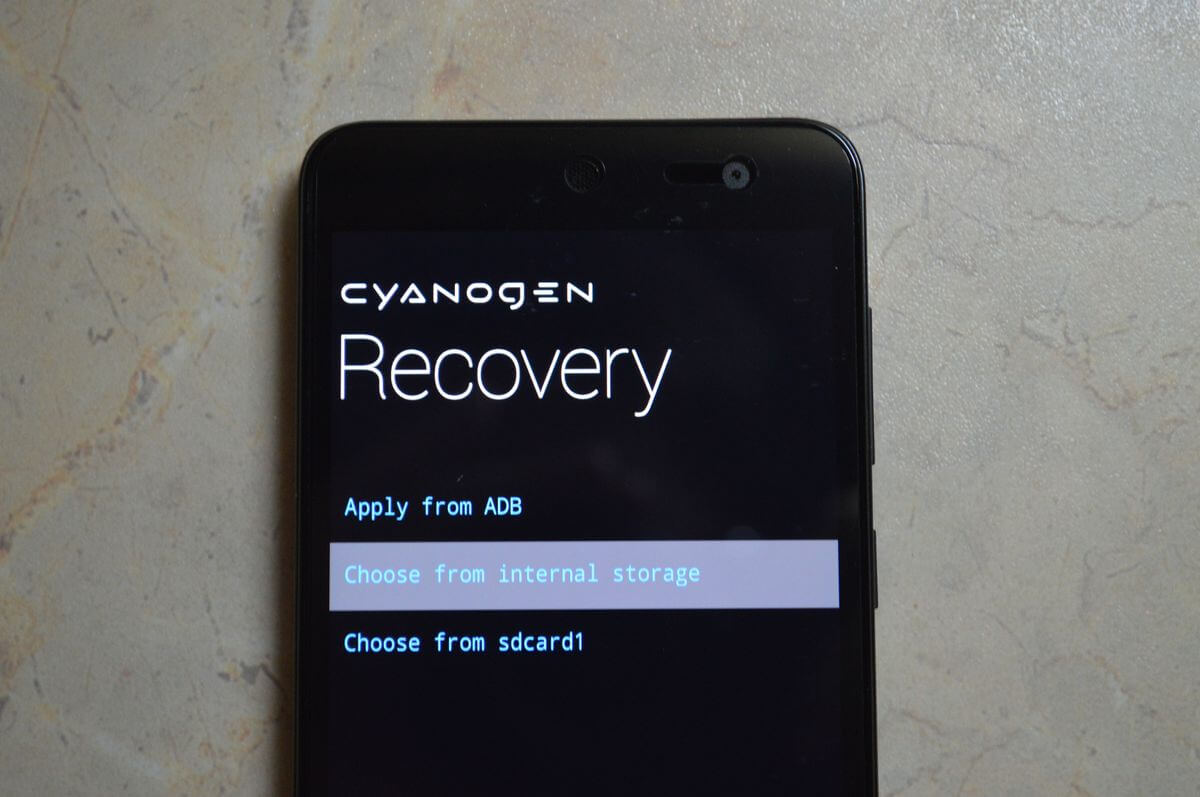
3. Select "Apply update".

4. Then select "Choose from internal storage" if you saved the archive with the firmware during internal memory or "Choose from sdcard" if on a memory card.
5. After that, go to the desired folder where you saved the firmware and select it.

The update installation process will begin.

After completion, return to the main Recovery menu and select "Reboot system now". Your device will reboot with the updated firmware.
That's how I told you everything you need to know about the Android update. If you have any questions about this topic, ask them in the comments.
Hello, dear readers of the blog site. Have you ever wondered why browser developers constantly release new versions of their creations, in which the discovered vulnerabilities are eliminated and the functionality is improved?
Therefore, we are constantly concerned with the question - how to update browser. Although the latest update is almost always carried out automatically in the background (invisibly to us). However, there is nothing perfect in the world, and it will not be superfluous to look at the current version of your Internet walker and, if necessary, manually initiate the update process if the browser has stopped updating automatically. How to do this, read below.
How to update google chrome
Google Chrome is currently one of the most popular browsers in the world. And this despite the fact that he was born one of the latest (you can). Personally, I use it to work with sites, because it is ideal for this.
For example, each of the tabs in Google Chrome is an independent system process and freezing it will not freeze the entire browser, which is just great when working with articles in . In addition, if the computer suddenly freezes or restarts, everything that you wrote will be restored after reopening the browser. There are, which you can read about at the link provided.
But back to the topic of our article - how to update this browser? To do this, you will need to click on the icon with three horizontal stripes located in the upper right corner and select the item from the drop-down menu. "About Google Chrome Browser":

As I mentioned above, this browser is updated automatically when it is restarted (closed or opened), but if you have not closed it for a very long time (for example, if your computer has not been turned off for weeks or months), then you can take out information about the appearance of new versions from background color changes, which displays the icon shown in the screenshot with three horizontal stripes:
So, after choosing the item "About Google browser Chrome" you will see a window where the current version of the browser will be compared with the one that is currently available on the update server.

At the end of the process, you will see a button that appears to restart the browser and apply the downloaded updates:

You can achieve the same effect by simply closing the program and restarting it. This way you make sure that you have all the security updates and additional functionality.
However, some kind of failure may occur, in which or there will be no communication with the update server. How to fix it? Come in to the official website of Google Chrome and for your operating system (it will be determined automatically according to the data received from your computer):

If the version of your OS was not determined correctly, then use the button "Download chrome for another platform" located just below. By the way, if you are a big fan of the latest updates and muleks, then there is an opportunity for you download the beta version of the browser engine, which is the flagship at the moment, but not yet one hundred percent stable and run-in.

After download, to activate the update process the version of the browser already installed on you will be enough to close Chrome and install the latest up-to-date version from the received distribution. All available settings, passwords, etc. should be preserved. But just in case, before updating, as it was shown in the article linked to.
Therefore, due to the impossibility Opera updates from version 12 until later you will have to go to their official website and :
This browser itself is worthy of special attention, because based on the same engine as Chrome, it managed to acquire a number of unique features that I wrote about in . There is also (voice assistant).
How to update Internet Explorer
This browser differs significantly from those described above, primarily in that it is part of the operating room Windows systems . And not for every type of Windows you will be able to update Internet Explorer to the maximum possible version (now it is 12). Why is that? Well, probably, Microsoft is trying to stimulate sales of its new operating systems in such a clumsy way.
For example, judging by the screenshot below, for my beloved Vista, I can only upgrade to Internet Explorer 9 (with the second service pack), although the newest version of this browser dates back to number 12 (it's a shame, but not enough to change the OS, because IE I hardly ever use it.)

However, not everyone will have such a sad situation, because for older Windows versions(7, 8 and 10) an upgrade to version 12 of Internet Explorer is available. What will need to be done for this? Yes, in fact, just a little - and download its distribution.

As predicted, Internet Explorer 9 doesn't offer me anything above, but you might have better luck. Go ahead.
Good luck to you! See you soon on the blog pages site
You may be interested
How to install Google Chrome, Yandex Browser, Opera, Mazila and Internet Explorer for free on your computer Outdated or not working Adobe Flash Player - how to update, uninstall and install a free flash player plugin latest version
 Incognito - what is it and how to enable incognito mode in Yandex browser and Google Chrome
  Where you can free and safely download Google Chrome browser, Opera, Yandex browser, Mazila, Amigo, Orbitum, Tor and many others What is a cache - how to clear the cache in Opera, Mozilla, Chrome and other browsers How to set (change) the default browser and make Google or Yandex the default search in it
  How to Install WhatsApp on Computer - PC Version and Use WhatsApp Web Online (Via Web Browser)
  Search and browsing history in Yandex - how to open and view it, and, if necessary, clear or delete it
We decided to devote today's material to answering the burning question of many users of Android smartphones: where to download and how to update Android? The operating system, developed by the giant Google, appeared recently (some 10 years ago), but is developing rapidly. Now Android is one of the market leaders in terms of prevalence, it receives updates with enviable regularity and has a lot of advantages that attract users.
How to find out what version of Android is on your smartphone
Before you start looking for fresh updates, you should find out which version of Android you are using.
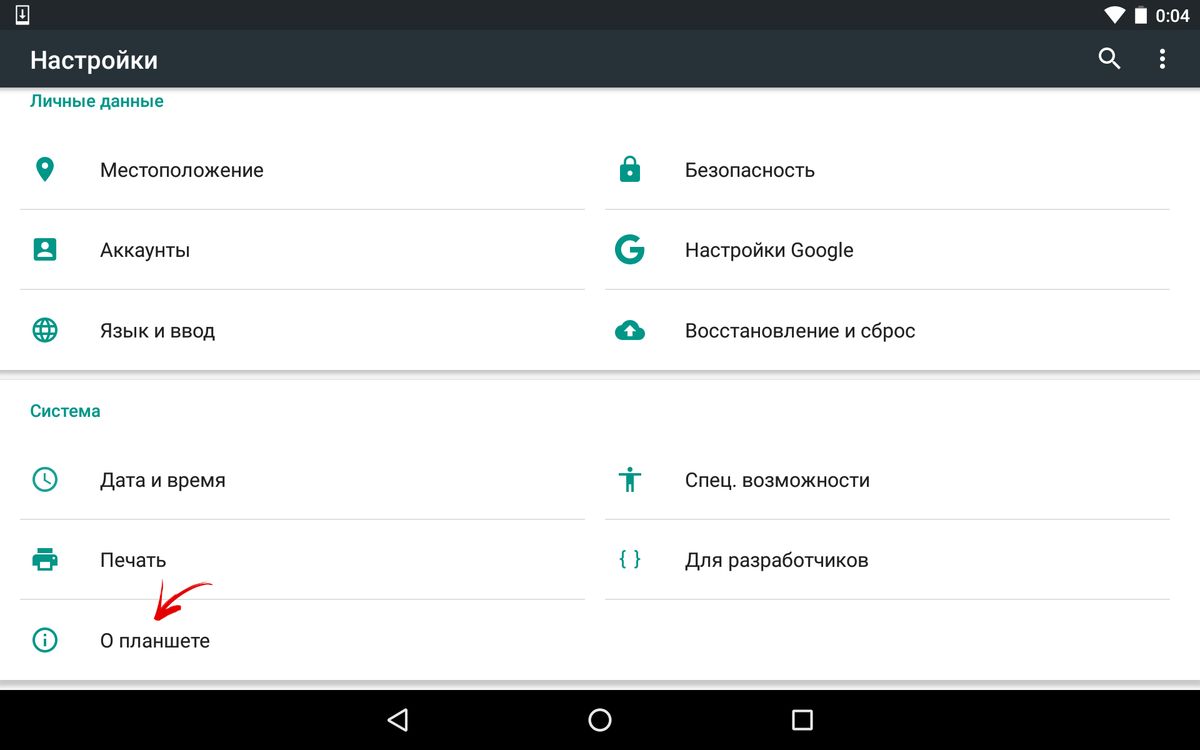
The version is indicated by the manufacturer in a separate item in the device settings - "About phone". Here you need to find "Android Version", where you will see the version used. Also in this menu you can find out which shell and date are preinstalled by the manufacturer. latest update security systems.
How to update Android
There are two ways to update the system:
- through OTA updates (over-the-air updates) provided by the device manufacturer;
- using custom firmware developed by ordinary users.
First way android updates preferred, as it provides ease of installation and stability of the device on the new version of the system, which cannot be said about custom firmware. However, OTA updates are usually relevant for flagship smartphones, whose manufacturers take care of the release of upgrades for a long time after the release. But the budget class often has to be content with a couple of updates, after which the manufacturer simply forgets about the device. Customs are ready to help out in this case.
Do not neglect backup before you start updating the operating system. Even in the case of an over-the-air update, errors are possible that will lead to the loss of photos, contacts and other information. Therefore, we recommend making backups of important data manually or using third-party software, which is available in abundance on Google Play (for example: CM Backup - Safe Cloud, App Backup Restore Transfer, G Cloud Backup).
Update Android "over the air" (OTA update)
The easiest way to update an Android phone or tablet, which requires a minimum of skills and knowledge from the user.
As already noted, official updates are more often released to popular devices. In addition, some smartphones (usually those ordered from China) can be flashed by the seller with custom firmware, which does not provide for over-the-air updates at all.
If you are one of the lucky ones, then:
- go to device settings;
- at the very bottom, find the item "About phone";
A number of manufacturers bring a tool to update Android to the desktop to make this process even easier for the user.
- in a new window, at the very top, there is a button "System Update", which is what we need. Click on the button;
- in the menu that opens, click "Check for updates";
On most devices, the factory default is set to automatic update, when the phone or tablet is downloading updates in the background (usually when the device is connected to a Wi-Fi network), prompting you to install them afterwards.
- it will take some time (depending on the speed of the Internet) until the available Android updates are found (or not found);
- if there are system updates, you will be prompted to download them, and then install them;
Be sure to fully charge your device before you start installing updates!
- now you just need to follow the instructions of the assistant and wait until the installation of updates is completed and the smartphone reboots.
As a result, you will receive a device with fresh updates, while personal data will be preserved, as well as installed applications.
Updating Android using custom firmware: where to download, how to install

Due to the abundance of phone models in the lines, manufacturers often do not have time to update all devices officially, and therefore enthusiasts take up this business, who collect firmware based on the latest versions of Android for a particular device. Custom firmware is distributed free of charge, installation requires additional software and some skills.
Note! Not every custom firmware is suitable for your device - only those that were developed for it. In exceptional cases, a firmware from a smartphone may be suitable, which is identical in characteristics to yours.
So let's start with the search. You can download the updated version of Android on the forums dedicated to the topic of flashing various devices. The most visited are the w3bsit3-dns.com resource forums, where using the search bar you can easily find a topic dedicated to your smartphone. Here you can choose the firmware you like (based on which version, from which developer, with what improvements), as well as learn more about it from the visitors of the topic.
It will not be superfluous to familiarize yourself with the instructions for installing the firmware, which are located in the topic headers and are constantly supplemented by users. The fact is that all smartphones, albeit slightly, differ from each other, as well as the process of their firmware, so you should pay attention to the instructions.
When the firmware image is loaded into the memory of your phone or computer, you can proceed to the installation itself, but there are some nuances here. First of all, you have to choose a method for installing custom firmware:
- through applications that are installed directly on Android;
- using a personal computer, special software and custom recovery.
Here it is worth warning you that you install custom firmware at your own risk. In addition to the fact that the firmware may simply not suit your device, there may be other problems: errors in operation, inoperability of some functions, complete failure of the device, etc.
Updating Android firmware using the application
An easier way to install firmware on Android, but it does not always guarantee success. To update we need:
- (not required, but desirable);
- install an application on the device (recommended: Android Update Manager, ROM Manager);
- download firmware (save to SD card).
When all of the above is ready, we move on to updating Android:
- run the installed application;
- the application will require you to install ClockWorkMod Recovery (custom recovery for installing third-party firmware), agree with the offer;
- click on "Install ROM from SD card", then specify the path to the firmware image;
- a new window will open, in which you should click "Keep current ROM" (in case of unexpected errors) and "Reboot and install";
- all that remains is to wait (about 10-15 minutes) until the smartphone appears before you with an updated interface and functionality.
Updating Android firmware using a computer
This option is somewhat more complicated, but with more flexibility and guarantees for success. It will take a little more time and different software:
- naturally, downloaded firmware;
- a client for installing the firmware (for each smartphone model it is different, so look for your device in the relevant sections of the forum);
- ADB-driver for your device, the download link of which can also be obtained on the forum.
Now, in order regarding the update:
- we take the smartphone in hand and go to "Settings", where at the bottom we look for the item "For developers";
It may not be there in the first place. In order for it to appear, you need to go to the "About phone" menu and click on the "Android version" item several times.
- in the "For Developers" settings, check the box next to "USB Debugging";
- install the ADB driver on the PC (so that it can recognize your device), and then connect the smartphone via a USB cable;
- run the client to download the firmware to the smartphone;
- we indicate to the client the location of the firmware and proceed to the update process;
Each client is different, so you should familiarize yourself with its features in advance.
- we wait while the client installs updates without disconnecting the wire;
- the end of the update will be notified by the client, as well as the smartphone, which will start to turn on.
The process of switching on for the first time can take quite a long time, don't worry.
What to do after updating Android
So we figured out how to install Android, installed the latest version of the operating system with a bunch of new features (or with a minimum of these features), what should we do next?
If you updated using the regular means of a smartphone, then you don’t have to do anything: you will have all applications, all SMS messages and other data (unless, of course, an error occurred during the update process). That is, you can continue to use your device without bothering with reinstalling applications.
In cases where the device is reflashed, all data disappears. Whether you like it or not, you'll have to re-login to your accounts, install the apps you want, and re-download your favorite music. Therefore, we always recommend making a Backup, which will greatly simplify these tasks.
How to turn off Android updates
Along with the question regarding the installation of new updates, many users are interested in how to disable them. Some people just don't need them, others are already used to old version Android and do not want to change anything in their smartphone. So that the system does not pester with constant offers to get updates, and also does not spend traffic on downloading them, you need to:
- go to the "Settings" of the phone or tablet;
- go to "About phone", then - "System update";
- uncheck the box next to "Auto-update".
Now, only after your request, the system will start searching for new versions to download.
Also, many users, as we have noticed, are hindered by automatic application updates, which often change the familiar messenger or client beyond recognition. social network and spends gigabytes of traffic. Here, too, everything is turned off in a few simple steps:
- launch Google Play (Play Market);
- making a swipe from the left side of the screen, we get to the side menu, where we find “Settings” at the bottom;
- go to "Auto-update applications";
- Select "Never" from the list provided.
In the future, only manually you can update the necessary applications.
Conclusion
Android update is a very useful thing. Regular updates fix bugs, bring a lot of innovations to the system, and simply make it more enjoyable to use. The updated smartphone is much less afraid of virus attacks, "smarter" than its counterparts on older versions of the OS. In addition, the update process is not as complicated as it might seem initially. Just thirty minutes of work and you have an updated device that can work with all relevant applications.
Getting updates is a joyful event for every owner of an Android smartphone and tablet. Since the new version of the system includes: advanced features, improved features, correction of previously identified errors and vulnerabilities. At the same time, some devices are not configured for automatic android updates, so they need to be activated or manual installation firmware. In our article, we will describe in detail how to update android in the simplest and most affordable way.
Ways to update Android OS
There are four main ways to update the system:
- FOTA (Firmware Over The Air).
- Update via PC.
- The standard recovery mode is Recovery Mode.
- Third party recovery mode - TWRP or CWM.
Literally from English, FOTA translates as: firmware over the air. For most manufacturers, this is the primary method of OS delivery and remote system updates. The method is good in that it excludes user intervention, does not require a PC and does not force you to go to service center. It is enough to find wireless Internet access.
The method using a PC involves installing the system through the manufacturer's proprietary utility. This allows you to receive an update before the OTA mailing list or if you do not have access to wireless internet. In some cases, if the bootloader is unlocked on the device and / or ROOT rights are obtained, the method will avoid software damage.
The standard recovery mode - Recovery Mode, allows you to update the official versions of the OS, similar to the "using a PC" method. In this case, the file with the firmware must first be placed in the device’s memory, start the boot mode and “flash” the system.
Third-party recovery mode TWRP or CWM, designed to install custom or modified versions of the Android OS. This method allows you to receive unofficial updates after the manufacturer stops supporting.
Important! Each update method carries the risk of damage to the device: due to unforeseen circumstances, non-compliance with conditions or user errors. We will talk in more detail about the problems that you may have to face when considering a specific update method. The methods are also arranged according to complexity, where 1 is the simplest, requires a minimum of effort and knowledge; 4 - the most difficult, recommended for experienced and knowledgeable users.
Before you update the android on your phone, you need to prepare the device and follow the general recommendations:
- Get feedback from other owners. Often, a hastily released update contains critical bugs that lead to a deterioration in device performance.
- Spend backup. Transferring application data and files will prevent the loss of important information and, if necessary, quickly set up the device after the update. If possible, make a backup copy of the entire firmware.
- Charge the battery to 75% or more. The process of installing a new system takes an average of 5-20 minutes. If there is not enough power, the system will not be completely updated, which may cause the device to become inoperable.
- Use original cable and USB connectors motherboard. It is not recommended to connect the device, if it is a PC, through hubs/splitters/extenders and use the connectors on the front panel.
- It is advisable to take care of a self-powered source. To prevent a sudden power outage, it is recommended to use a laptop / netbook or uninterruptible power supplies - UPS.
- It is important to remember that updates take up to 2 GB, so it is recommended to download files via a Wi-Fi connection without traffic limits.
- During the installation process, do not touch the device. It may seem that the device is frozen, but it is not.
For a better understanding, please read the articles below:
Method 1: Install updates via FOTA
Often a notification about the availability of an update comes automatically. This allows you to immediately proceed to download and install the new system. If this does not happen, the verification must be performed manually.
Instructions for checking for updates in a "clean" version of Android:
- Open the settings section.
- Scroll down and select "About device", in some devices "System Update" is placed in the settings.
- Click on the "System Update" line.
- In the new window, select the line "Check for update" or "Download" - if the update is available.
- We are waiting for the download of the firmware file. The process runs in the background, so it is not necessary to keep the update window open.
- After the download is complete, you will be notified that the installation is ready. You need to click "Restart and install", after which the update will begin.


Instructions for checking for updates in Xiaomi devices:
- Let's go to the settings.
- We go down to the very bottom, select the item "About phone".
- In the new window, select the "System Update" button.
- In the next window that appears, click on the "Check for Update" button. We are waiting for the information to be updated, after which we press the "Update" button if updates are available.


Important!
- When using FOTA, user data is not deleted.
- You cannot use FOTA if the bootloader is unlocked on the device, ROOT rights are obtained, third-party or modified firmware or kernel is installed. There is a high probability of software or physical damage to the device.
- Often the use of FOTA leads to software damage due to the fault of the manufacturer. In this case, you need to contact the service center certified by the manufacturer or the store where the purchase was made.
- If an update is available but you don't receive a notification, you need to clear the data and cache of the Google Services Framework app. To do this, go to settings, then applications, then switch the display of system programs, select GSM, clear the cache and data. After that, you need to check the update again. Often the notification does not appear immediately, you have to wait several minutes or hours.
Method 1.1: FOTA update of Xiaomi smartphones
Xiaomi releases updates for its own devices with the MIUI shell every week. These are test versions, where the errors found earlier are fixed, but the stability is not brought to the optimal value. At the same time, each owner has the opportunity to try out an interim update that is installed similarly to the stable version.
Instructions for installing a "stable" and / or "weekly" update:
- Go to the official website of the manufacturer.
- Select the device type to be used from the list.
- Click on the green button to download the firmware - "Download Full ROM".
Please note "Stable ROM" is a stable update, and "Developer ROM" is a test update. Often the version of the test build is higher, there may be new features or additional bugs fixed. At the same time, it is recommended to download the stable version, due to the smaller number of flaws.
If the firmware is downloaded via a smartphone, you should specify the initial partition or download folder for saving, so as not to waste time searching for the firmware later. If through a PC, then the file is also better placed in the root folder. In this case, the free amount of flash memory must be at least 1 GB.
- Next, you need to open the settings section, select "About device", and then "System update".
- A new window will pop up with a suggestion for FOTA verification.
- You must click on the button with three dots to open the drop-down list, where select the item "Select firmware file".
- In an open window file manager, specify the firmware file.
- After confirming the action, the device will start in recovery mode, after which the further process will take place without user intervention.


Method 2: Update using PC
To install the update, you need a PC and a proprietary utility for a specific brand of device. Motorola uses RSDLite, Samsung uses Smart Switch, etc.
General instructions for updating Motorola smartphones via RSDLite:
- Install the drivers and the RSDLite program.
- Download and unzip the appropriate firmware file for the device you are using.
- We connect the smartphone / tablet to the PC via a USB cable. We launch the RSDLite program.
- We are waiting for the successful discovery of the device.
- Click on the button with three dots and specify the XML file in the unzipped folder.
- Click "Start" and wait for the operation to complete.
Very important! Before flashing, it is imperative to clarify whether the XML file needs to be pre-edited, where part of the code needs to be removed. For example, in the Razr M model, you need to erase the lines with the “tz” and “gpt” sections, otherwise you will not be able to flash the device. Read more about this in a separate article below.
Instructions for updating Samsung devices through the Smart Switch program:
- Download Smart Switch Utility on PC official site .
- Run the program, connect the device to PC via USB cable. The presence of the Internet for a PC is mandatory.
- If an update is available for the connected device, you will be prompted to download it. Otherwise, there will be no notification.
- You need to click on the "Update" button, after which the download of the file will begin.
- Then follow the further instructions and confirm the action.
- The device will reboot into recovery mode where the installation will begin.
- After finishing, it is recommended to make a backup copy and perform a factory reset. This will delete the data on internal storage, as well as on the external one if Adoptable storage is used.


Method 3: Using the standard recovery mode - Recovery
Recovery Mode - Recovery Mode, allows you not only to reset the settings and clear the data, but also to install updates. To switch to this mode, you need:
- Turn off the device, then turn it on by simultaneously holding one of the combinations of physical buttons. On a specific device, the correct combination is different:
- Power and volume "+".
- Power and volume "-".
- Both volume and power buttons.
- Volume "-", home button and power button.
- As soon as a picture with a green robot and an exclamation mark appears, you need to simultaneously hold down both volume keys.
- If everything is done correctly, a list of commands will be displayed. The volume buttons are used for navigation, and the power key is the "select" action.
It is difficult for novice users to get into Recovery Mode the first time. There is nothing to worry about, just try again. To exit the mode, you need to select the “reboot system now” item or hold down the power button to reboot the device.
Android update algorithm through Recovery Mode:
- First download the firmware file via a smartphone, tablet or computer. In the latter case, the archive must be transferred to the device on an SD card.
- Restart your device and enter recovery mode.
- Select the item "Apply Update from SD card", then find the firmware file.
- We are waiting for the end of the procedure, after which we select "reboot system now".
Important!
- Be sure to download the firmware with the appropriate region for the device. Since due to different versions of the modem, there is a high probability of being left with a device that does not load the system.
- Using Recovery Mode does not invalidate the warranty, as this is the standard mode of any Android device.
Method 4: Using a third-party recovery mode - TWRP or CWM
TWRP and CWM are similar standard mode recovery, due to the same purpose, while having advanced features. The user can create the current version of the system, restore; installation of third-party firmware, kernels, applications, etc.
Installing updated versions of third-party firmware is similar to the previous paragraph:
- First download the firmware file.
- Turn off the device and go to TWRP.
- We create a backup copy of the current system, the "Save" button. To confirm any action, you always need to hold the arrow to the right from the bottom.
- Next, click on the "Clear" button to erase the data and cache.
- We return to the main menu and press the "Install" button, specify the firmware file.
- Confirm the action, wait for the end of the operation. After that, clear the cache and reboot the system.
Important! Updating android using TWRP or CWM is quite simple. We placed this method last due to the fact that in order to use the method, you first need to get ROOT rights, and for this you need to unlock the bootloader. And this automatically deprives the owner of the guarantee. Additional difficulties are that for some models there are no effective ways to unlock the bootloader, an initially unsuitable OS version for hacking, or you need to pay for unlocking.
Conclusion
If you follow the recommendations described, follow the instructions and clarify all incomprehensible questions in advance, updating android to android with the new version will go smoothly and without problems. At the same time, it is worth remembering that errors are not excluded, not through the fault of the user, but due to the haste of the manufacturer, the incompetence of the developer, or for other reasons.
Therefore, in the absence of sufficient knowledge and experience, it is recommended to start with a simple update method and move gradually to the most difficult one, if it makes sense. Don't forget to read the recommended articles to better understand the topic.
(4 ratings, average: 3,75 out of 5)